

Introduction to HTMX
- Published on
- Reading time
- 14 min read
- Category
- The Sandbox
Hey, and welcome to this blog post.
While my primary focus lies in Angular for web development, I always like to explore emerging technologies that pique my interest. A few months ago, I came across HTMX and found it to be a fascinating concept. Consequently, I started looking into it and have prepared my talk at FrankenJS Würzburg to share my first insights and also this blog post.
To kick things off, I’ll begin with some foundational information, explain the architecture and underlying principles of HTMX. Following that, I’ve created a little demo application to illustrate how a basic HTMX application works. We will take a look the some of HTML code and also look at the live website and see how it behaves.
Background
Web architectures
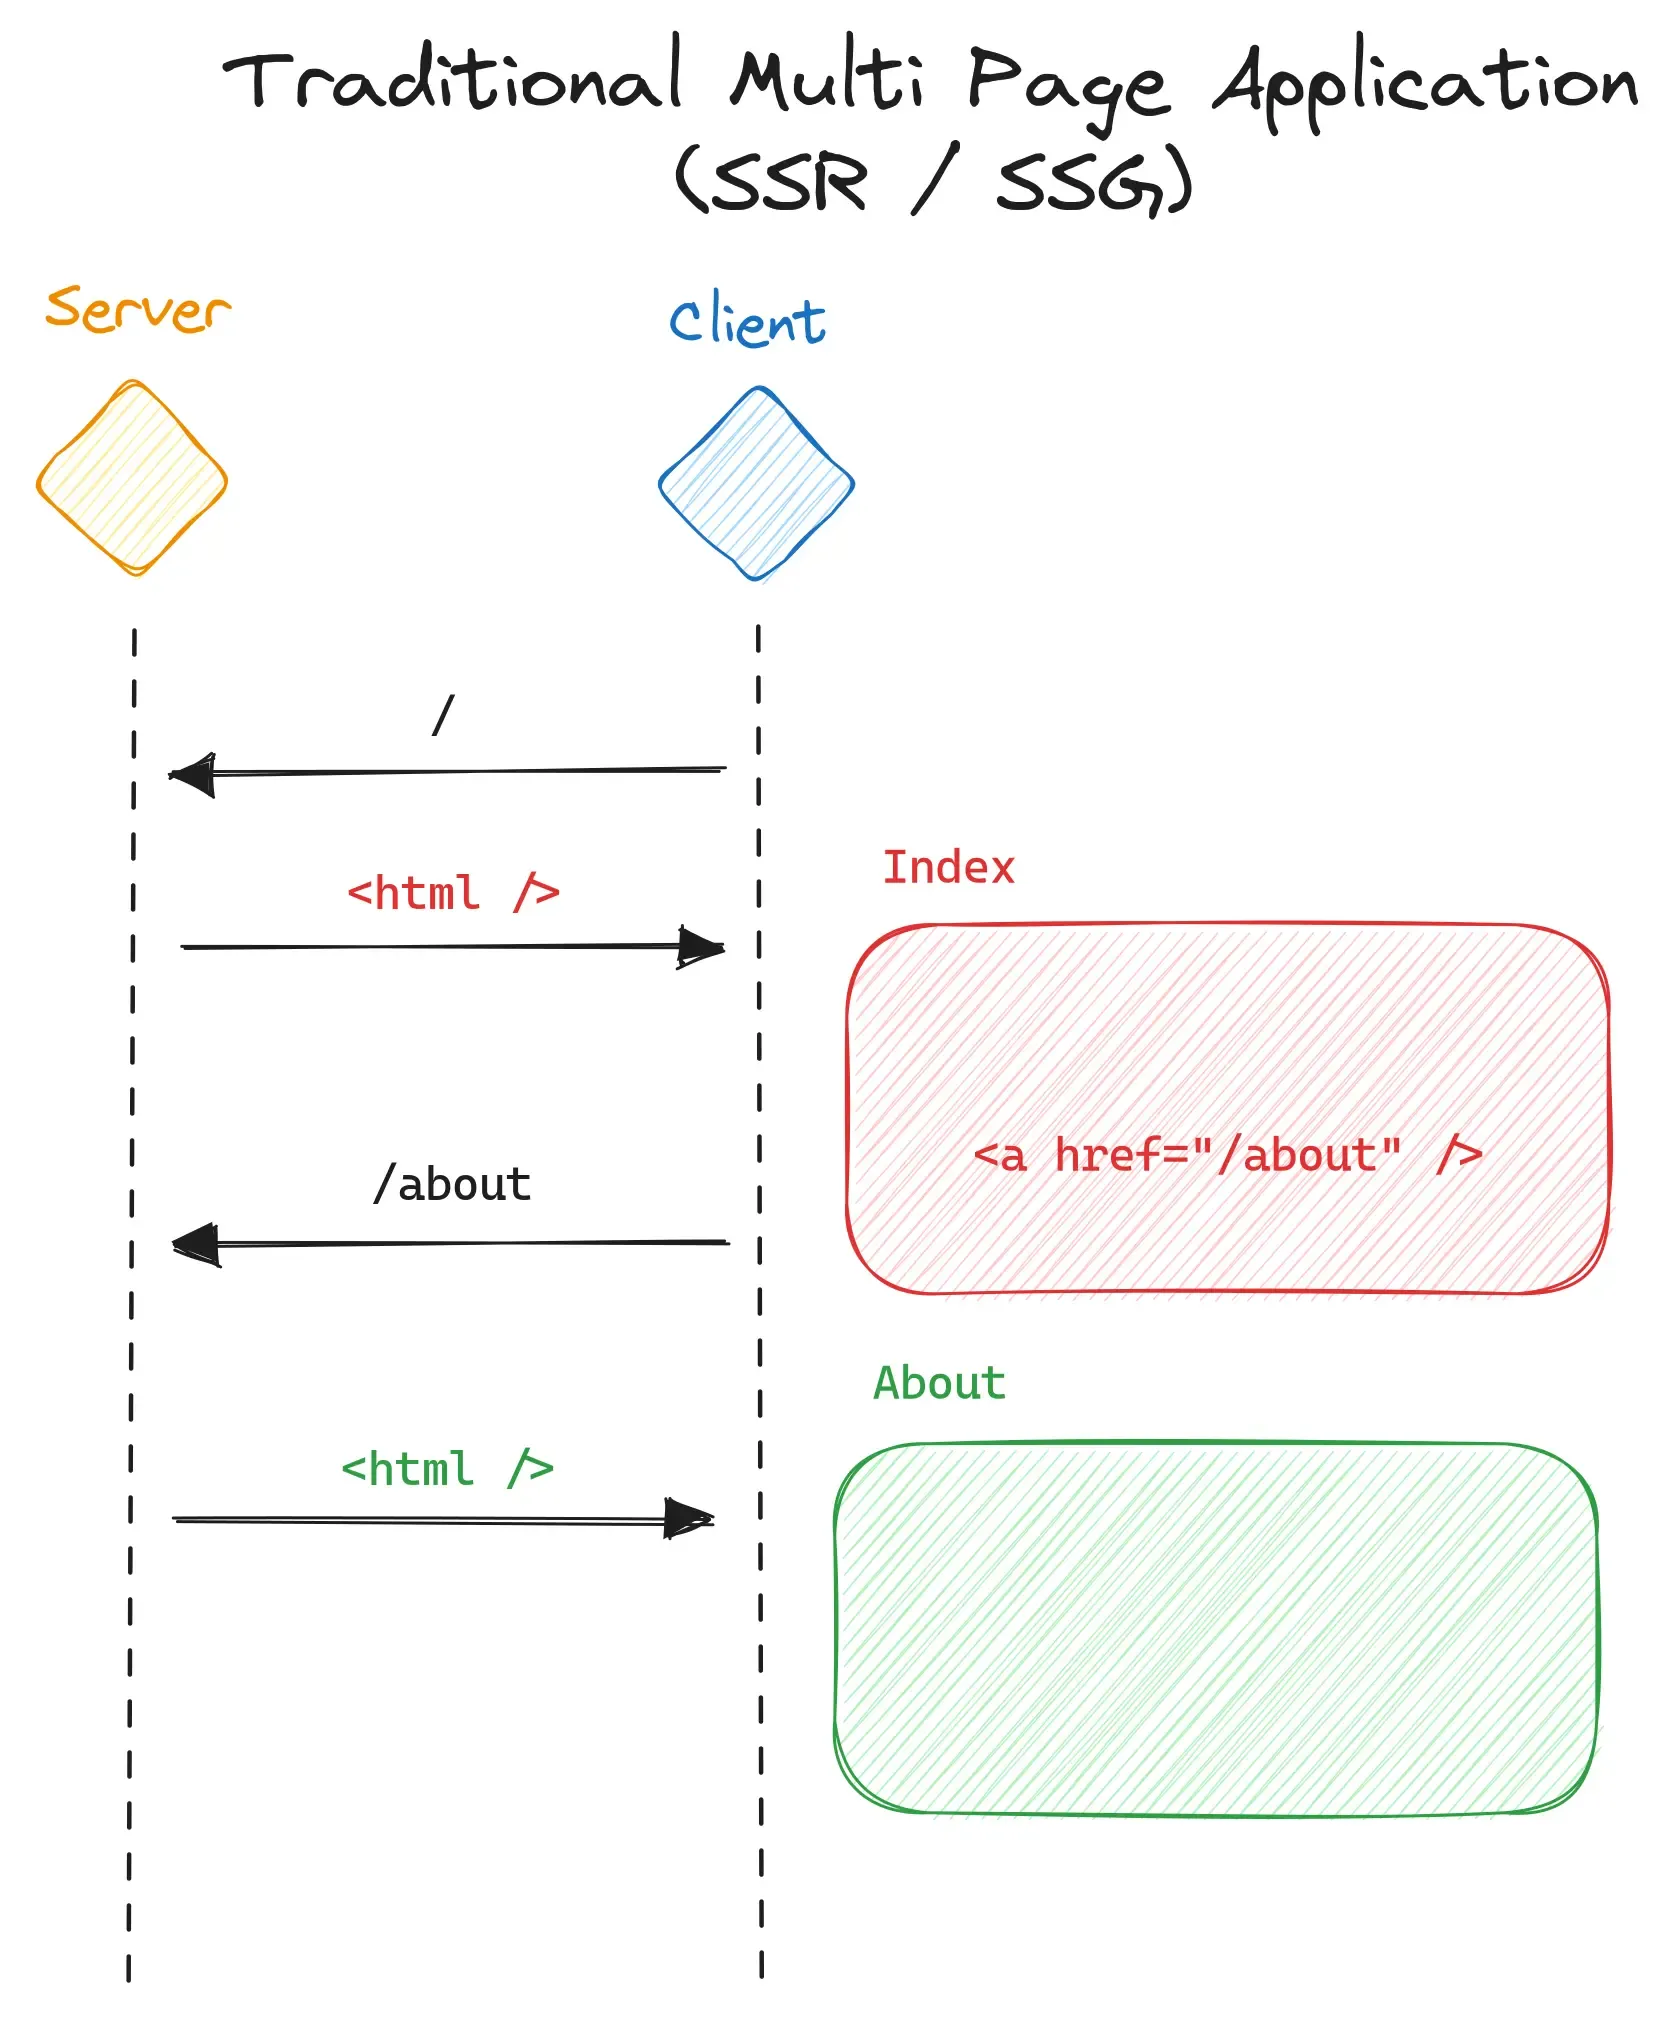
Let’s dive into various web application architectures, starting with the traditional multi-page application featuring server-side rendering or static site generation. In this setup, a web server hosts a PHP application, which dynamically generates HTML documents using templates and data fetched from a database. These HTML documents are then sent to the client’s browser. When a user clicks on a link, the process repeats, generating a new HTML page.
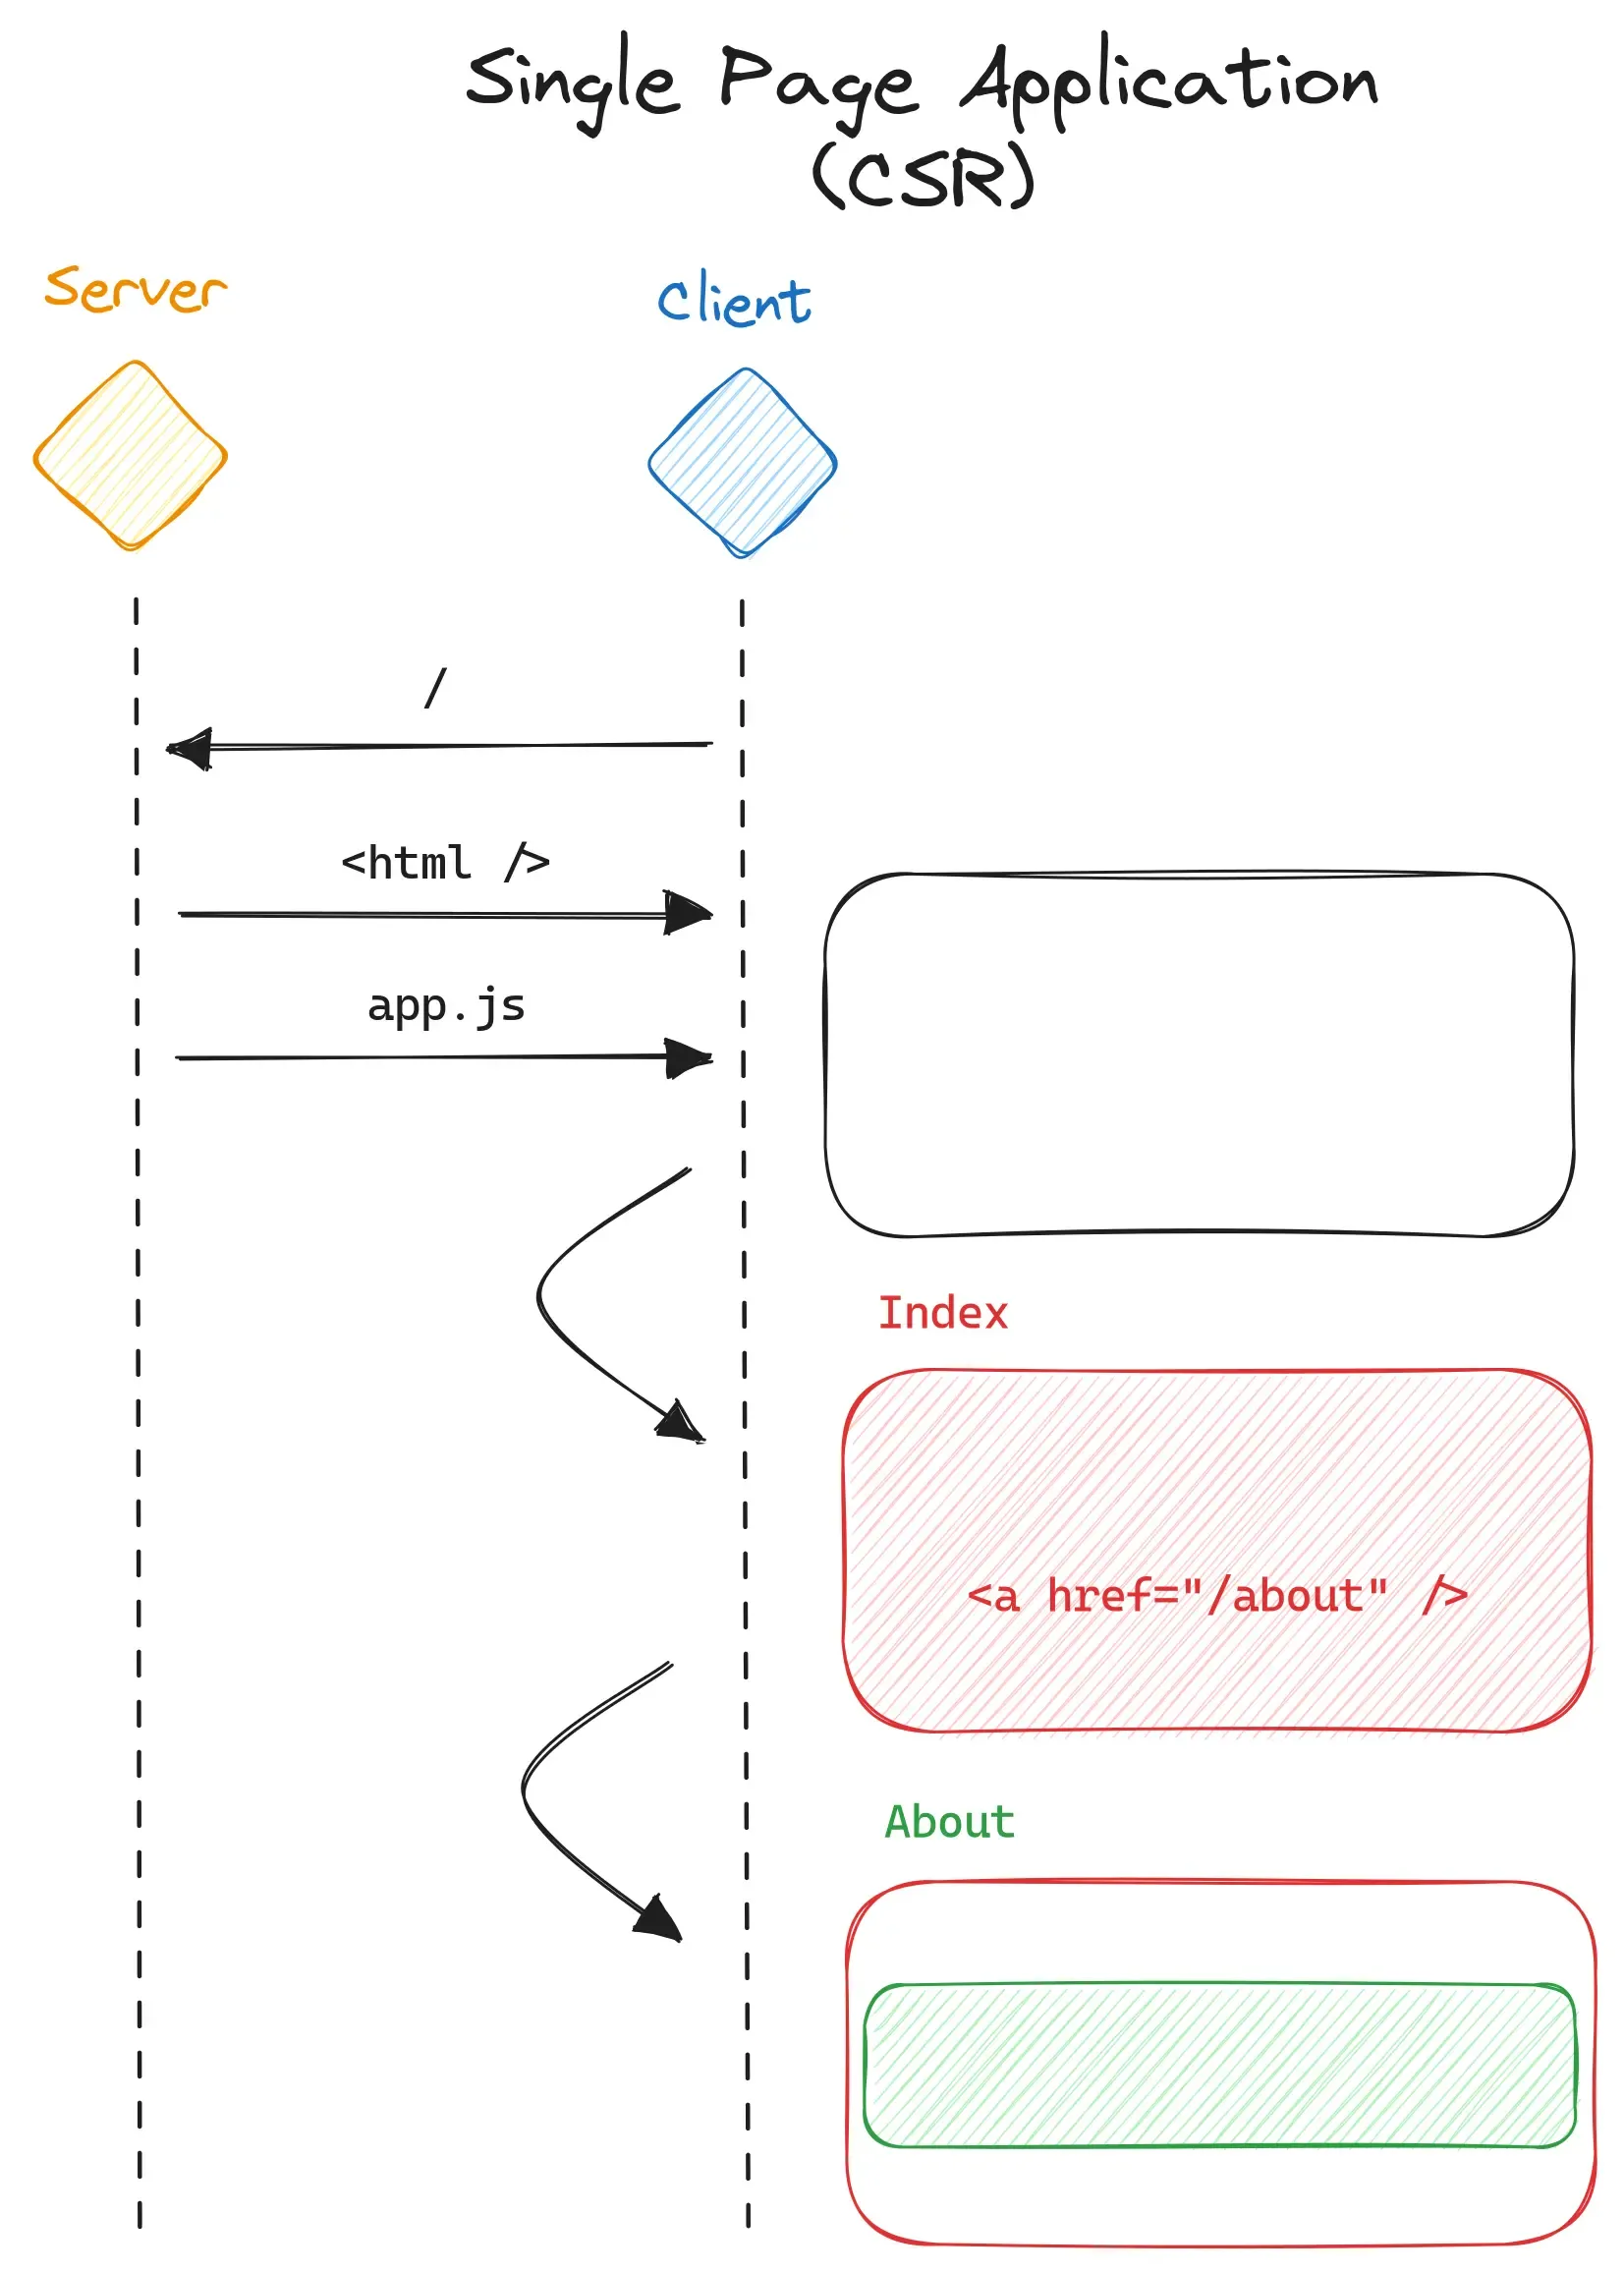
Now, contrast this with the single-page application model, characterized by client-side rendering. In this approach, an entire website is constructed using a framework like Angular, React, or a similar technology. This website is bundled and delivered to the user’s browser. Here, the browser is responsible for executing JavaScript code and rendering the page. When a user clicks a link, only the content of the page that needs to change is updated, resulting in a smoother and more interactive experience.
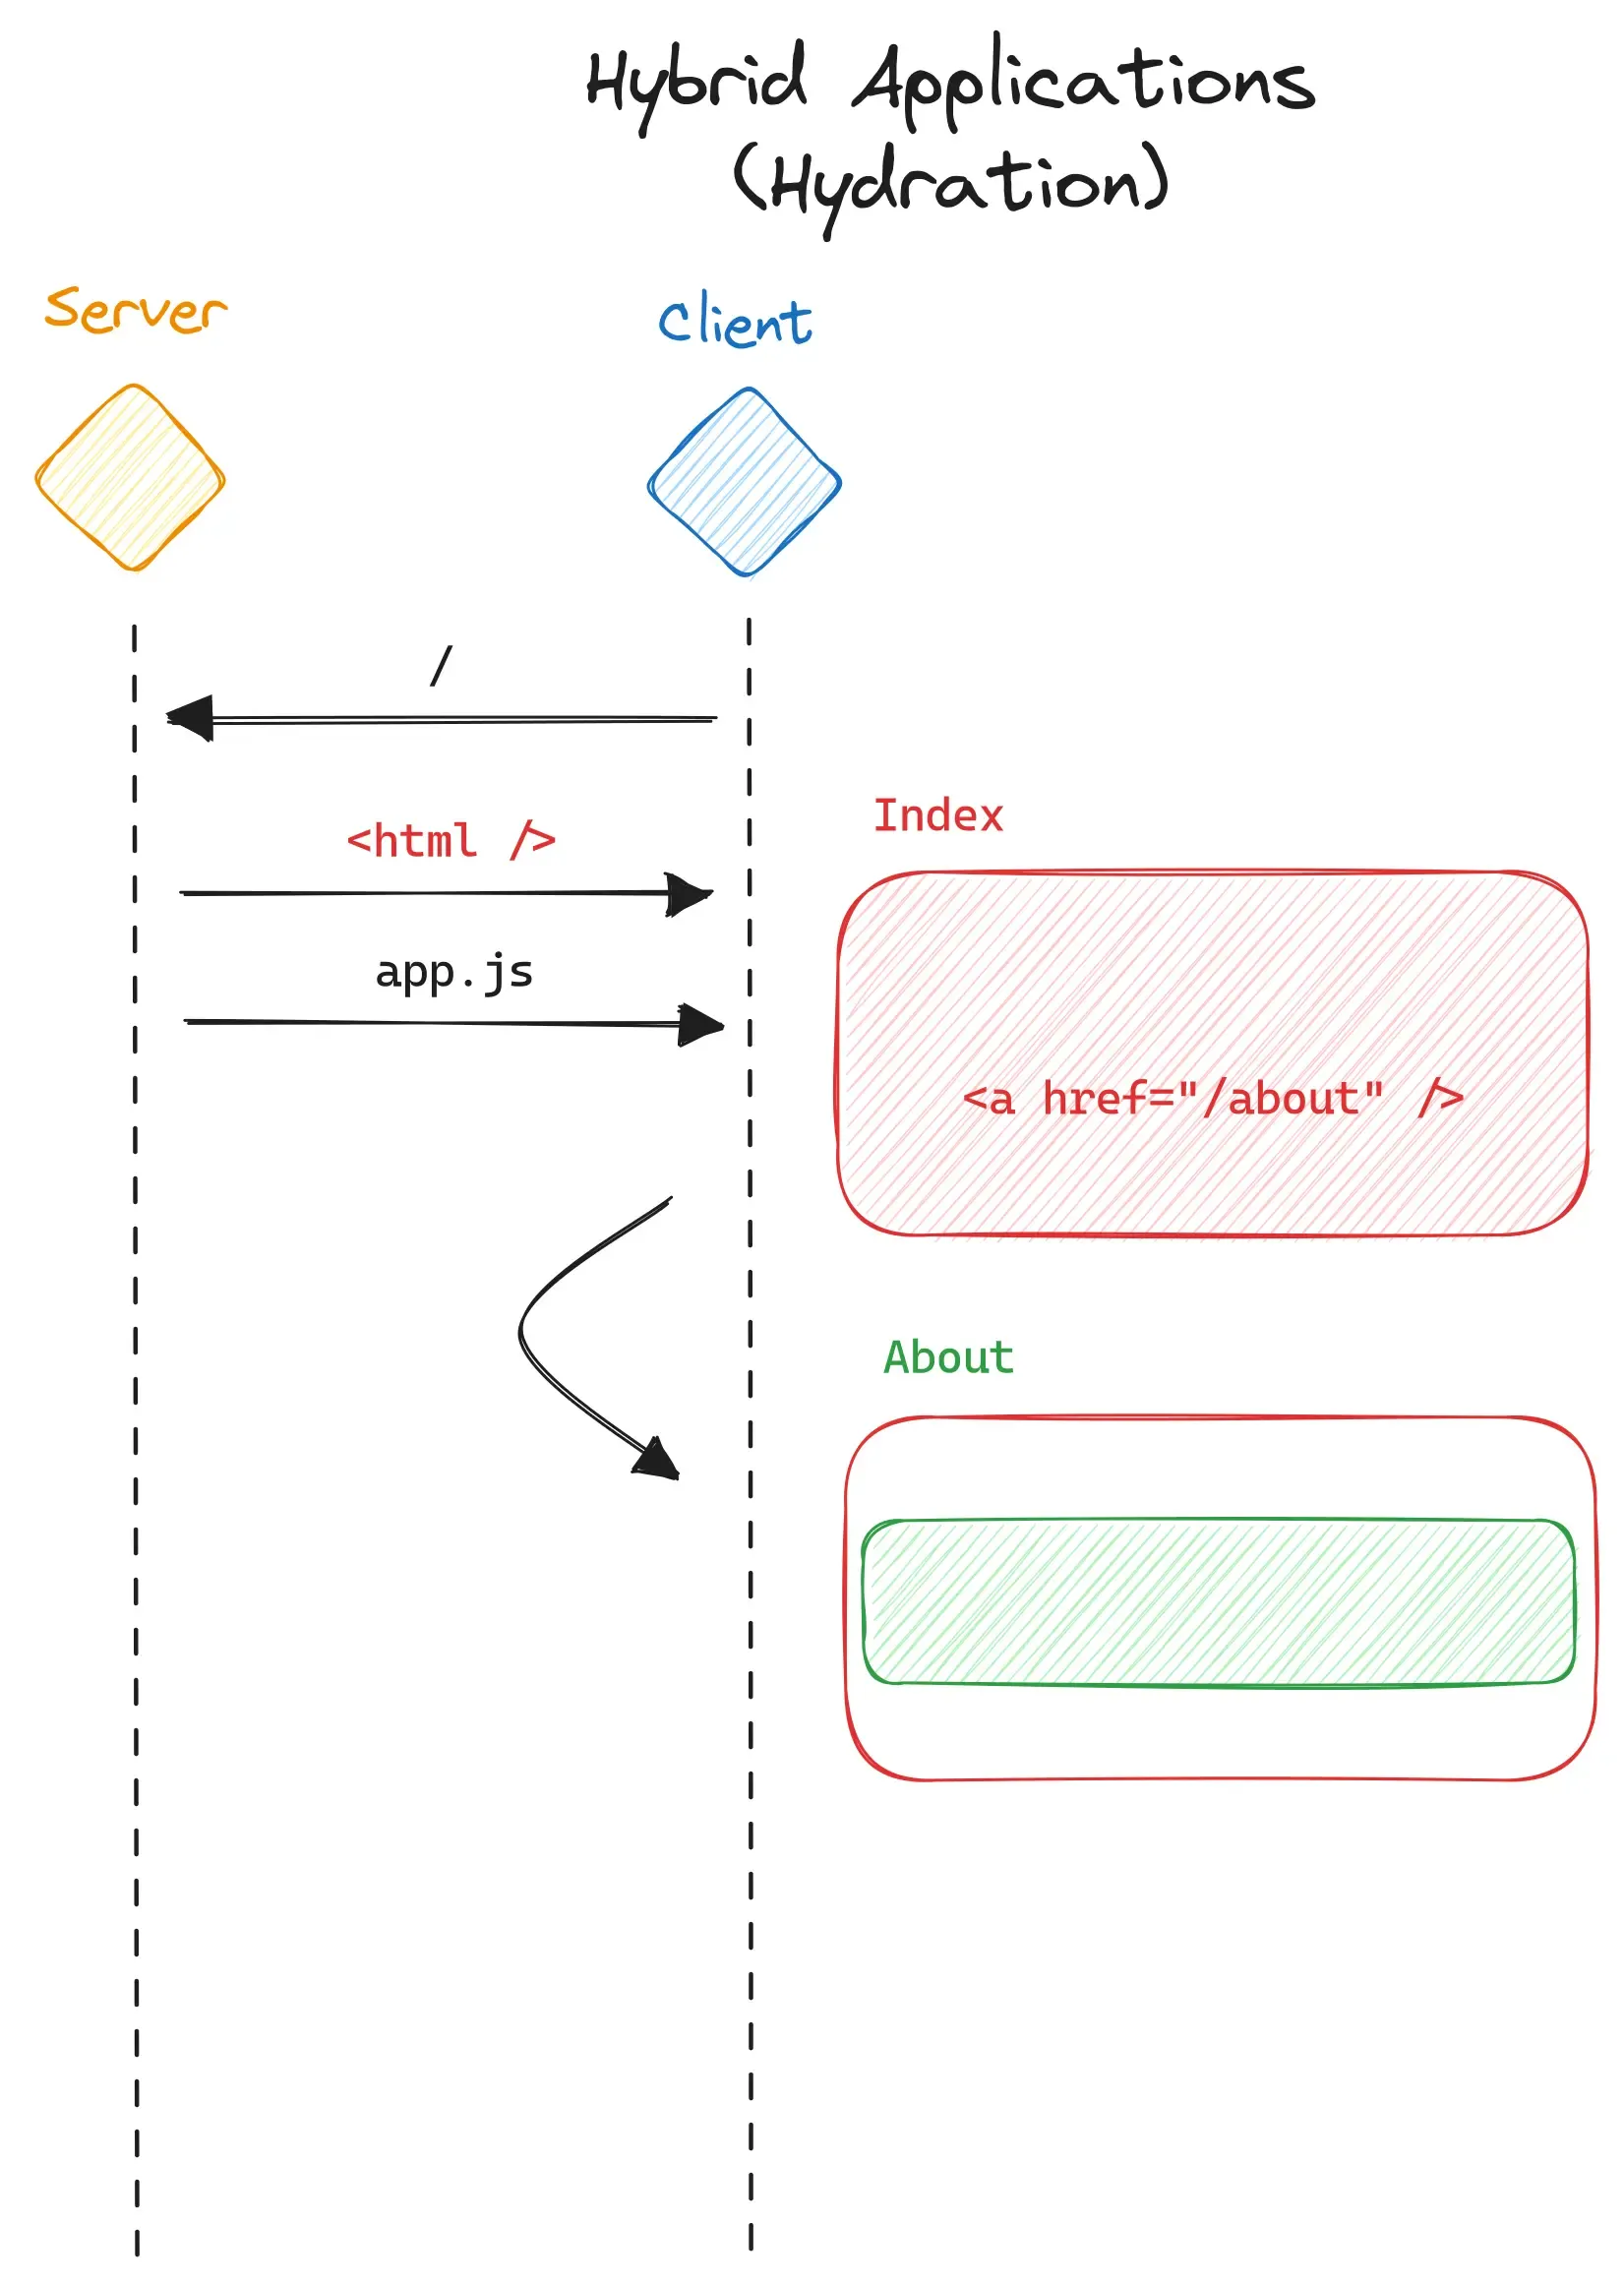
Hybrid architectures seek to blend the advantages and drawbacks of both preceding concepts. Initially, the server generates and sends a fully rendered HTML document to the client. Subsequently, the client executes JavaScript to “hydrate” the page and transitions into client-side rendering. This hybrid approach offers the benefits of server-side rendering for search engine optimization while allowing for highly interactive web applications with fine-grained DOM manipulation.
Let’s see where an HTMX application operates on this spectrum.
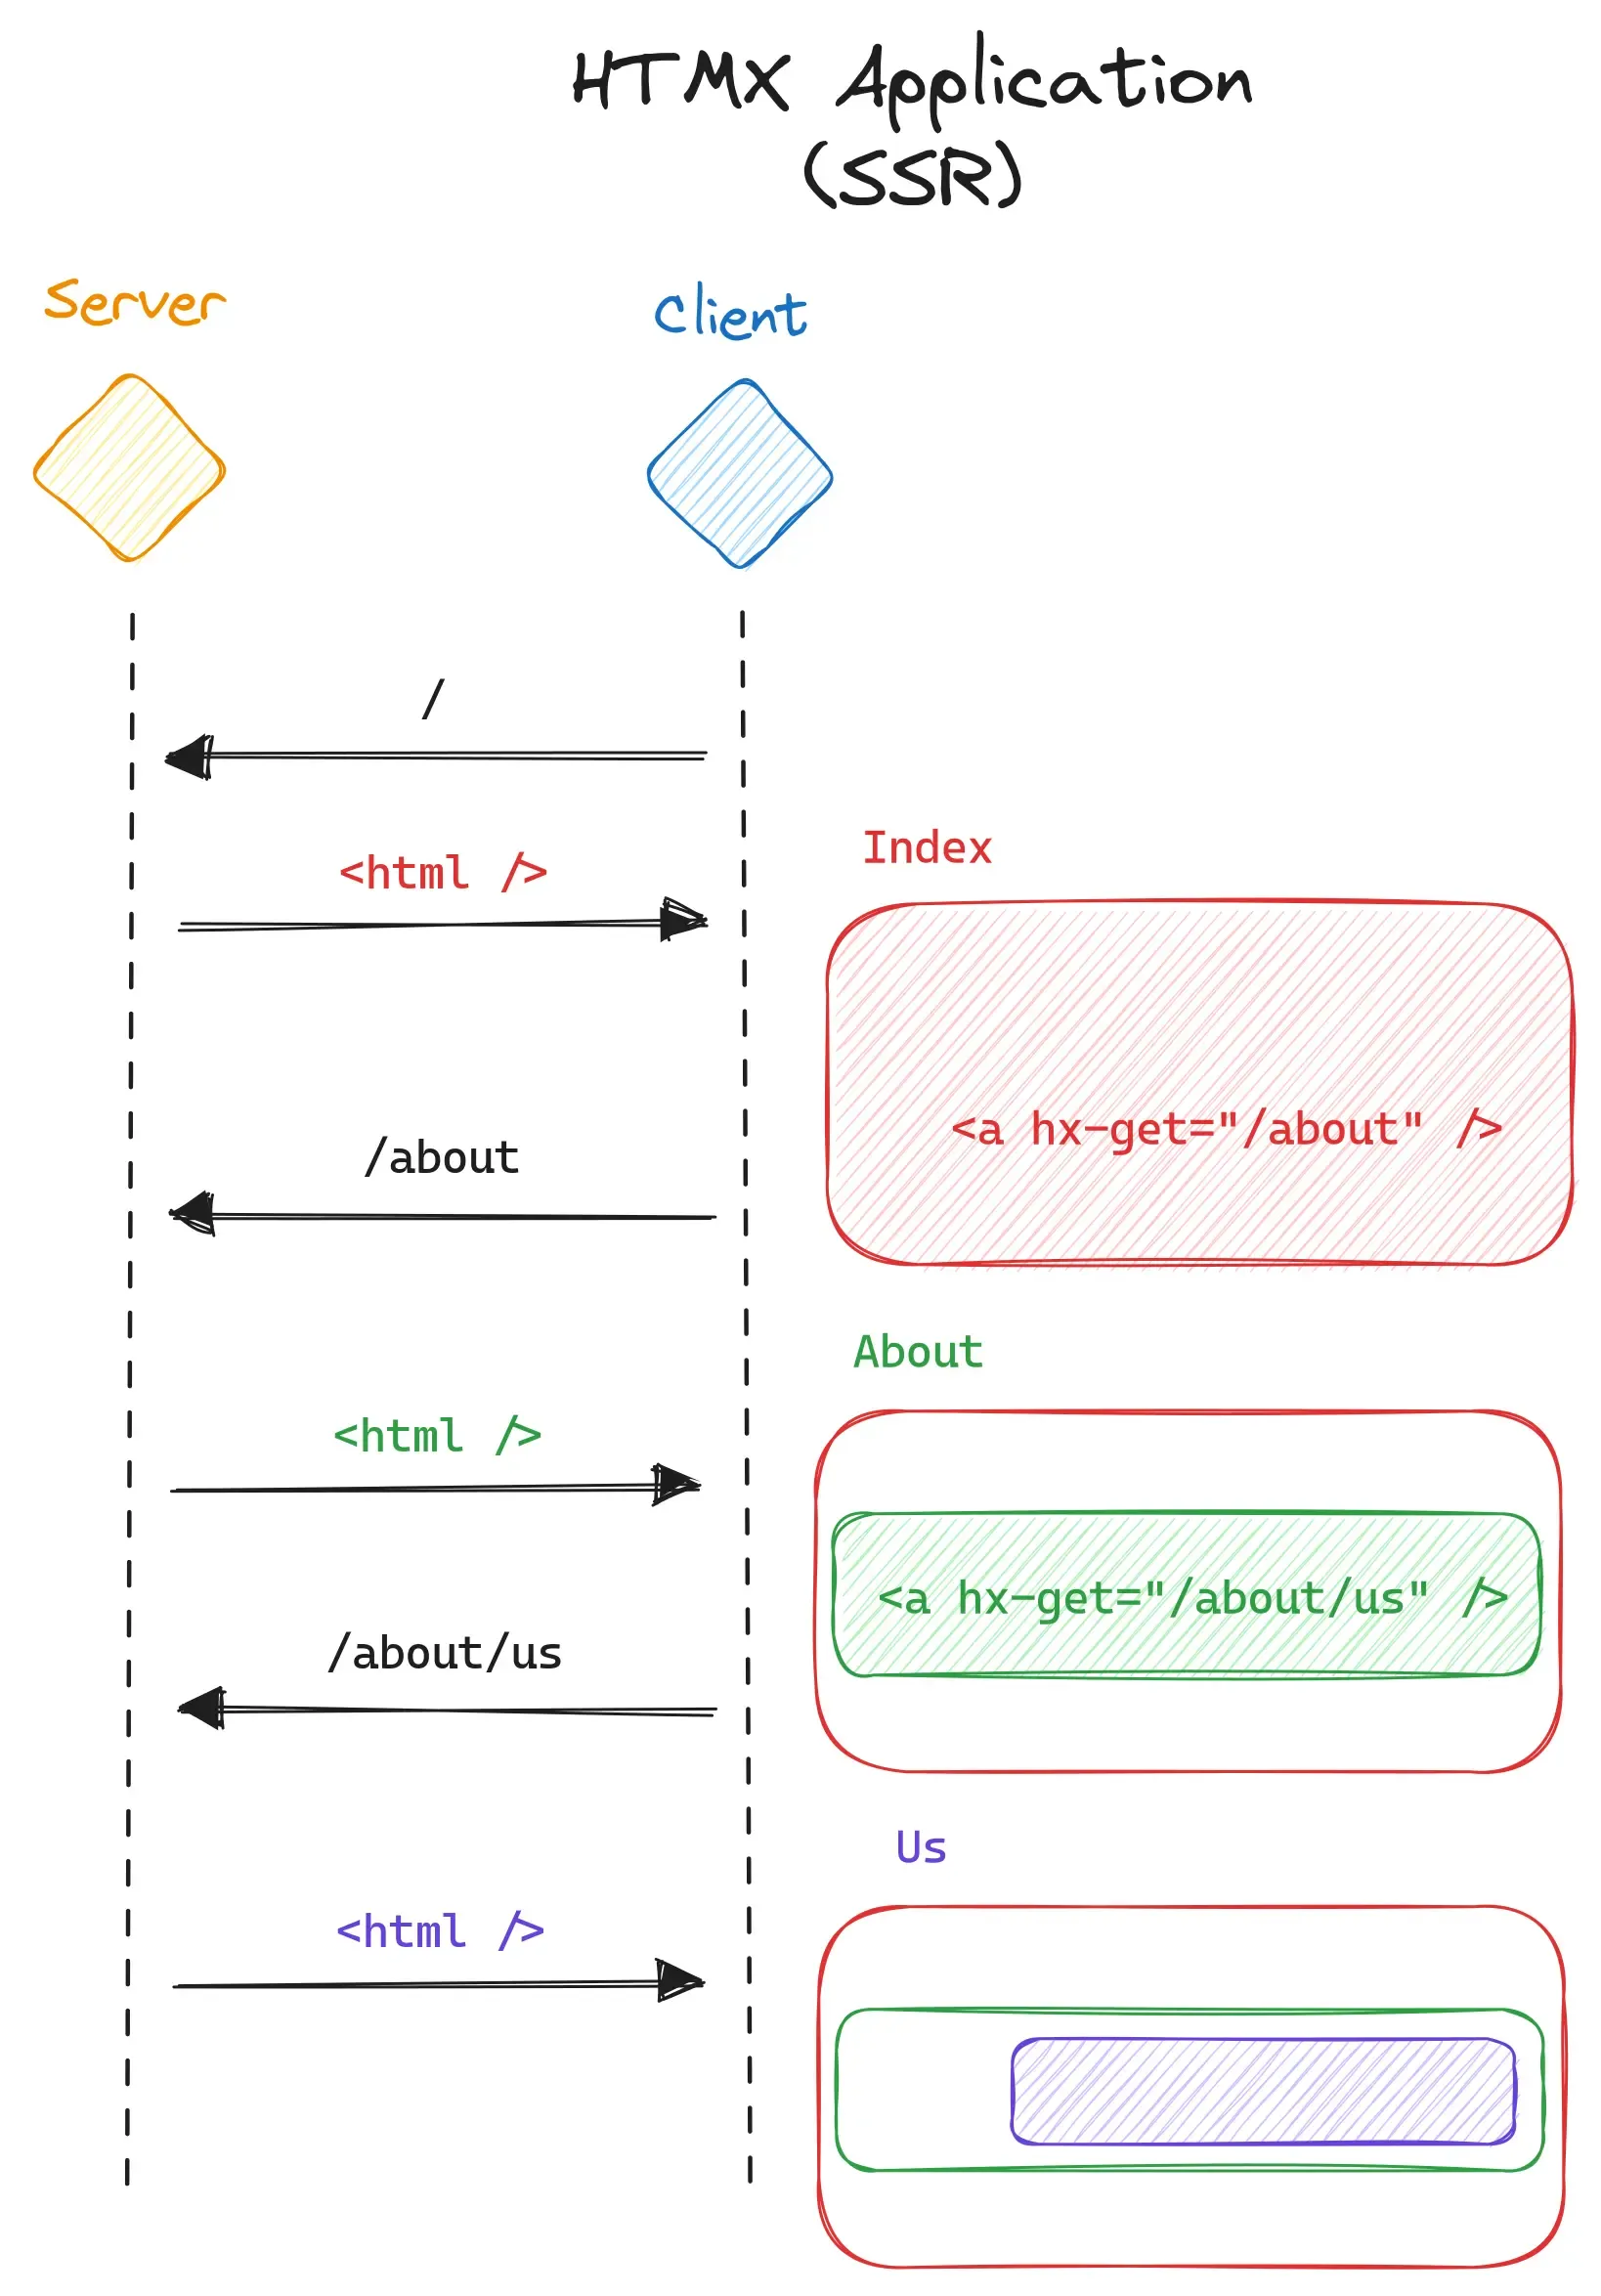
When a client initiates the first request, the server performs server-side rendering (SSR) in a manner similar to traditional web applications. It generates the entire HTML document and sends it back to the client, just as any SSR page would. However, here’s where HTMX introduces its unique approach.
When a user clicks on a link within the HTMX application, the server doesn’t generate a complete new HTML page. Instead, it selectively renders only the specific fragment or part of the page that the user needs at that moment. This partial HTML document is then sent back to the client.
Upon receiving this partial document, the client-side JavaScript, primarily managed by HTMX, takes action. It intelligently replaces the content on the page that should be updated with the new content from the partial document. This approach minimizes the need to redraw or re-render the entire page.
One of the notable advantages of HTMX is that it eliminates the necessity to write and distribute extensive client-side JavaScript code, aside from the HTMX script itself. I think this is a really cool concept for small applications without many interactions or for backend engineers to get started with web development.
HATEOAS
The second fundamental principle behind HTMX is HATEOAS, which stands for:
Hypermedia As The Engine Of Application State
{
  "account": {
    "account_number": 12345,
    "balance": 100.0,
    "links": {
      "deposits": "/accounts/12345/deposits",
      "transfers": "/accounts/12345/transfers",
      "close-requests": "/accounts/12345/close-requests"
    }
  }
}
Imagine a JSON response like the one you see here. It contains some information about a bank account, including details such as the account number and balance. However, what sets it apart from other REST APIs is that it also includes a list of endpoints or actions that can be executed with this account. In essence, HATEOAS enables the server to provide not only data but also the links or actions that can be performed with that data.
Instead of hardcoding a list of possible interactions, the client can rely on the hypermedia links provided in the response to determine what actions are possible at any given moment. This concept aligns with the HATEOAS principle of allowing hypermedia to drive the application’s state and behavior.
Demo application
BEDH-Stack
Before we dive into the demo application, let me introduce you to the tech stack I’ve used, which is called “BEDH” stack.
| Bun | Elysia | DaisyUI | HTMX |
|---|---|---|---|
 |  |  |  |
For the backend server, I’ve chosen Bun, which recently had its 1.0 release, like a month ago. It’s renowned for its impressive speed, and I thought, why not seize the opportunity to explore Bun while I’m also exploring other new technologies?
Similarly, I’ve opted for the Elysia framework. Elysia is a straightforward and simple framework designed specifically for Bun. It facilitates the quick setup of a web server with an Express-like feel, making it an ideal choice for our project.
Now, let’s talk about the “D” in BEDH. For this simple demo application, I didn’t require a globally distributed edge SQLite database like Turso, which is part of the original BETH stack. Instead I used a standard SQLite database, which Bun conveniently has built in support inspired by better-sqlite3. In this context, “T” could stand for the design framework of my choice: Tailwind. Additionally, I’ve integrated DaisyUI into the mix. DaisyUI is a framework that builds on top of Tailwind CSS and provides a range of pre-designed components, saving me the effort of creating CSS styles from scratch.
Of course, the star of our show is HTMX, as it’s the central theme of this presentation.
With the BETH stack, we have a well-rounded set of tools and technologies to showcase the power and capabilities of HTMX in action.
What do we want to build?
The demo application I’ve prepared for my presentation / this blog post is a simple yet practical link shortener. I could have chosen a default to-do list application, but I wanted to build something different and more useful. The core features include:
- The ability to create new short links, which can be easily shared with friends.
- These short links can then of course be utilized to redirect users to their intended destinations.
- Additionally, the application offers a feature to display a list of all generated links, allowing users to keep track of their usage and
- Delete older links if necessary.
As our main focus is on HTMX, I won’t delve into the details of the server-side code during this presentation itself. For those interested in exploring the code in more depth, you can find it on my GitHub profile.
First HTMX attributes
First, let’s take a closer look at the body of the page.
<!-- index.html -->

<header>...</header>

<main hx-get="/new" hx-trigger="load" ... />

<footer />
We’ll temporarily skip the header until we get into the navigation functionality, and the footer just consists of static content.
The main element is where things get interesting. It features two custom HTMX attributes:
- hx-get: This attribute instructs the browser which endpoint to call, in this case, /new.
- hx-trigger: This attribute specifies when to invoke the endpoint, which, in this case, is set to “on page load.”
With these attributes in place, we can implement lazy loading for the main body of the page. By default, HTMX handles content swapping by replacing the content of the specified element with the received HTML. This mechanism allows us to dynamically load and update content as needed, enhancing the user experience.
Targets and swaps
Now, let’s examine what the endpoint responds with when we make a GET request to /new. The response consists of two elements:
<!-- new.html -->

<form hx-post="/new" hx-target="#new-created" hx-swap="afterbegin">
  <!-- url input -->
  <!-- submit button -->
</form>

<section id="new-created" />- A form element with custom HTMX attributes, including the necessary input fields.
- An empty section with the id “new-created.”
Before we proceed, let’s check the browser to confirm that the page loads and displays this form.

Now, let’s delve into the code for the form and its custom attributes:
- hx-post: This attribute instructs the browser to send a request to the /new endpoint, just as we saw on the previous slide. However, in this case, it’s a POST request because we intend to submit data. This submission occurs automatically when the user clicks the submit button, similar to a standard form.
- hx-target: This attribute specifies which element should be modified with the response. In this case, it points to the separate section with the id “new-created.”
- hx-swap: This attribute defines what action the browser should take with the specified element. As mentioned earlier, the default behavior is to swap the content of the element. However, in this case, we want to prepend new markup to it instead of replacing it entirely. So, we instruct the browser to add the new markup “after the beginning of the target element.” Sounds complicated at first, but trust me, there’s a logic behind this madness.
Adding a link
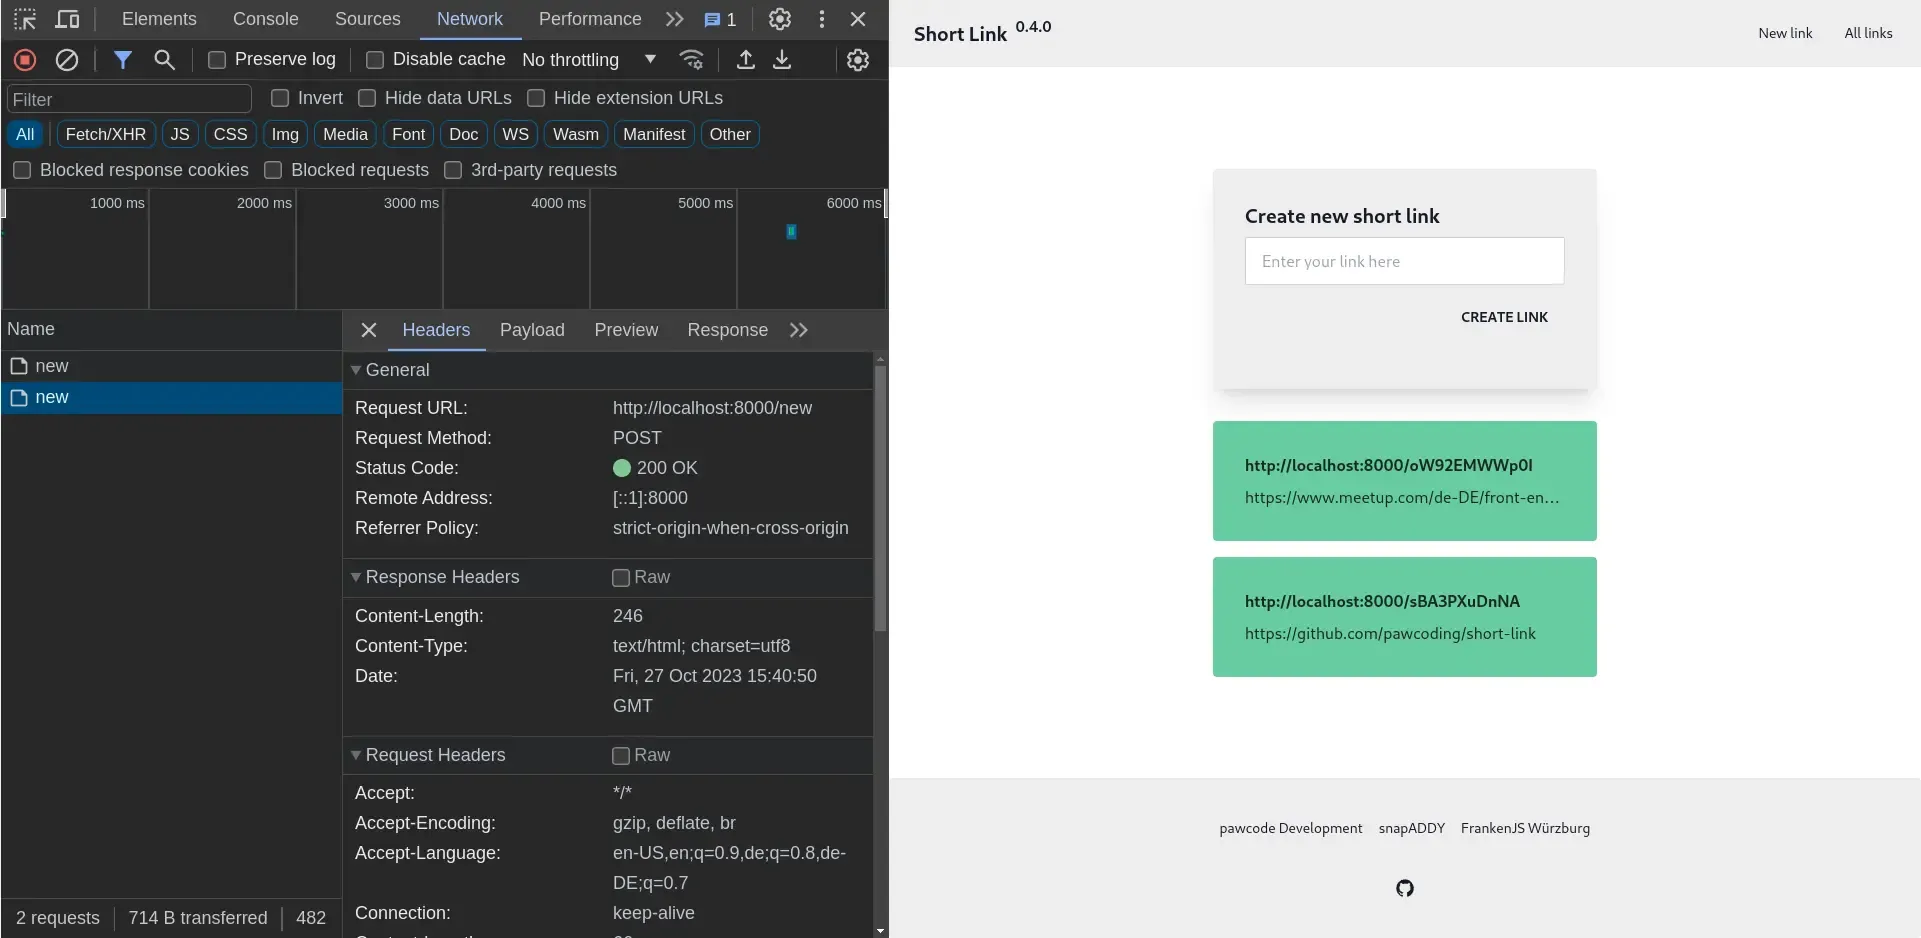
Great, now let’s proceed to observe what happens when we make this POST request to the server. This POST request results in the link being saved to the SQLite database, and the server responds with the following markup:
<!-- create.html -->

<div class="card-body">
  <strong> {{ url }} </strong>

  <p class="truncate">{{ link }}</p>
</div>
It’s a straightforward card presentation containing the URL that can be shared with friends, along with the original link.
Let’s go ahead and try this out in practice to see how it works in action.
Navigation
Excellent! Now, let’s expand on the basic functionality by incorporating the ability to view a list of all registered links and their usage.
To achieve this, we’ll add a link to the navigation bar.
<!-- index.html -->
<header>
<!-- Page title -->
<!-- Other links -->
<li>
<a hx-get="/list" hx-target="main" hx-indicator="#main-load"> All links </a>
</li>
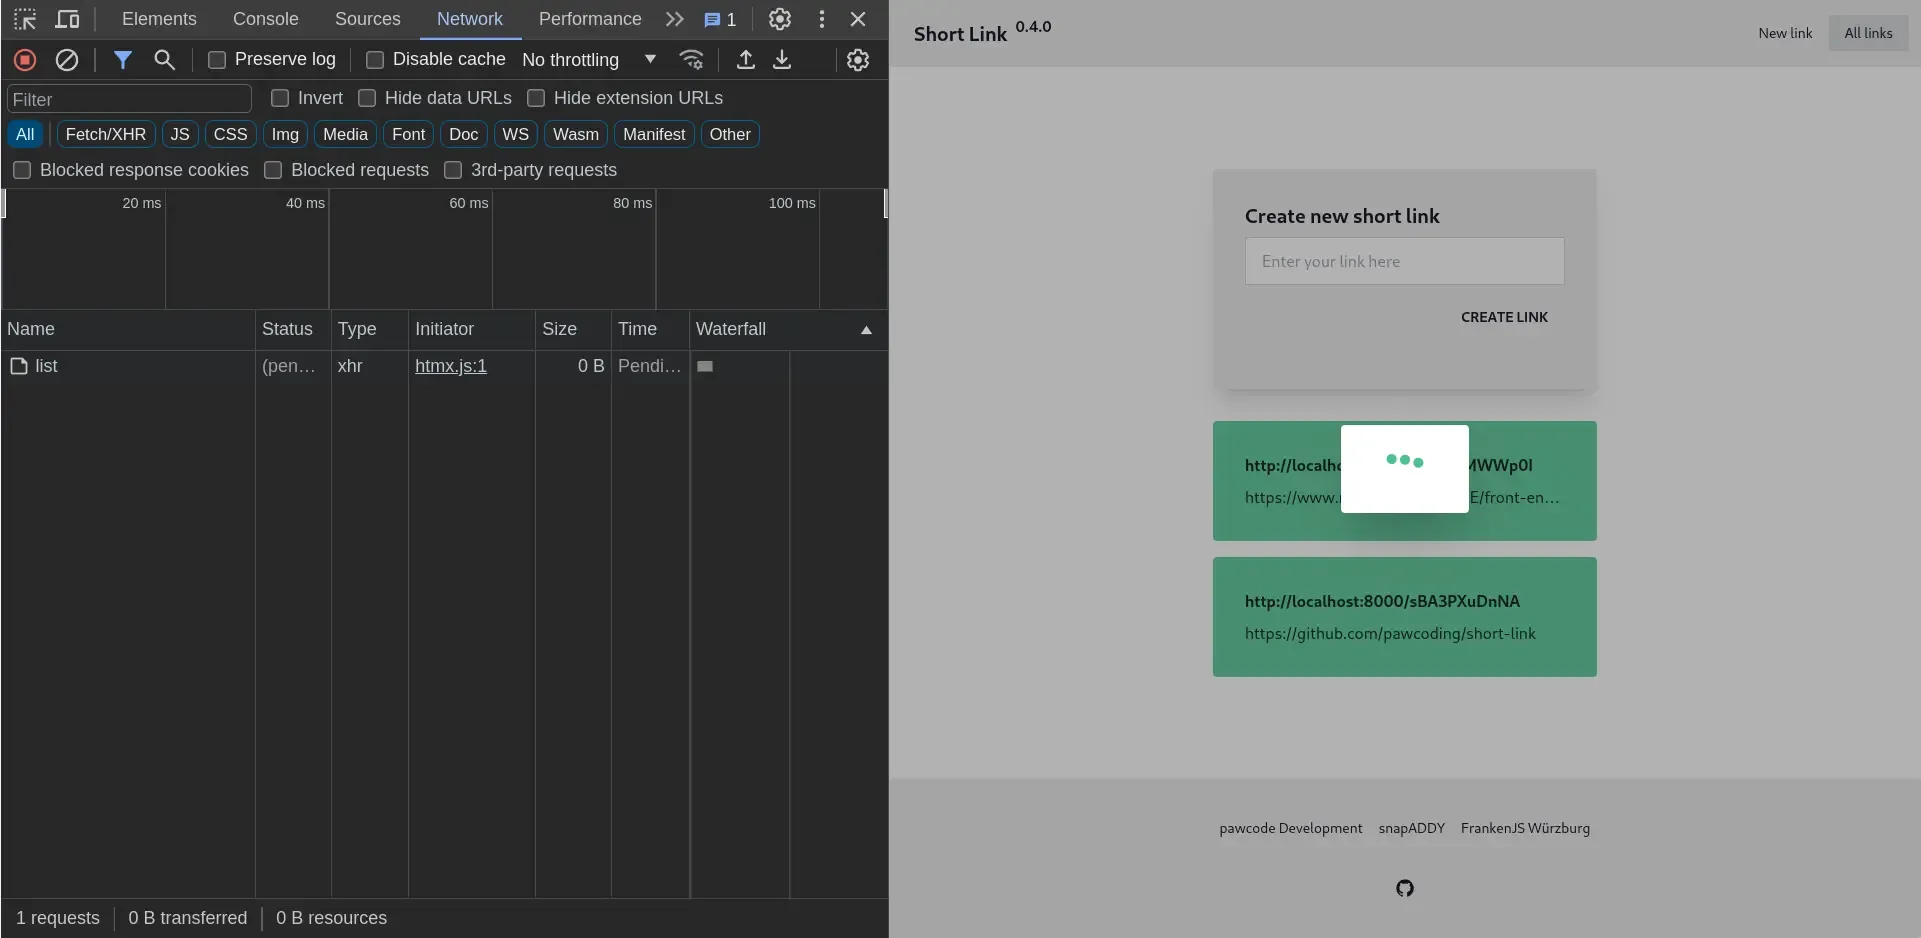
</header>When this anchor tag is clicked, it will send a request to the /list endpoint, which will subsequently replace the inner HTML of the main element. This process is consistent with what we’ve seen before.
However, there’s a new attribute to consider here: the hx-indicator. Retrieving the list of links might take some time (in this case the server responds after 2 seconds), so it’s crucial to provide feedback to the user and show that their click is being processed. With the hx-indicator tag, we can specify which element should be displayed as a loading indicator while the request is being handled. This enhances the user experience by providing visual feedback during potentially longer loading times.
Loading indicators
Because I knew, that we’ll need a loading indicator, I already placed this in the markup of the index.html file.
<!-- index.html -->

<section class="... htmx-indicator" id="main-load">
  <div class="...">
    <span class="loading loading-dots ..." />
  </div>
</section>
Two key aspects to note here are the main-load id, which corresponds to the one specified on the previous slide, and the htmx-indicator class. This class effectively hides the element until it’s triggered, and after the response is received, it gracefully fades out the loading indicator.
With all these components in place, we’re now ready to click the link and display all the links we’ve created, showcasing this feature in action.
Delete a link
Now, let’s delve into the markup for the table, which is the last essential part of the application.
<!-- links.html -->

<!-- Table head -->
<tbody hx-confirm="Are you sure?" hx-target="closest tr" hx-swap="outerHTML">
  <tr>
    <!-- Data display -->
    <button hx-delete="/{{ id }}" />
  </tr>
</tbody>
Here, we have the table body along with three HTMX attributes, as well as individual table rows. Each row contains information about the links and a button for deleting a link. Let’s explore what happens when we click the delete button.
First and foremost, the hx-confirm attribute is triggered. This action displays a confirm dialog, allowing us to confirm the deletion request. Once confirmed, the browser sends a DELETE request to the server, including the ID of the link to be deleted. On the server side, the link is removed from the database, and an empty response is sent back.
So what happens at the client with this empty response? The htmx attribute specify that the outer HTML of the closest table row to the button should be replaced with new content. However, since there’s no new content provided in the response, the row effectively gets deleted.
In summary, this combination of HTMX attributes and actions allows for seamless deletion of links from the table, resulting in a smooth user experience without rerendering the complete list.
Architecture overview
Yeah, so that’s the whole application. We’ve built a link shortener as a kind of single page application but without writing any client side JavaScript.
Here is the complete architecture:
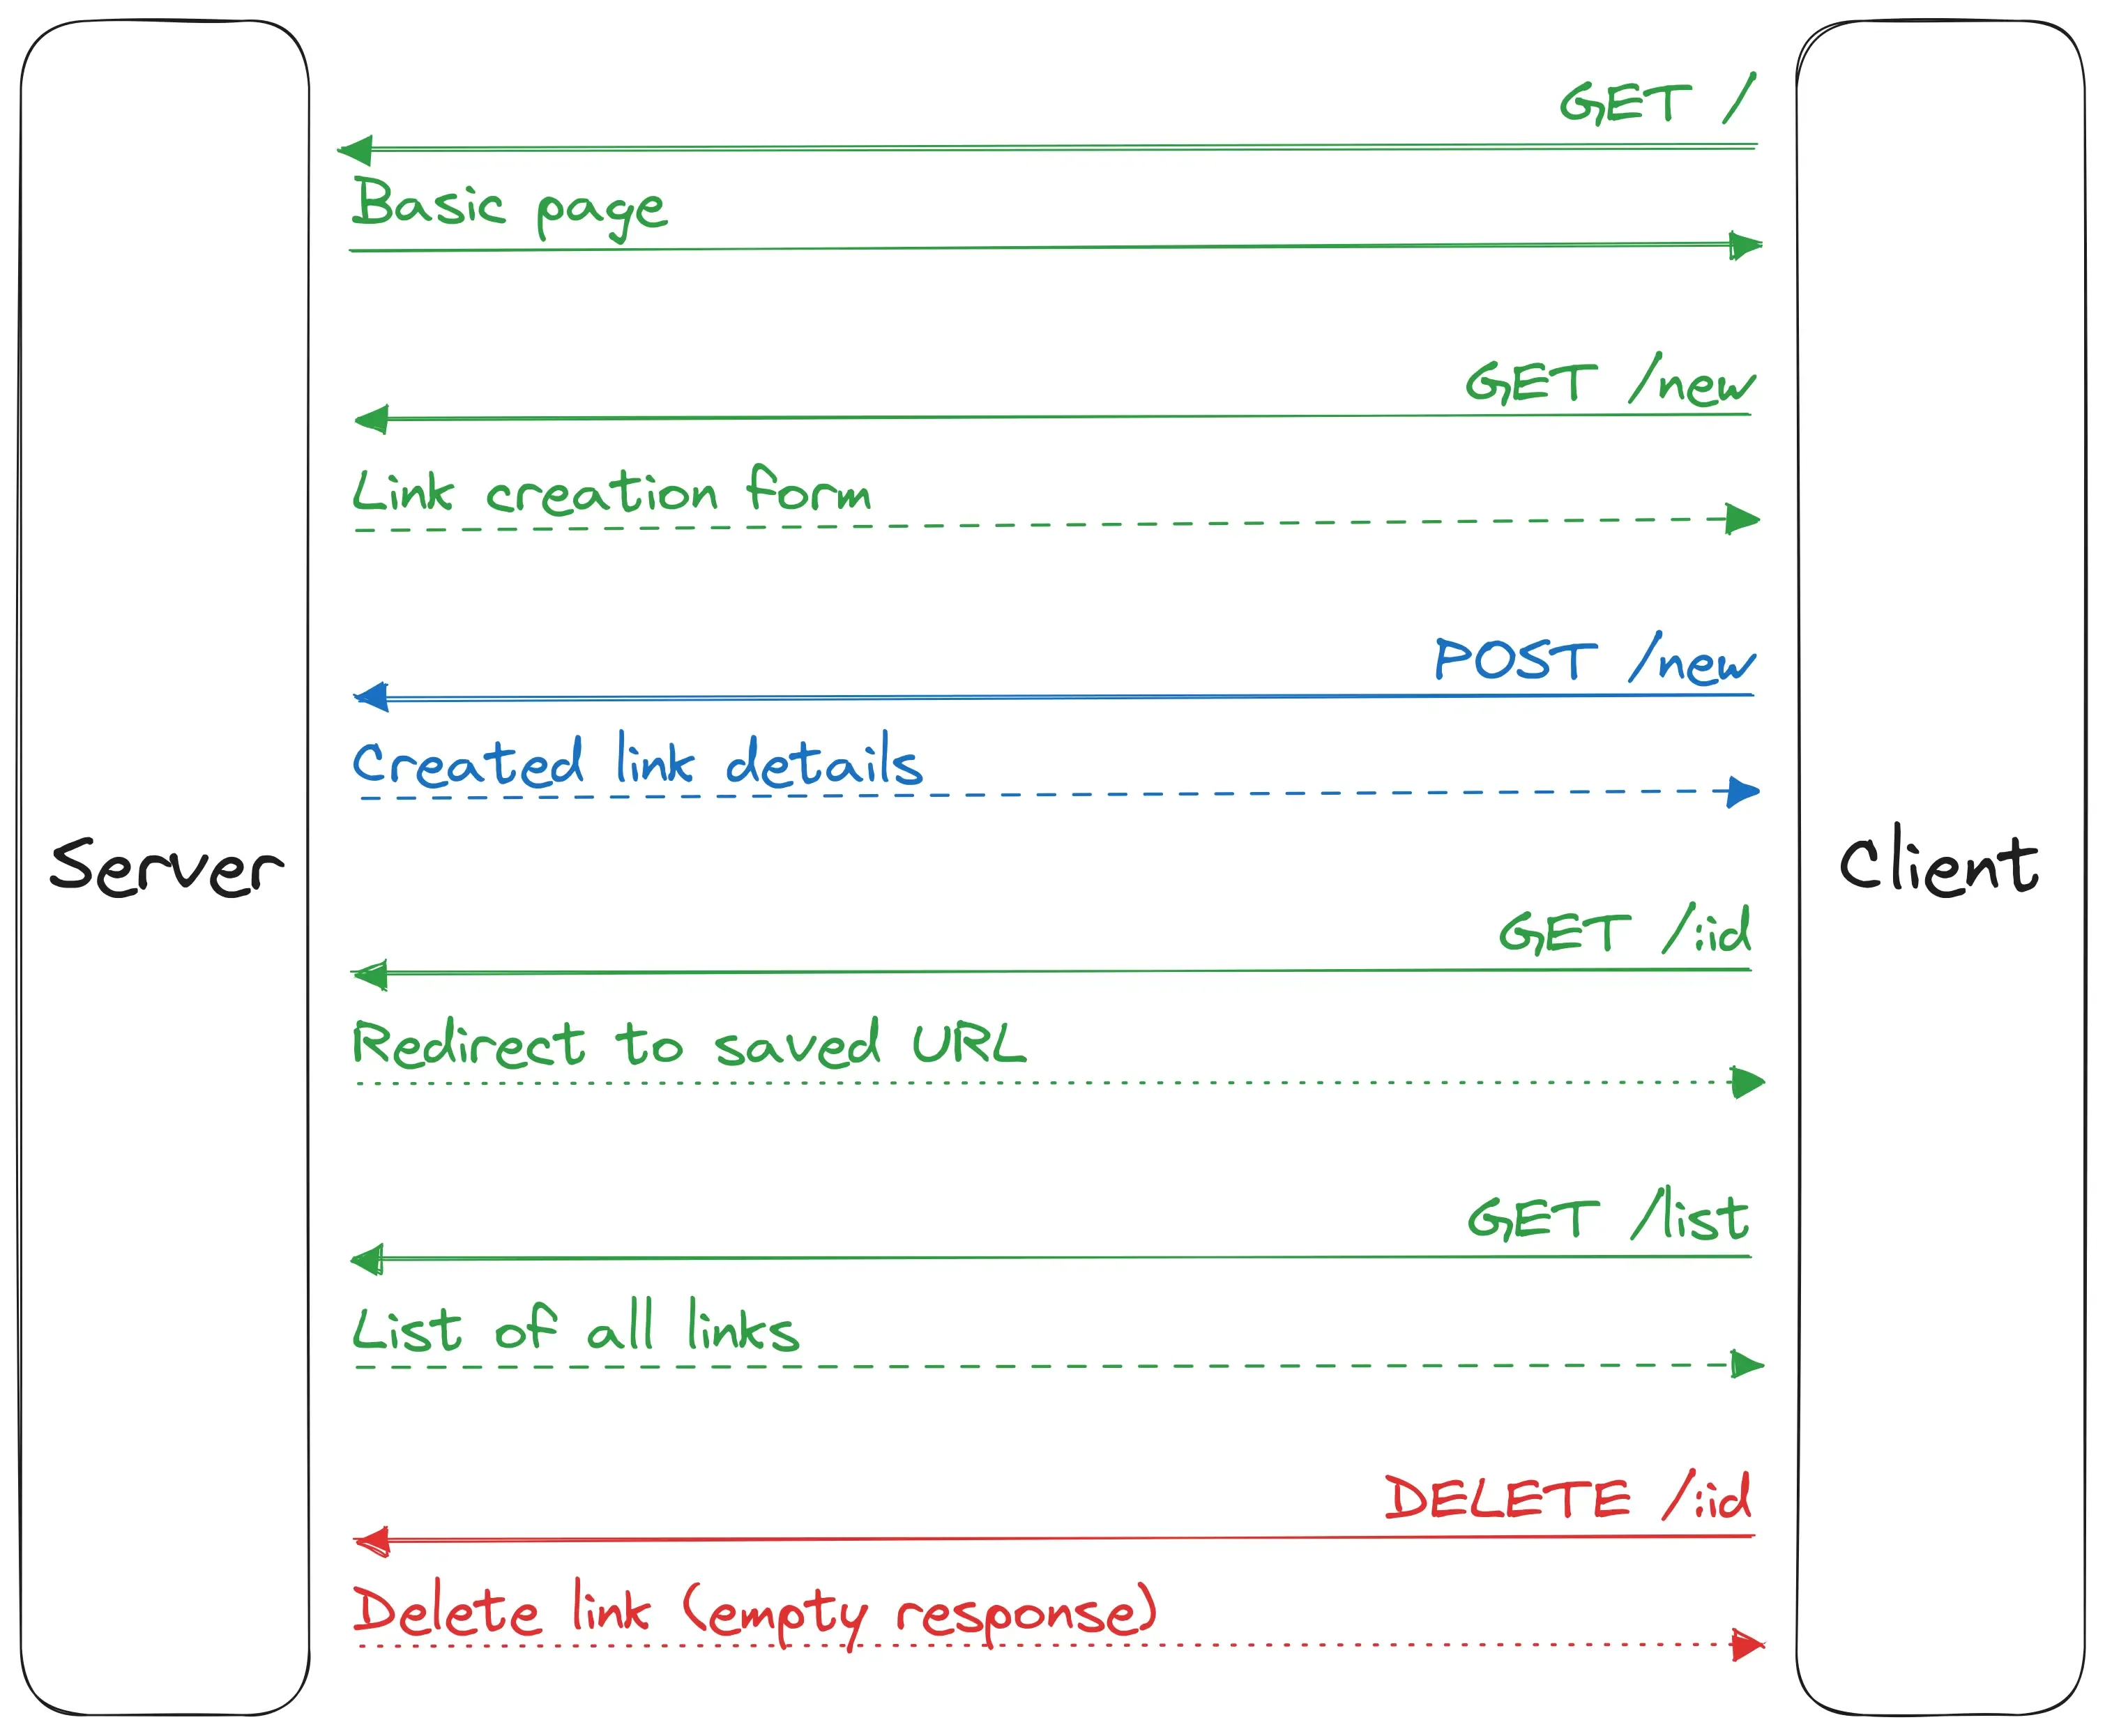
- We can send a GET request to first load the basic page with the HTMX script tag and the stylesheet.
- We then load the creation form with an automatic GET request to the new endpoint.
- When sending the form data with a POST request to the new endpoint, the server responds with the details about the created link.
- The person who opens the link will be redirected to the page that the first user specified.
- To get the list of all created links with their usage data, we can send a GET request to the list endpoint.
- And lastly, if we click the delete button and confirm the action, the browser sends a DELETE request, the server deletes the link and responds with an empty body to hide the table row.
Other features of HTMX
HTMX also offers a wide range of powerful features beyond what we’ve covered today. Here are some additional capabilities and use cases:
- Pagination with HATEOAS: You can implement pagination by updating button links with the next page numbers, utilizing hypermedia links to navigate through a set of results.
- Prefetching (Boosting): HTMX allows you to prefetch links, enhancing the user experience by loading resources when the user hovers over a link rather than clicking it. This can make the page feel faster and more responsive.
- WebSocket and Server-Side Events (SSE): HTMX supports bidirectional communication through WebSocket and Server-Side Events. This enables real-time updates and interactions between the client and server.
- Infinite Scrolling: You can implement infinite scrolling by triggering the loading of the next resource when a specific component is scrolled into view. This is useful for applications with long lists or paginated content.
- Keyboard Shortcuts: HTMX allows you to add keyboard shortcuts to your web application, enhancing accessibility and user navigation.
- Window History Manipulation: You can manipulate the browser’s window history to add all the “pages” the user visits to their history. This enables users to return to a specific point in the application, assuming your server-side code supports this feature.
HTMX’s flexibility and versatility make it a valuable tool for creating dynamic and responsive web applications with various interactive features and optimizations. Of course this does not replace client-side frameworks like Angular or React, but can be useful for smaller projects like this demo today.
Ending notes
That concludes my post for today! If you’re interested in delving deeper into the code, you’re welcome to visit the GitHub repository. For a broader look at my portfolio, including various other projects, please feel free to explore my website at pawcode.de.
Lastly, I’m excited to share that I’ve started building a real production project using HTMX for a local motor sports club in my hometown. This website encompasses a full range of features, including navigation, history manipulation, title updates, pagination, and more. It’s going great so far and it replaced the old website with the HTMX version just 2 days after writing this blog post. So if you want to see HTMX in action, you can also check this page out.
Latest Post

Related Post

Building a local AI-powered Summarizer chat
Unlock the power of AI right in your browser! Discover how Google Chrome's Summarizer API lets you build AI-powered chats and quickly grasp article content – all locally and for free! Learn about the different summary types, how to enable the API, and the exciting possibilities for web development. Ready to dive in?
- Published on
- Category
- The Sandbox