

Integrating local AI into Rainbow Palette
- Published on
- Reading time
- 15 min read
- Category
- The Sandbox
Back at this years Google I/O, it was announced that Google will include a local AI model directly into Chrome. This can then be used by websites directly in the browser. Completely local and offline, without any network requests being made. Users also don’t have to wait for the model to be downloaded, since it’s already living on their device. Even though I was a bit skeptical at first (like with all products calling “Hey, we have AI now!”), I was very impressed by the first demos. The results themselves were not that impressive, but the ease of use and integration into websites seemed pretty good.
So I wanted to try it out myself and experiment with it. Luckily I already have a website that is built around generating stuff, so it was the perfect first experiment for including generative AI in my projects. The website I’m talking about is Rainbow Palette, a tool that can generate entire color palettes by starting with just one color. So come along on the ride to try to integrate this experimental local AI in the browser into Rainbow Palette!
What is Rainbow Palette?
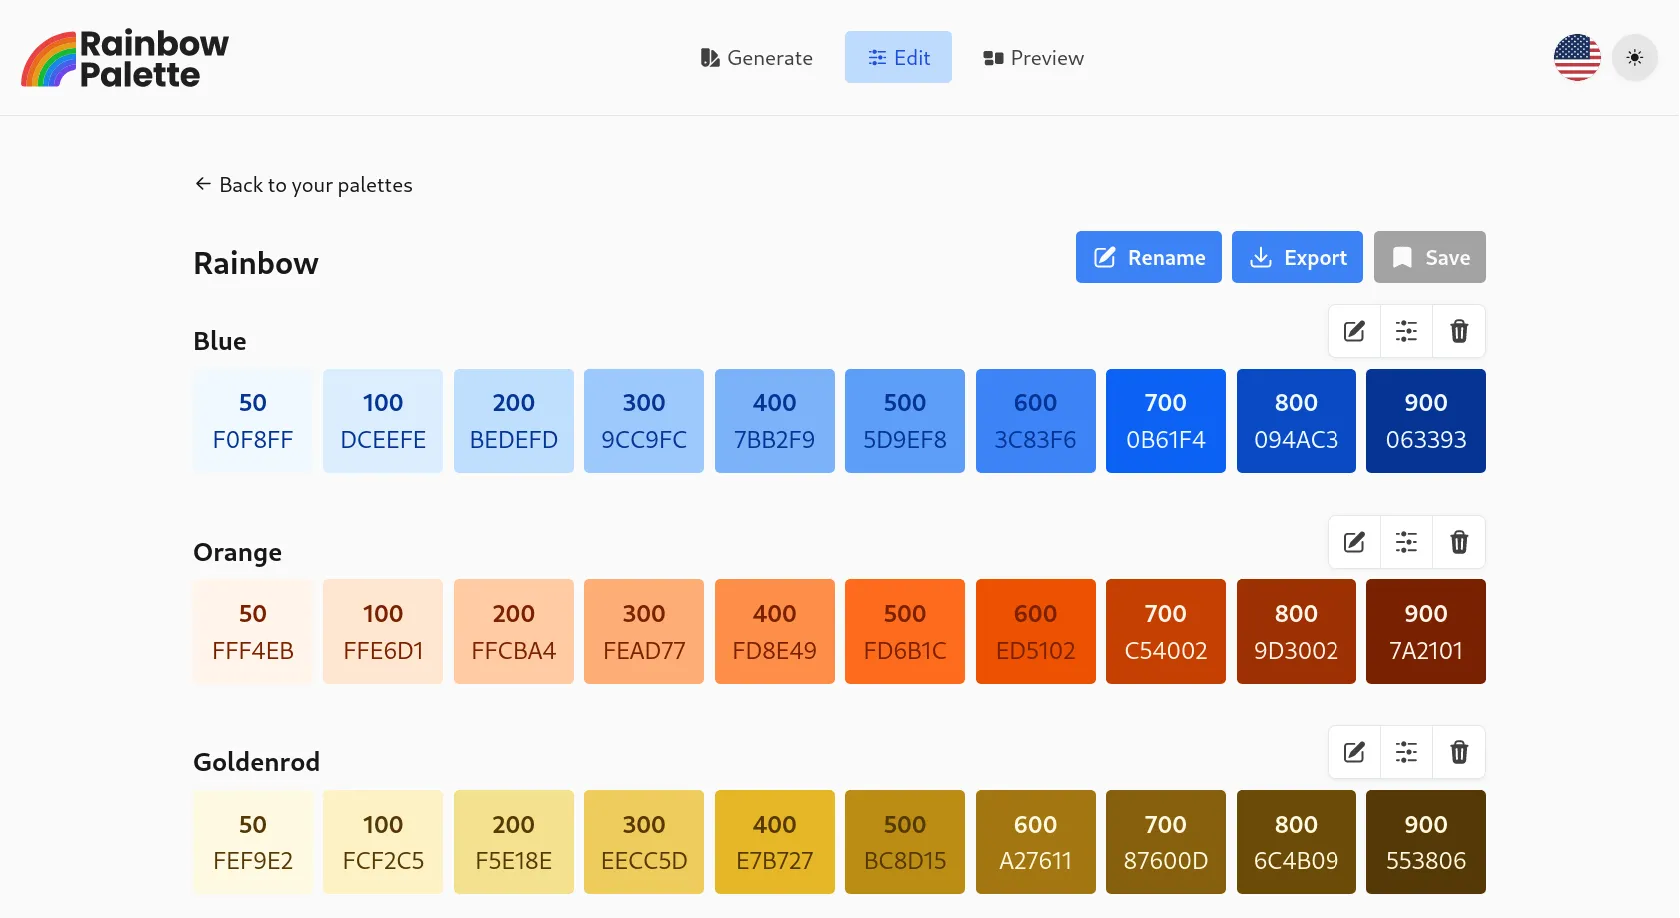
For those of you who don’t know, Rainbow Palette was my first big open source project. It started as a small tool to add and edit color palettes for TailwindCSS. You could start with one color, let the program generate different shades of this color, fine tune them and so on. Over time I added more and more features, like generating entire palettes, exporting them in different formats, adding automatic color names, etc.
This year was also the release of the 1.0 version, which was a big milestone for me. The code was completely rewritten, building a solid foundation for more features and improvements in the future (stay tuned for some of the stuff I’m working on).
If all of this sounds interesting to you, you can try it out here and come back later.
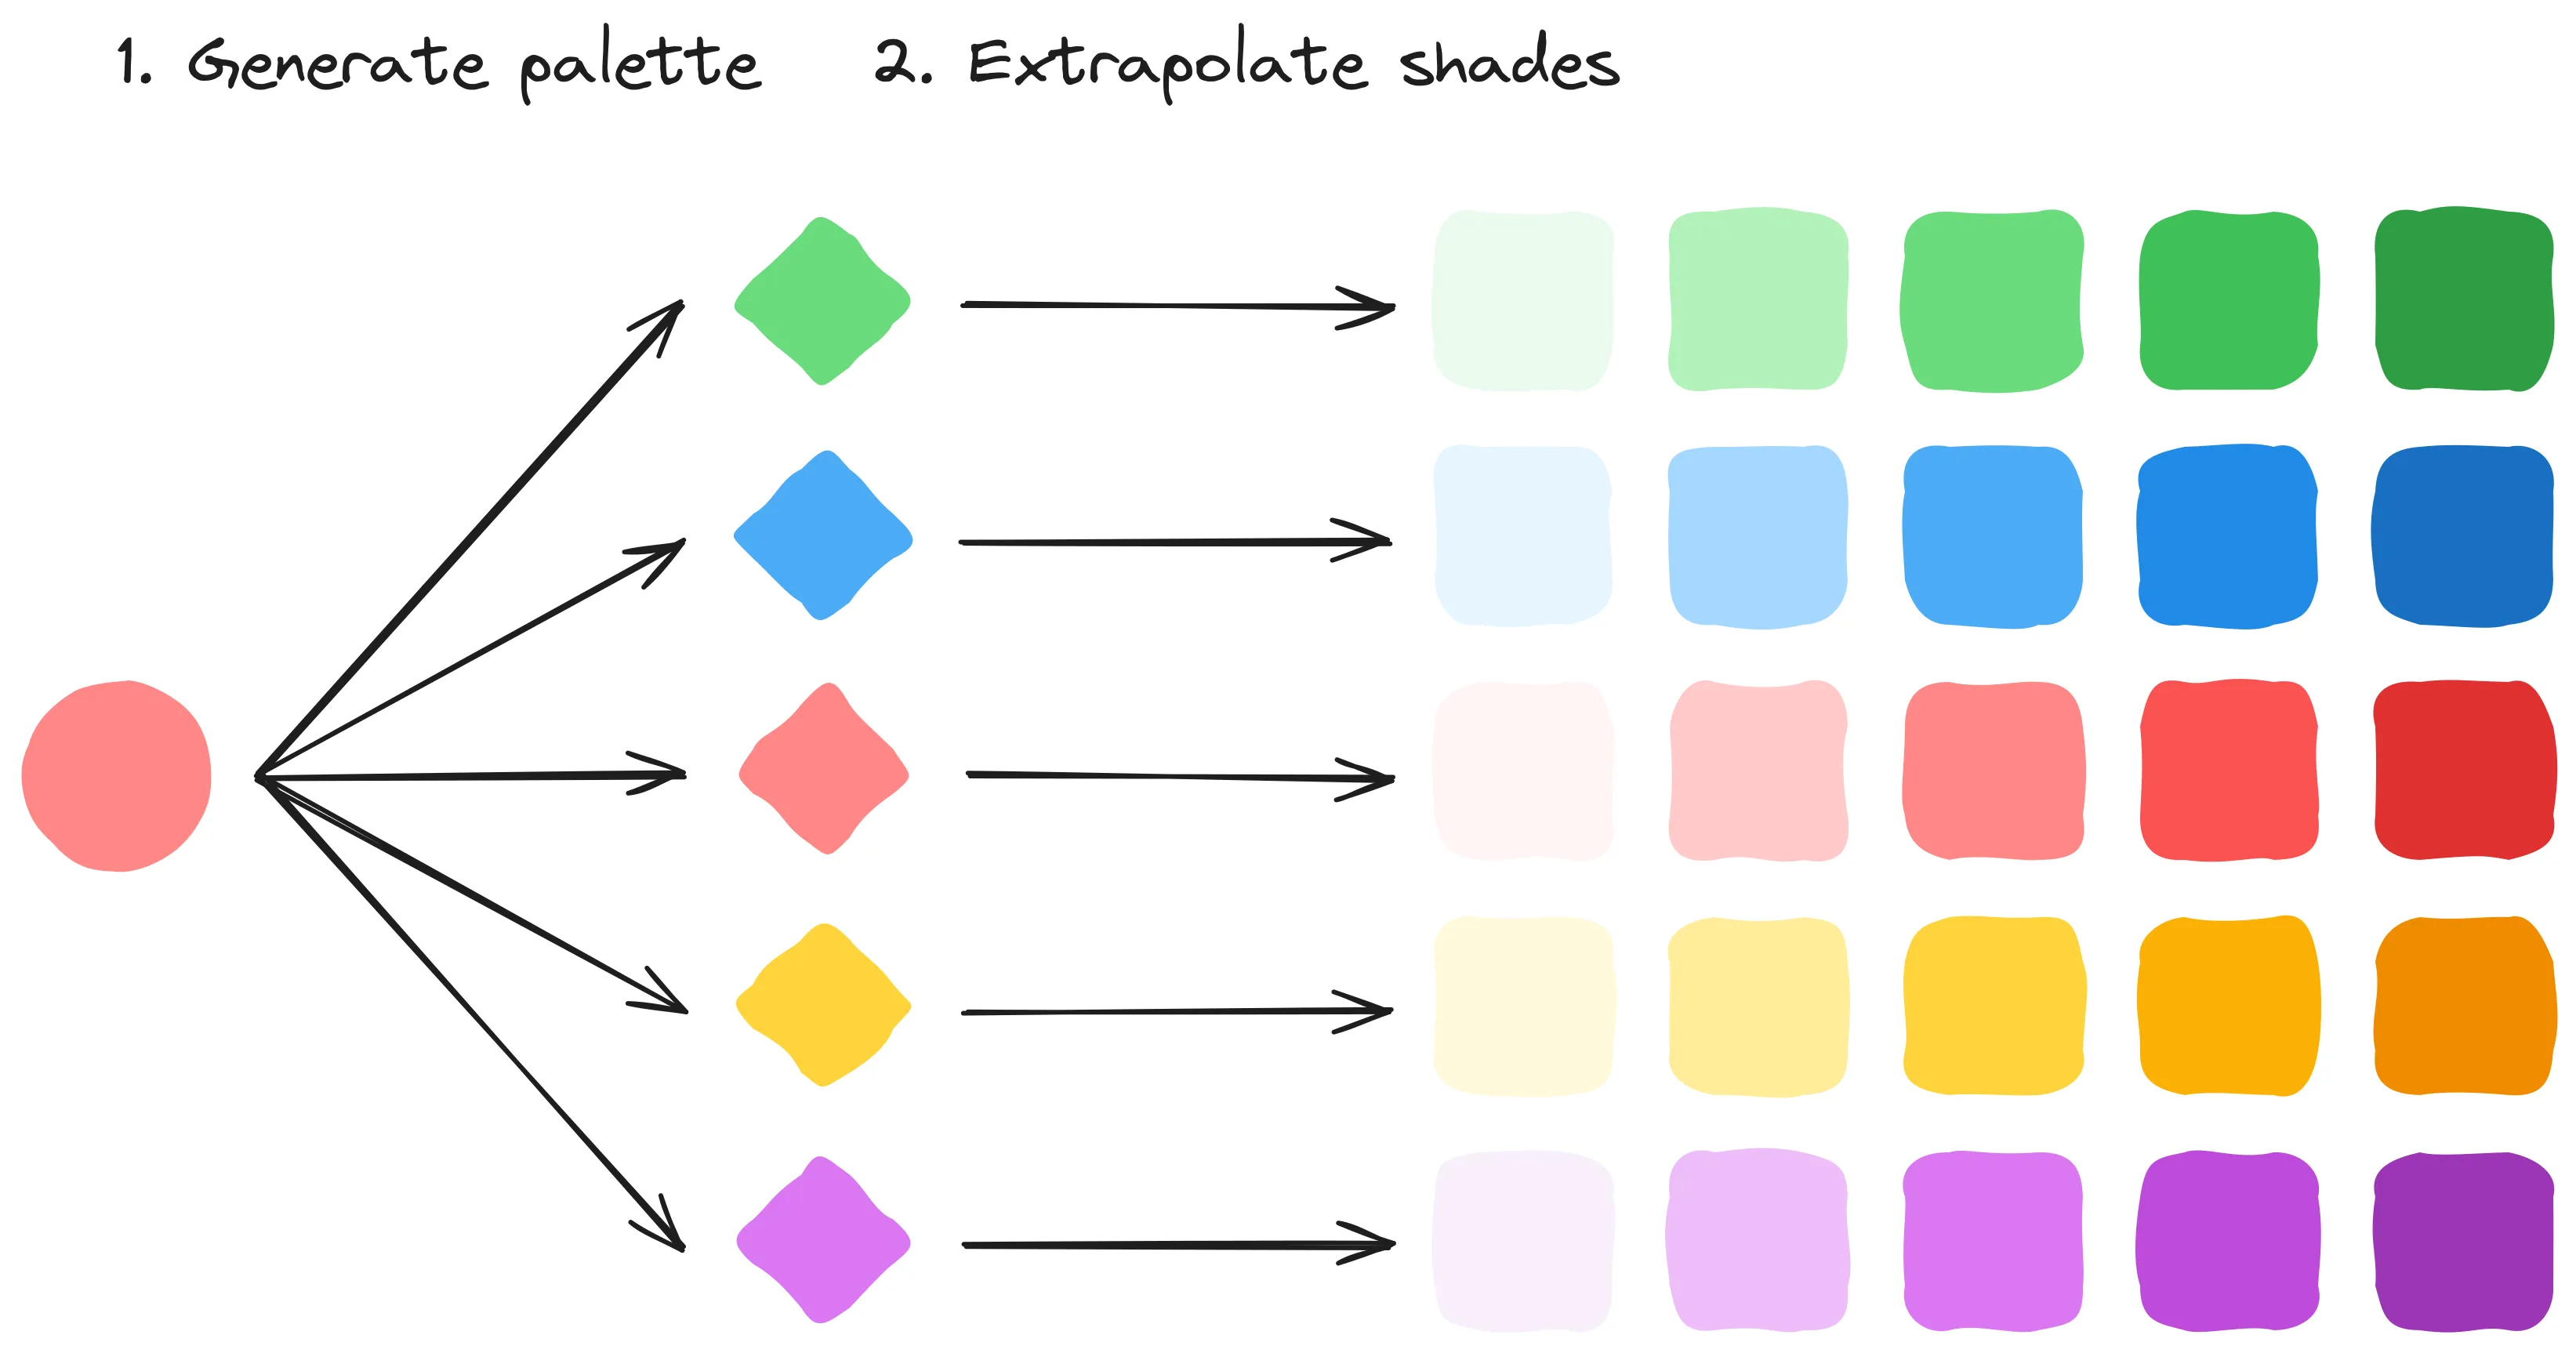
Traditionally I’ve used some basic algorithms (which grew more complex over time) for the generation. These algorithms can be categorized into two parts:
- Palette generation: Starting with one color, the program generates a whole palette of fitting colors. A user can pick between different schemes like complementary, triadic, rainbow, etc. and the program uses color theory to generate the additional colors.
- Shade generation: After the general palette is generated, the program then extrapolates each color into multiple different shades. This was heavily inspired by TailwindCSS, which uses a lot of different shades to create a coherent design system.
The first group of algorithms is based on classic color theory and some custom tweaks I added over time. There are some basic rules like “complementary colors are opposite on the color wheel” and so on. The only thing to keep in mind with these algorithms is that the distances on the color wheel are not the same as hue differences in the HSL color space. You can see this in the following example:

Interactive sliders to show the difference between the color wheel and the HSL color space
The second group of algorithms is a bit more complex and uses a lot of math. Generating shades between light and dark is not as easy as it sounds.
“Just interpolate the brightness (luminosity) of the colors” you might say.
Yeah, that’s what I thought at first too. But have you noticed that the yellow-greens seem to be much lighter than the blue-purples, when they have the same luminosity on paper? This is because the perceived brightness of colors is not the same as the technical luminosity of the color.
Comparison of colors with the same luminosity and the same perceived brightness
As you can see, this differs heavily depending on the hue of the color. So I built a more complex algorithm that tries to balance the saturation and brightness in a way that the perceived brightness of all hues feels the same. After that I can interpolate the colors, keeping the perceived brightness in mind, to generate the shades.
While this second group of algorithms uses a lot of math, the first group is more open to experimentation. So this is what I wanted to try out with the local AI instead of some hardcoded rules.
Activating the model inside the browser
If you just want to see how I integrated the model into Rainbow Palette, you can skip to the next chapter about the implementation itself.
To use the local AI model inside the browser you need to do some setup. Since the model is from Google, it’s only available in Google Chrome. At the time of writing, it’s not even available in the stable versions of Chrome, but only in some dev and canary builds (version 127+). So make sure you have one of these versions installed.
To then activate the model inside your browser you need to activate both of the following flags:
#prompt-api-for-gemini-nano(Enabled)#optimization-guide-on-device-model(Enabled BypassPerfRequirement)
After that you also need to go to chrome://components, search for Optimization Guide On Device Model and click on Check for update.
Maybe you need to restart your browser in between for this to appear or maybe it doesn’t appear at all (for me it didn’t appear on my Linux machine, but only on my Windows laptop).
But if you can see it, click on Check for update and wait for the model to be downloaded.
November update: The component is not available anymore, but the model can be downloaded automatically now.
Then you should be ready to go and can start using the model in your browser.
Sending the first prompt
Now that we have the model activated in our browser, we can start sending it some prompts.
The prompt has to be sent to a session, so we first have to create one.
This can be done via the window.ai object in the browser like this:
const session = await window.ai.languageModel.create();This creates a new text session with some default options.
You can also pass some options to the create function to customize the session, but we will not do this for now.
But now that we have a session, we can start sending prompts to it:
const question = "Tell me a joke";
const response = await session.prompt(question);
console.log(response);
This will send the question to the model and print the response to the console. It’s that easy to get started.
Feel free to play around with it yourself in the console of your browser or try the following live demo:
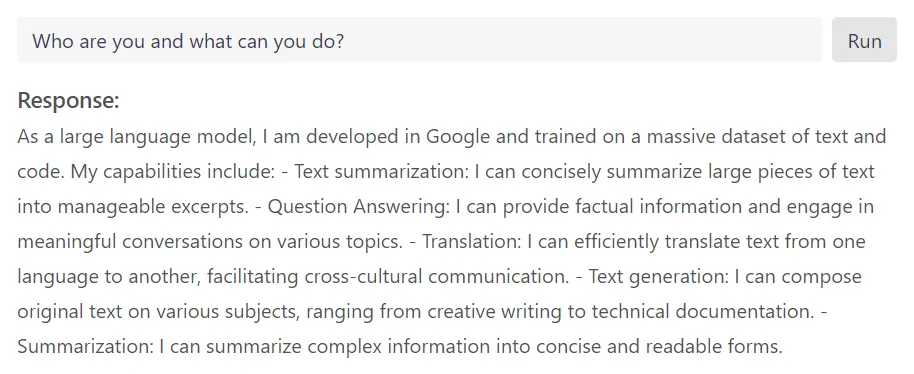
Interactive demo to prompt the local AI model in the browser
It’s not the fastest model and depending on your hardware and the prompt it may take some time to respond. But it’s fun to play around with it. Since the model is running locally on your device, you can also use it offline!
Until now, the only sort of documentation I found for this API is this type declaration file used in the chrome-ai npm package.
This package is a wrapper around the API to make it easier to use.
This also allows you to easily integrate the model with the ai package, which is a more general wrapper around different AI models.
For now though I’ll stick with the raw API.
Generating color palettes with generative AI
So far we only played around with the model and let it tell us some jokes and stuff. But now we want to actually use it to generate color palettes for Rainbow Palette. Let’s see how we can do this.
I’ll skip over the stuff like adding the “AI generated” scheme to the selection and other adjustments I had to make to the application. This is just normal Angular code and prepares some stuff in the current architecture. If you want to see all the changes I made, you can take a look at this commit.
In this post we will only look at the AiService which is the only thing that interacts with the model.
Creating the session
Like in our previous example, we first have to create a session.
async function createSession(): Promise<ChromeAISession> {
  // Check if the AI is available
  if (!window.ai) {
    throw new Error("AI is not available");
  }

  /*
   * Some other checks
   */

  const capabilities = await window.ai.languageModel.capabilities();
  if (capabilities.available === "readily") {
    return await window.ai.languageModel.create({
      temperature: 0.6,
    });
  }

  /*
   * Some fallback stuff
   */
}
Because we are now in a real application, it looks a bit more complex and does some additional checks to make sure everything is working correctly.
Since the API is still very experimental and not all users have it yet, I first check if the window.ai object is available, together with some other checks.
If everything is fine, I check if I can even create a text session with canCreateTextSession.
This method returns either “readily” or “no”.
If it’s “readily” I first get the default options for the text session and then create a new session with these options. I’m doing this to lower the temperature of the model to 0.6, which makes the output more predictable. Using higher temperature values makes the output more variable, which makes the model output some other stuff even with the explicit instructions we’ll give it later.
Prompting the model
Next up is my helper function for the prompt itself:
async function prompt(prompt: string): Promise<string> {
  // Create a new session if necessary
  if (!this.#session) {
    await this.createSession();
  }

  // Start timing the AI
  const start = Date.now();
  console.info("Prompting AI...");

  // Prompt the AI with a timeout
  const result = await Promise.race([
    // Prompt the AI
    this.#session!.prompt(prompt),
    // Wait for 10 seconds before timing out
    sleep(10_000).then(() => false as const),
  ]);

  // Throw an error if the AI took too long to respond
  if (!result) {
    throw new Error("AI took too long to respond");
  }

  // Log the duration the AI took to generate the response
  const duration = Date.now() - start;
  console.info(`AI took ${duration}ms to respond`);

  return result.trim();
}
Again this looks a bit more advanced than the simple example we had before. First I check if I already have a session or if I need to create one.
Then I start timing the AI. This is just for debugging purposes and helps me to see if the model is actually doing something and how long it takes to respond. After the model answered, I can just calculate the duration and log it to the console.
In between there is the actual prompt.
I’m using the Promise.race function here, which resolves with the first promise that resolves.
This allows me to set a timeout for the model to respond (in this case 10 seconds).
If the model does not respond in time, I throw an error. I’m doing this because in my tests the model could sometimes take a long time to respond or even get stuck. This way I can handle this case and retry the prompt on time. (Testing it in action, 10 seconds is very aggressive and often lets the model timeout. Maybe 15 seconds would be better here.)
Generating the palette
So far this was basically like the basic example we had before. Just with some fancy logging, helper methods and some proper error handling for a better integration into the application. The last remaining part is the connection to the palette generation. So here it is:
async function generatePalette(hex: string): Promise<Palette> {
  // Create the base color and palette
  const shade = new Shade(-1, Value.fromHex(hex), true);
  const aiPalette = new Palette("AI (experimental)", []);
  aiPalette.addColor(new Color([shade], "Primary"));

  // Prompt the AI for a color palette
  for (let tries = 0; tries < 3; tries++) {
    try {
      // Use a random scheme to prime the AI
      const scheme = randomScheme();

      // Prompt the AI for a color palette
      let response = await this.prompt(/* PROMPT */);

      // Remove markdown code block if present
      if (response.startsWith("```json")) {
        response = response
          .replaceAll("```json", "")
          .replaceAll("```", "")
          .trim();
      }

      // Attempt to parse the response as a JSON array of colors
      let colors = JSON.parse(response);
      if (!Array.isArray(colors)) {
        if ("colors" in colors && Array.isArray(colors.colors)) {
          colors = colors.colors;
        } else {
          console.warn("Invalid response", response);
          continue;
        }
      }

      // Loop through the generated colors and add them to the palette
      for (const color of colors) {
        // Check if the color is valid
        if (typeof color !== "object" || !color.hex) {
          console.warn("Invalid color: ", color);
          continue;
        }

        // Create a shade and color
        const shade = new Shade(-1, Value.fromHex(color.hex), true);
        const name =
          color.name || (await this.#colorNameService.getColorName(shade));
        aiPalette.addColor(new Color([shade], name));
      }

      // If the AI successfully generated at least one color, return
      if (aiPalette.colors.length > 1) {
        return aiPalette;
      }
    } catch (error: any) {
      console.warn(error);
      continue;
    }
  }

  // AI failed to generate a palette
  throw new Error("AI failed to generate a palette");
}
Let’s break this down a bit:
First I create the base color and palette. This is the same as for my other algorithms and transfers the hex code into the internal representation of the color. Then I add the base color to the palette.
After that I start a loop and give the AI three tries to generate a palette. Why three tries? Because as I mentioned in the previous section, the model can sometimes take too long to respond or throw some errors. So I give it multiple tries to actually generate a palette.
I then create a random scheme name to prime the AI and nudge it into the right direction.
This scheme is then included in the prompt, which gets sent to the model through the prompt function we defined before.
My prompt currently looks like this:
Generate a <scheme> color palette with 3 to 7 colors using this as a starting point: <hex>.
Please return a JSON array of colors with the following format: [{hex: string, name: string}, nextColor, …]. Always response in pure json string format that matches the JSON schema above, not markdown or other format!!
The rest of the code is where the hard work starts. You probably know that AI models tend to hallucinate a lot. This means they generate some random stuff like facts that are not true, or in this case formats that are not what I explicitly asked for:
# Example 1 (okayish)
```json { "colors": [
  { "hex": "#3B82F6", "name": "#3B82F6" },
  { "hex": "#60C0CE", "name": "#60C0CE" },
  { "hex": "#98FBCE", "name": "#98FBCE" }
] } ```

# Example 2 (expected, but strange names)
```json [
  { "hex": "#3B82F6", "name": "Dark Green and Blue" },
  { "hex": "#87CEEB", "name": "Light Green and Blue" },
  { "hex": "#F0D0E0", "name": "Light Gray and Blue" }
] ```

# Example 3 (whatever this is)
```json {
  "0": [
    { "hex": "#3B82F6", "name": "Dark Blue" }, { "hex": "#60C0CE", "name": "Light Cyan" }
  ],
  "1": [
    { "hex": "#60C0CE", "name": "Light Cyan" }, { "hex": "#00CDCD", "name": "Light Blue" }
  ],
  "2": [
    { "hex": "#00CDCD", "name": "Light Blue" }, { "hex": "#37E0E0", "name": "Light Green" }
  ],
  "3": [
    { "hex": "#37E0E0", "name": "Light Green" }, { "hex": "#7FFF00", "name": "Yellow" }
  ],
  "4": [
    { "hex": "#7FFF00", "name": "Yellow" }, { "hex": "#FFC100", "name": "Orange" }
  ],
  "5": [
    { "hex": "#FFC100", "name": "Orange" }, { "hex": "#FF6300", "name": "Red" }
  ]
} ```
So I try to save the response by unwrapping markdown code blocks, trying to find the actual array of colors, checking if the content has at least the hex code and so on. I also cut the model some slack and let it leave out the generated name and use my existing color name service to pick a fitting name for the color.
When the model successfully generates at least one additional color, I consider the palette as generated and return it to the user. Now they can edit it just like any other palette. Otherwise if something went wrong, I retry the prompt and hope for the best.
Conclusion
As you can see, integrating a local AI model into your website is very easy with this new experimental API.
Building a ChatGPT like interface just for prompting some questions like a conversation can be done in a couple of minutes.
For this you can also use the promptStreaming function to stream in the answer token by token to make it feel more responsive for longer sentences and texts (like in the interactive demo above).
The only tricky thing is to handle the common cases of hallucinations and different formats, trying to save the response somehow to be usable.
Trying out this local Gemini Nano model was a very fun experiment and integrating it into my existing application was surprisingly easy. Even without experience with AI and LLMs, I could get it up and running properly in a couple of hours.
Is it any good for day to day use?
Obviously not. The API in the browser is hidden after two experimental flags in some dev builds of Google Chrome and can change at any time. So no real user can actually use this right now. Prompting it to tell some jokes just returns the same 3 or 4 bad jokes. The palettes generated by the model are much worse than my custom fine tuned algorithms I’ve built over the last couple of months / years. So at least my work was not for nothing!
But I think I will keep this experiment going, integrating it for real into Rainbow Palette. So if you need a color palette or you just want to experiment with it, visit rainbow-palette.app and start creating your own!
If your browser supports the local AI and you could use the demo above, there will be a “AI generated (experimental)” scheme in the dropdown.
Latest Post

Related Post

Building a local AI-powered Summarizer chat
Unlock the power of AI right in your browser! Discover how Google Chrome's Summarizer API lets you build AI-powered chats and quickly grasp article content – all locally and for free! Learn about the different summary types, how to enable the API, and the exciting possibilities for web development. Ready to dive in?
- Published on
- Category
- The Sandbox