Building an Astro Integration
- Published on
- Reading time
- 16 min read
- Category
- Under the Hood
In my previous post, I talked about building a custom loader for Astro using the new Content Layer API.
This loader allows you to load content from PocketBase directly into your Astro project.
I later also published it as astro-loader-pocketbase on npm so you can easily use it in your own projects.
If you don’t know what this loader is about, I highly recommend you to read the previous post first since the integration builds on top of it.
While this loader works great on it’s own just loading content, I wanted to make the developer experience even better.
This is why I build an additional integration for Astro that provides you with lots of small helpers during the development of your project.
The integration is called astro-integration-pocketbase and is also available on npm.
In this post, I’ll show you which features the integration provides, how they work and how you can use them in your own projects.
What is an Astro integration?
Integrations are libraries that add new functionality to Astro projects. They can be used to:
- Add frontend frameworks like Solid to build interactive islands or SSR adapters for server-side rendering
- Integrate tools like Tailwind or a Markdown renderer
- Enhance the developer experience with custom toolbars or other goodies
There are hundreds of integrations available for Astro. You can browse them on the Astro website and find the ones that fit your needs. Some of them are built and maintained by the Astro team directly, while others are created by the community. And you can even build your own integration if you have a great idea for a new feature.
So let’s take a look at my integration for PocketBase and see how it works.
Building the integration
Adding your own toolbar
Toolbars can only be added to Astro projects using an integration.
So the first step is to setup a new integration in your project.
This is just a function that returns an AstroIntegration:
export function pocketbaseIntegration(): AstroIntegration {
  return {
    name: "pocketbase-integration",
    hooks: {},
  };
}
A toolbar can be registered in the astro:config:setup hook.
This hook is called when the server or your build process starts.
So let’s register our new toolbar:
hooks: {
  "astro:config:setup": ({ addDevToolbarApp, command }): void => {
    if (command !== "dev") {
      return;
    }

    addDevToolbarApp({
      name: "PocketBase",
      id: "pocketbase-entry",
      entrypoint: fileUrlToPath(new URL("./toolbar", import.meta.url))
    });
  }
}
We can skip adding the toolbar when we are not in development mode, since we only need it during development.
The addDevToolbarApp function is used to add a new toolbar using the given URL to load the toolbar on the client.
So let’s create the toolbar itself:
export default defineToolbarApp({
  init: async (
    canvas: ShadowRoot,
    app: ToolbarAppEventTarget,
  ): Promise<void> => {
    const container = document.createElement("astro-dev-toolbar-window");
    container.innerHTML = `
      <h1>PocketBase</h1>
    `;

    app.onToggled(({ state }) => {
      if (!state) {
        canvas.innerHTML = "";
        return;
      }

      canvas.appendChild(container);
    });
  },
});
This is a very basic toolbar that just shows a headline.
Astro provides you with some custom elements so you don’t have to style everything yourself.
In this case, we use astro-dev-toolbar-window to create a window-like container for our toolbar.
You can find a list of all elements in the Astro documentation.
Next up we added a headline to the toolbar and a listener for the onToggled event.
This event is called whenever our toolbar is toggled on or off.
When the toolbar is toggled off (state is false), we remove all content from the canvas and cleanup the DOM.
When the toolbar is toggled on, we add our container to the canvas element provided by Astro.
This is all we need to create a first basic toolbar.
View raw entities in the toolbar
The first thing I wanted to add to my integration was the ability to view the raw entities from PocketBase directly in the toolbar. This way you can easily debug your pages and see which data was used to render the page. Additionally, you can also click on “View in PocketBase” to open the entity in your PocketBase admin dashboard to make changes.
Getting the used entities
Before we can display the entities in the toolbar, we first need to get the entities that are used on the current page. Unfortunately this is not as easy as it sounds, since Astro doesn’t provide a direct way to access them. But we can register a custom middleware that is called for every page and try to extract the entities from there.
hooks: {
  "astro:config:setup": ({ addMiddleware }): void => {
    /**
     * Setup the toolbar like above
     */

    addMiddleware({
      order: "post",
      entrypoint: fileUrlToPath(new URL("./middleware", import.meta.url))
    });
  }
}
The middleware is registered similar to the toolbar in the astro:config:setup hook using the addMiddleware function.
We set the order to post to make sure the middleware runs after all other middlewares and provide the URL to the middleware file.
In the middleware itself we can now access the pages props with context.props and look for PocketBase entities in there.
export const onRequest = defineMiddleware(async (context, next) => {
  const props = Object.values(context.props);
  const entities = findEntitiesRecursive(props);

  const response = await next();
  const body = await response.text();

  const newBody = body.replace(
    "</head>",
    `<script>
      window.__astro_entities__ = ${JSON.stringify(entities)};
    </script></head>`,
  );

  return new Response(newBody, response);
});
We first extract all the props from the context and search for PocketBase entities.
This means that it only works for pages that get their entities passed via Astro.props but not when they are loaded directly via getCollection.
If you know a better way to get the entities, please let me know!
After we found all entities, we render the page as usual. When the page is rendered, the middleware adds a script tag to the head of the page1 that sets a global variable with the entities that the toolbar can then access on the client.
Displaying the entities
Now that we have the raw entities available in the client, we can display them in the toolbar.
We can use the onToggled event again to update the content of the toolbar.
app.onToggled(() => {
  /**
   * Clear or attach the container like above
   */

  const entities = window.__astro_entities__;
  if (!entities || entities.length === 0) {
    container.innerHTML = "<p>No entities found</p>";
    return;
  }

  container.innerHTML = `
    <main>
      ${createEntities(entities)}
    </main>
  `;
});
When the toolbar is toggled on, we now check the global variable for entities. If they are provided, we add them to the container.
function createEntities(entities: Array<Entity>): string {
  const renderedEntities = entities.map(entity => `
    <astro-dev-toolbar-card>
      <div class="entity">
        <pre>${JSON.stringify(entity, null, 2)}</pre>
      </div>
    </astro-dev-toolbar-card>
  `).join('');

  return `
    <style>
      .entity {
        pre {
          margin: 0;
          overflow: auto;
        }
      }
    </style>

    ${renderedEntities}
  `;
}
This function is simplified a lot for this example.
But we can build our HTML using template literals and the astro-dev-toolbar-card element to create a card-like container with basic styles for each element.
And then we can write additional styles to make the entities look nice.
In addition to just the raw JSON data, we can also add a button to view or edit the entity in PocketBase.
<div class="entity">
  <pre>${JSON.stringify(entity, null, 2)}</pre>

  <astro-dev-toolbar-button
    size="small"
    button-style="purple"
    textContent="View in PocketBase"
    onclick="window.open(linkToEntity, '_blank')"
  >
    View in PocketBase
  </astro-dev-toolbar-button>
</div>
Again this is a slightly simplified example, removing some extra styles or logic to create the link. If you want to see the full implementation, you can check out the source code on GitHub. When done, the toolbar will look something like this:

Refresh collection data via the toolbar
Okay, so we can now view the raw entities in the toolbar. But what if the data changed and we want to see the updated entities? We could reload the data by writing s + enter in the terminal, but that’s not very convenient. So let’s add a button to the toolbar that allows us to refresh the entities directly from the toolbar.
Adding a refresh button
Inside the toolbar, we just need to add a new button:
init: async (
  canvas: ShadowRoot,
  app: ToolbarAppEventTarget,
  server: ToolbarServerHelpers,
): Promise<void> => {
  /**
   * Setup the container like above
   */

  const header = `
    <header>
      <!-- other header content -->

      <astro-dev-toolbar-button
        id="refresh-button"
        size="small"
        button-style="green"
      >
        Refresh content
      </astro-dev-toolbar-button>
    </header>
  `;

  const refresh = header.querySelector("#refresh-button");
  refresh.addEventListener("click", () => {
    server.send("astro-integration-pocketbase:refresh");
  });
};
The general setup of the button is the same as for the entity viewer.
Where it gets interesting is the click handler.
Instead of opening a new window or just reloading the page (which would not do what we want), we send a message to the server.
For this, the init function gets a parameter server that provides us with a send function to send a message to the dev server.
We use this to send a message to the server, telling it to refresh the entities.
We can also listen for messages from the server with server.on("<my-message>", (data) => {}) to react to messages from the server.
In the actual implementation, I do this e.g. to gray out the refresh button while the server is refreshing the entities.
Refreshing the entities
Because the actual loading of the entities is still done by the loader, we need to somehow trigger the refresh. For this, we now need to listen for the message we sent from the toolbar in the server.
hooks: {
  "astro:server:setup": ({ toolbar, refreshContent }): void => {
    toolbar.on("astro-integration-pocketbase:refresh", async () => {
      toolbar.send("astro-integration-pocketbase:refresh", {
        loading: true
      });

      await refreshContent({
        loaders: ["pocketbase-loader"]
      });

      toolbar.send("astro-integration-pocketbase:refresh", {
        loading: false
      });
    });
  }
}
The setup for this is done in the astro:server:setup hook, which is called when the dev server starts.
We listen for the same message we send from the toolbar and call the refreshContent function with all the loaders we want to refresh.
Since this integration was purpose-built for my PocketBase loader, I only refresh this loader.
I also send back messages to the toolbar to show a loading state while the entities are refreshing and to remove it when the refresh is done.
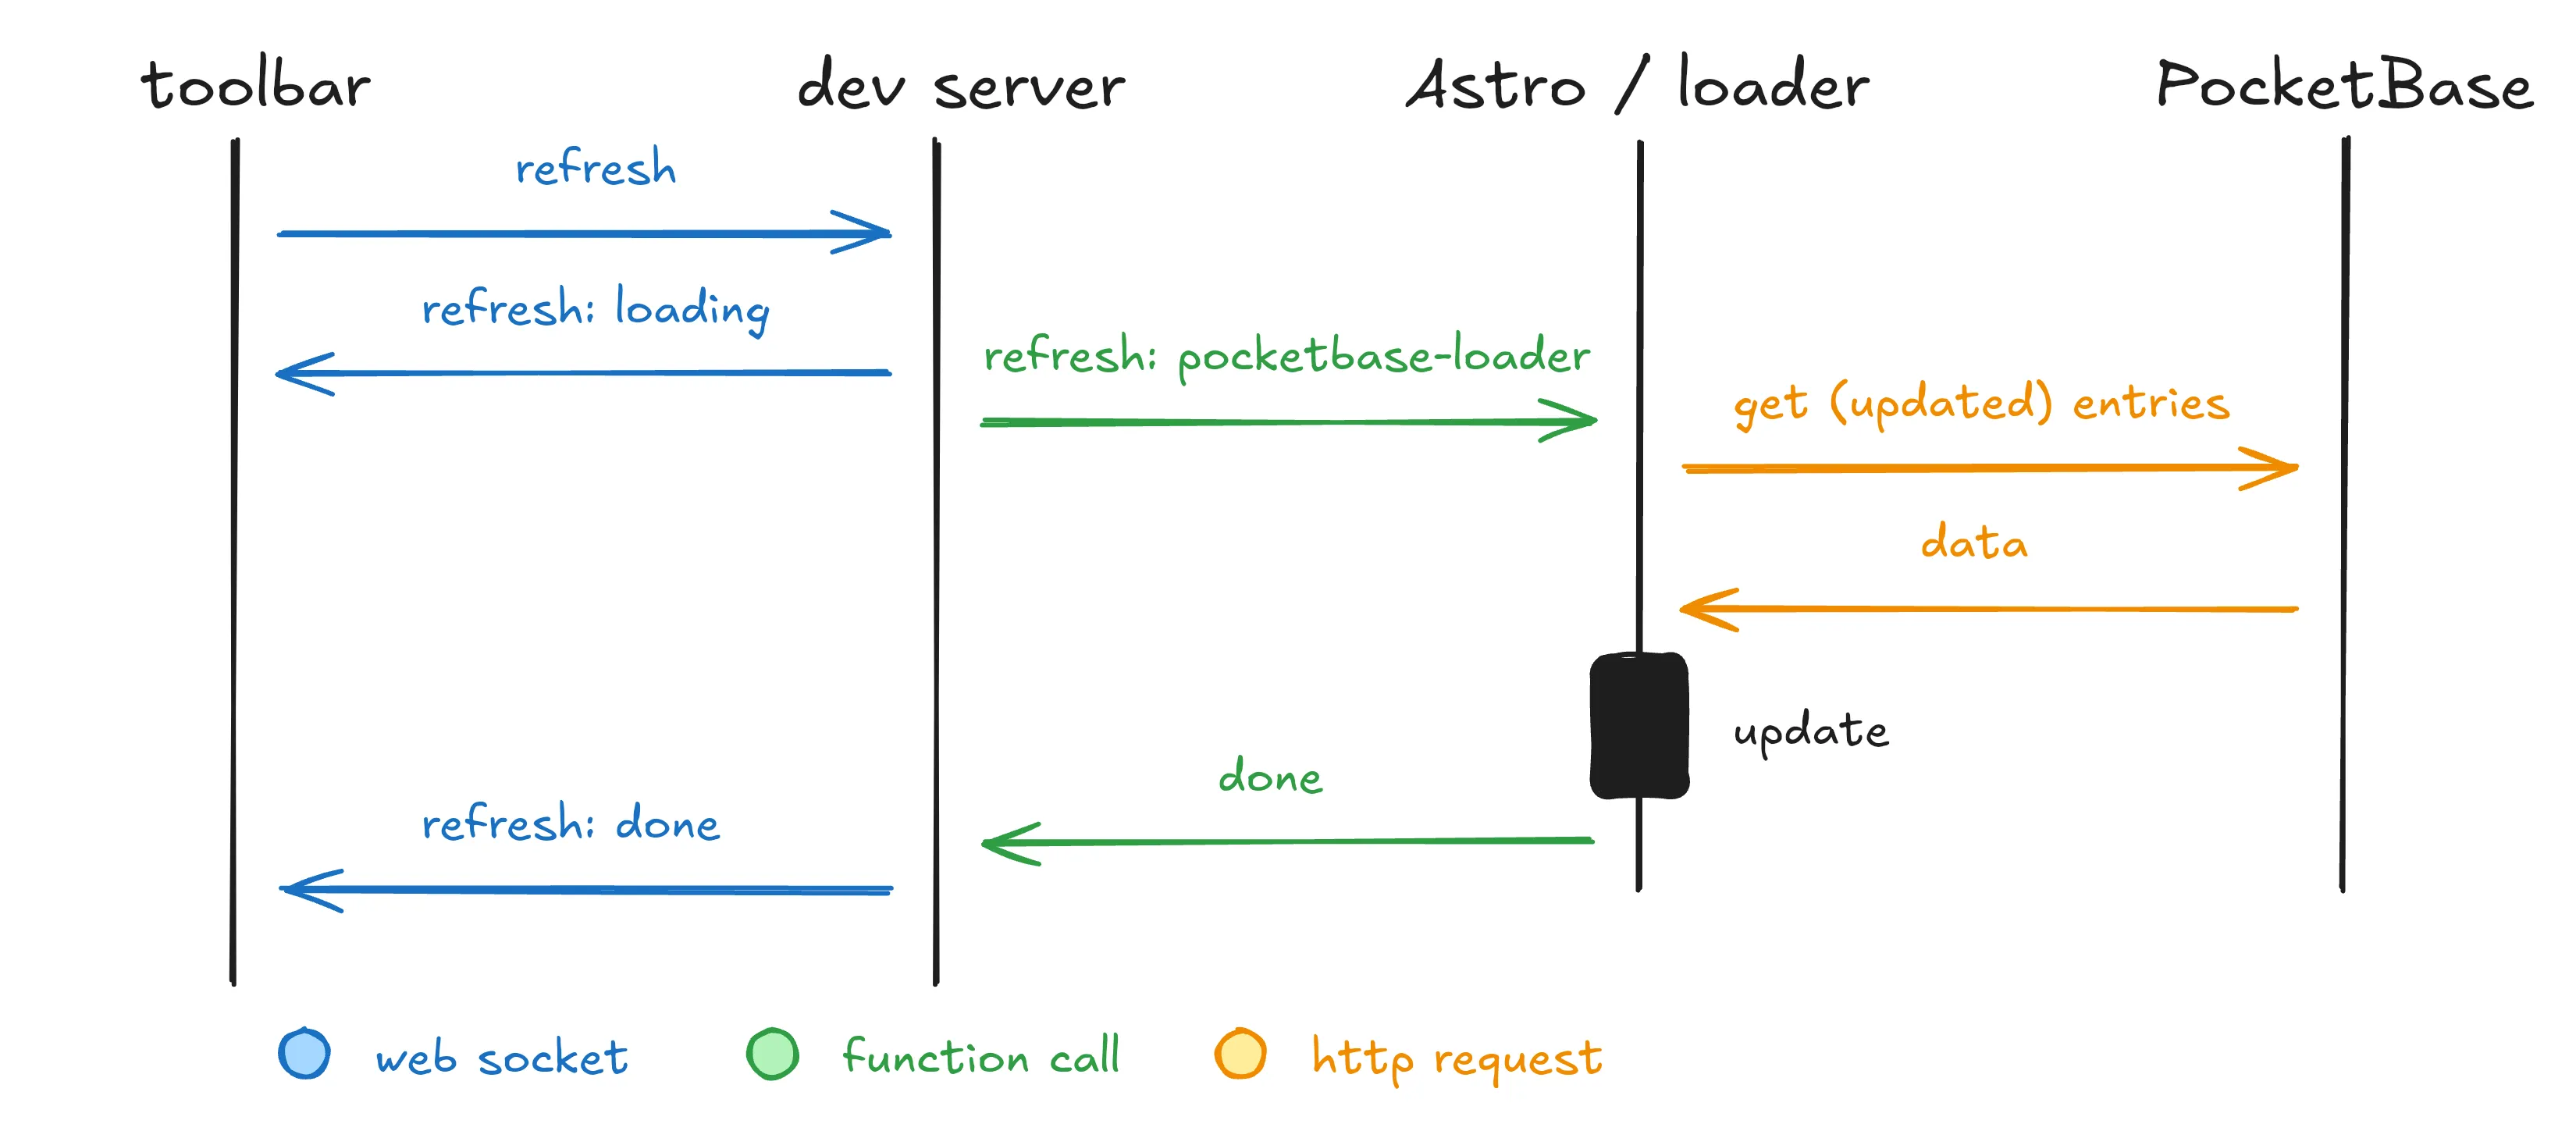
And that’s it. Now you can refresh the PocketBase entities directly from the toolbar without having to restart the dev server!

But what if this is not enough for you? What if the collection could automatically refresh when the data changes?
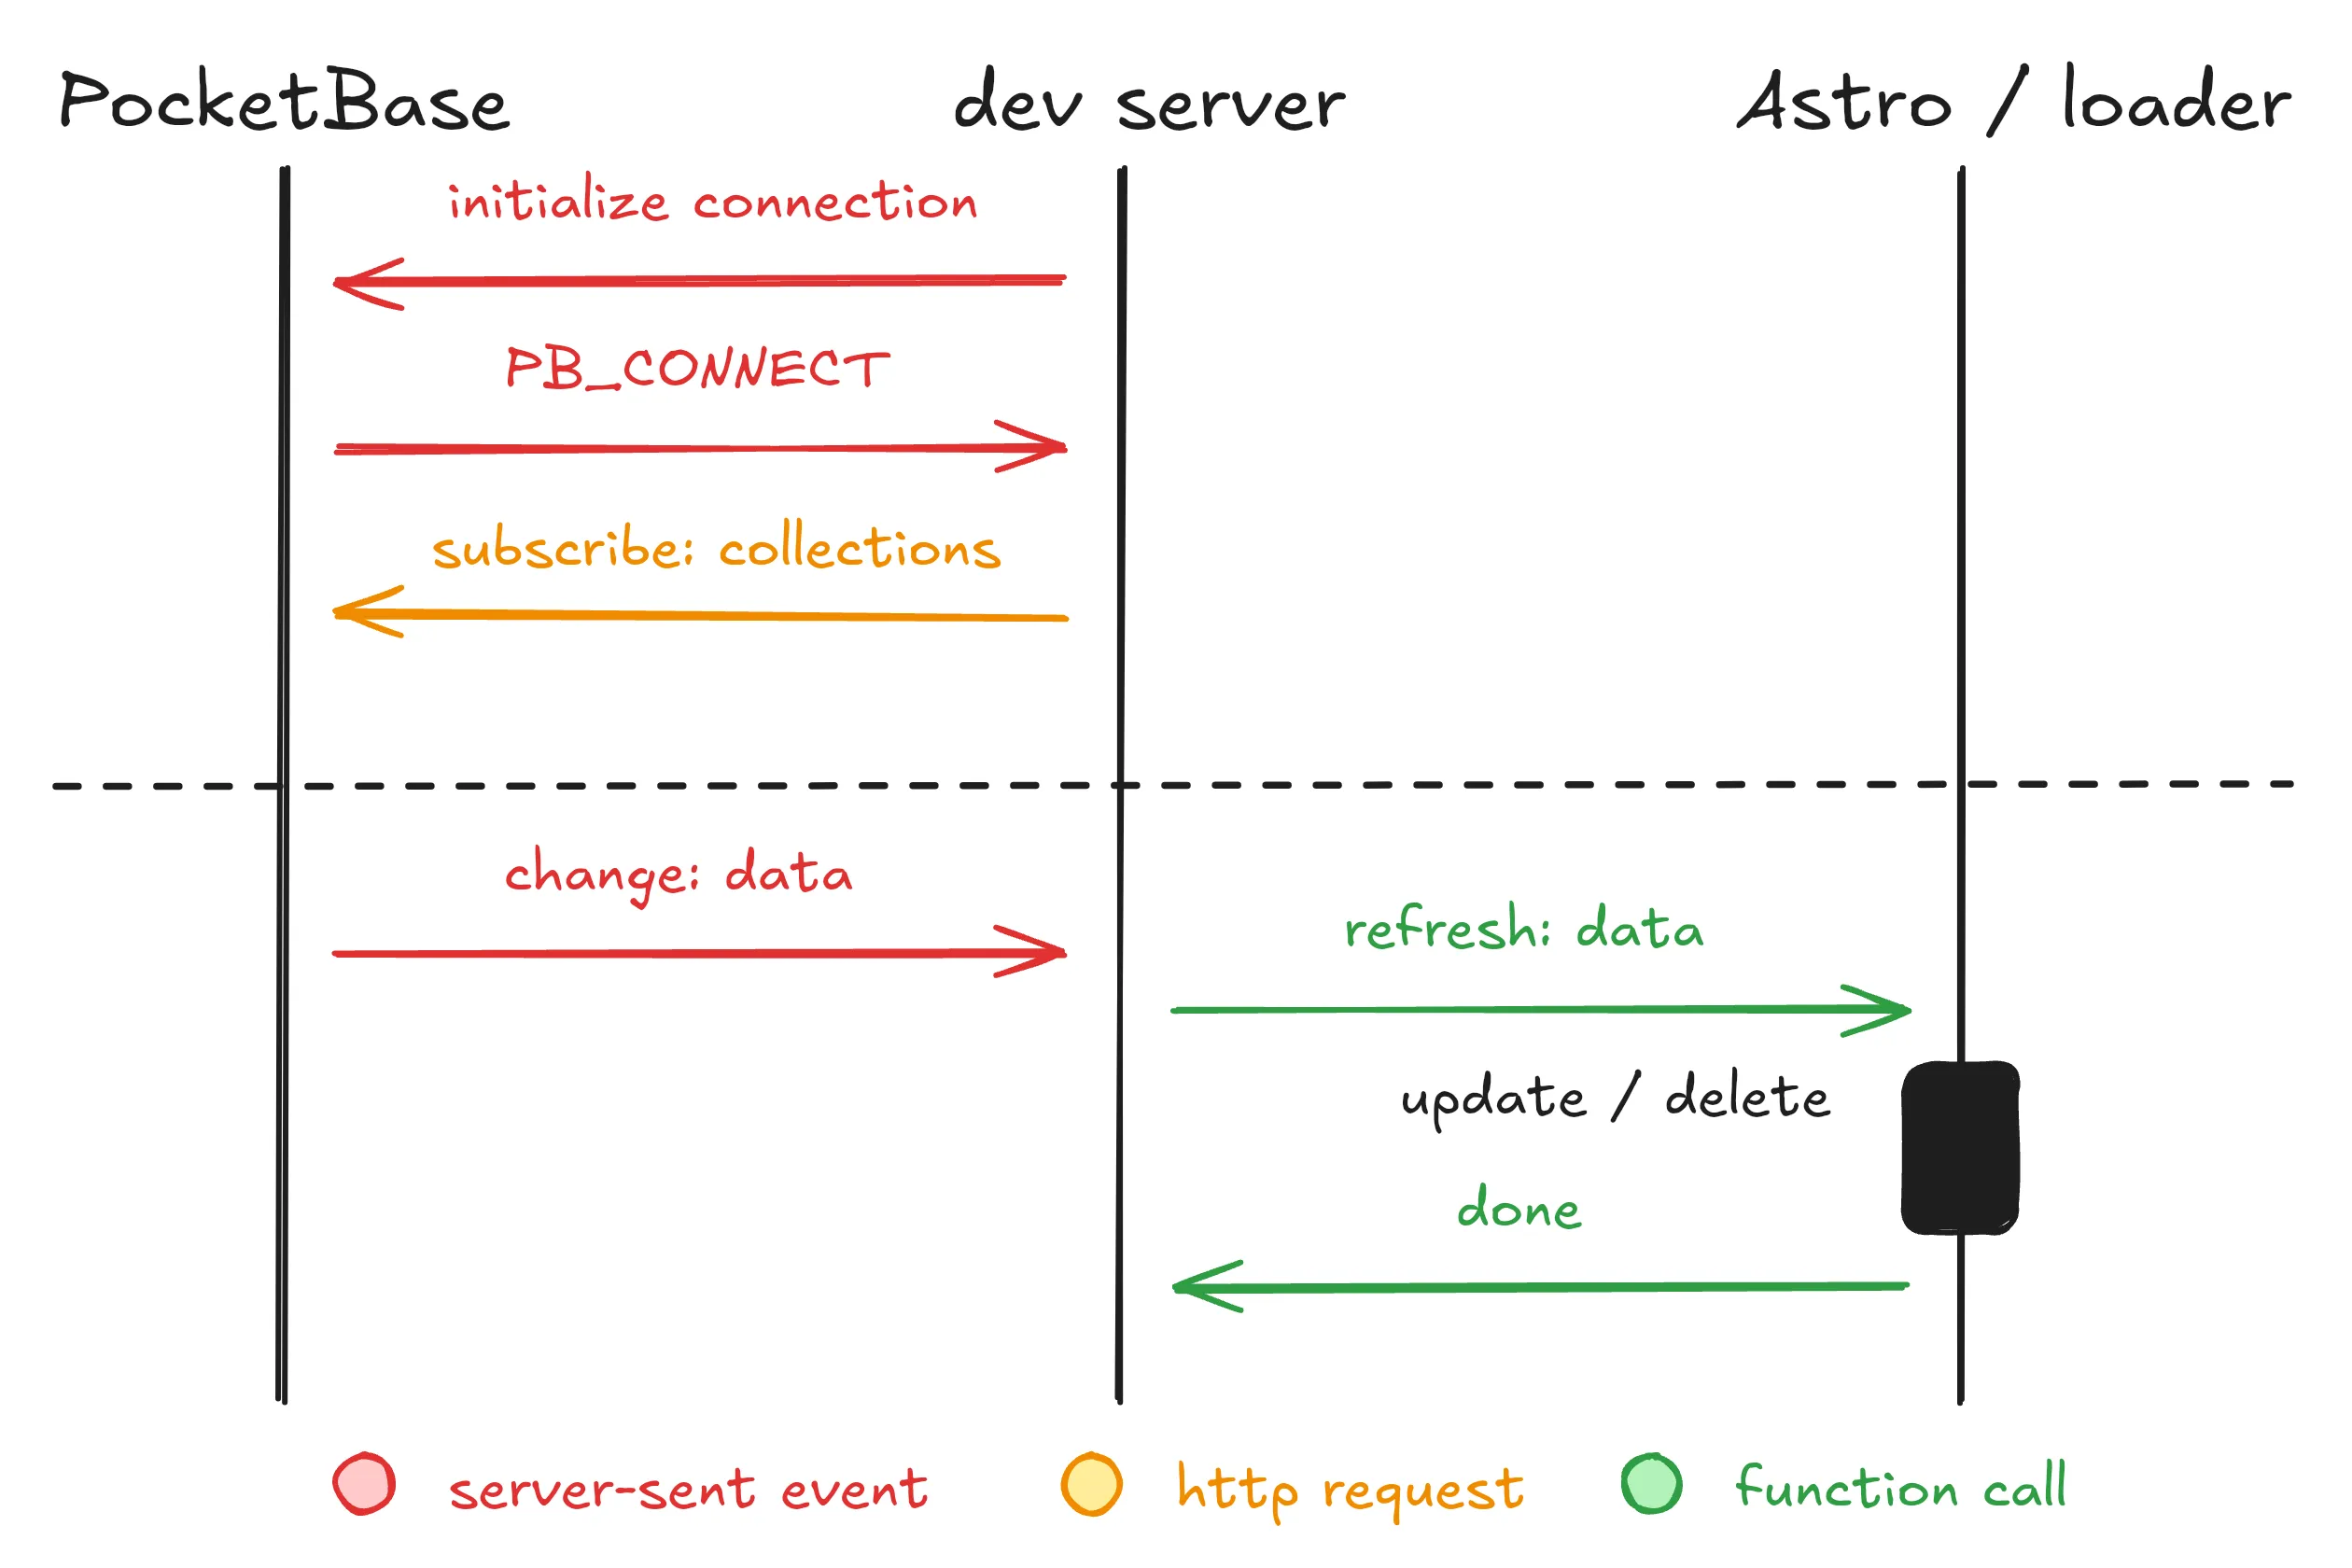
Automatically refresh entities via realtime updates
Fortunately, PocketBase provides a realtime API that allows you to subscribe to changes in your collections. The integration can use this API to automatically refresh the entities when they change, without you having to do anything. So let’s add this feature to the integration.
Receiving updates via Server-Sent Events
To enable realtime updates, the server (PocketBase) needs to tell the client (Astro dev server) when the data changes. With a simple HTTP response, this is not possible, since it only allows the client to initiate the request. So we have to use something different.
PocketBase uses Server-Sent Events (SSE) to send updates to the client. In contrast to WebSockets, SSE is a one-way communication channel, but this time from the server to the client. The client still has to initiate the connection, but the server can then send data whenever it wants.
While Server-Sent Events are around for quite some time, they are not as well-known as WebSockets (probably because of the lack of two-way communication).
Browsers support SSE out of the box, but unfortunately the Astro dev server is not a browser.
According to mdn, Node.js does not support SSE natively, which is why we have to use the eventsource package to polyfill the missing functionality.
Subscribing to updates
Initiating the connection to the PocketBase server is again done when the dev server starts.
hooks: {
  "astro:server:setup": ({ toolbar, refreshContent }): void => {
    const eventSource = new EventSource(`${url}/api/realtime`);
  }
}
We create a new EventSource with the URL to the PocketBase realtime API.
The first event that is sent by the server is the PB_CONNECT event.
This event contains a generated client id but doesn’t do anything else.
Before we will receive any other events, we have to tell PocketBase which collections we are interested in.
This happens via a normal HTTP POST request, but we have to use our freshly received client id so PocketBase knows to which connection it should send the updates.
eventSource.addEventListener("PB_CONNECT", async (event) => {
  const clientId = event.lastEventId;

  await fetch(`${url}/api/realtime`, {
    method: "POST",
    headers: {
      "Content-Type": "application/json",
    },
    body: JSON.stringify({
      clientId,
      subscriptions: collections.map((collection) => `${collection}/*`),
    }),
  });
});
Now we are connected to the PocketBase server and subscribed to the collections we want to watch for changes.
The API would also allow us to subscribe to single entities, but for this integration we just subscribe to all entities in a collection, hence the /* at the end of the collection name.
The one thing that is missing is to actually do something with the updates.
for (const collection of collections) {
  eventSource.addEventListener(`${collection}/*`, async (event) => {
    await refreshContent({
      loaders: ["pocketbase-loader"],
      context: {
        collection,
        data: JSON.parse(event.data),
      },
    });
  });
}
For each collection we subscribed to, we add a new event listener that handles incoming updates.
When such an update is received, we again call the refreshContent function for the PocketBase loader.
This time we can also provide the one collection in which the data changed and even the new data itself.
Updating the entry
Since my last post and the initial release of the loader, I also added some special handling for the context provided when refreshing the loader. This allows the loader to directly update the entities in the store without having to reload all entities. There is not even an additional request to PocketBase needed, since the received event contains all the data we need.
async function loader(context: LoaderContext): Promise<void> {
  // Check if the loader should refresh the data
  if (context.refreshContextData.collection) {
    if (context.refreshContextData.collection !== collectionName) {
      // Updated collection is not the one this loader is responsible for
      return;
    }
  }

  const data = context.refreshContextData.data;
  if (data) {
    if (data.action === "delete") {
      // Delete the entity from the store
      context.store.delete(data.record.id);
      return;
    } else {
      // Update or create the entity in the store
      await parseEntry(data.record, context);
      return;
    }
  }

  // Proceed with normal loading
}
First we need to check if the loader is even responsible for the collection that was updated. We need to do this since you can have multiple loaders for different collections in your project, each with their own context. If the collection is not the one the loader is responsible for, we can skip the update entirely.
Next we check if some data was provided. If not there is nothing we can use as a shortcut and we have to proceed with the normal loading. If data was provided, we need to check what kind of action was performed.
PocketBase sends three different actions: create, update and delete.
For the first two actions, we can just call the usual parseEntry function which will handle the data and update the store with the new data.
Handling the delete action is even easier, since we just have to delete the entity from the store.
Using the integration in your project
Now that we have built the integration, how can you use it for your own website?
As mentioned the integration is available on npm as astro-integration-pocketbase.
You can install it in your project using your preferred package manager:
npm install -D astro-integration-pocketbaseThen you need to configure the integration in your Astro project in the astro.config.mjs file:
import { pocketbaseIntegration } from "astro-integration-pocketbase";
import { defineConfig } from "astro/config";

export default defineConfig({
  integrations: [
    pocketbaseIntegration({
      url: "<your-pocketbase-url>",
      collectionsToWatch: ["<collection-name>"],
    }),
  ],
});
All you need to start with is the url to your PocketBase instance so the integration can connect to the realtime API and the “View in PocketBase” button knows where to send you. To enable the automatic refresh of entities, you also can provide a configuration of collections you want to watch for changes. In this example, I’m just passing an array with one collection, but you can check the documentation in the Readme for more advanced configurations.
And that’s it! When you start your dev server, you should see the PocketBase icon in the toolbar. When a PocketBase entity is used on the page and passed as a prop, you can see the raw entity in the toolbar window, along some other buttons and toggles to control the integration.
Conclusion
Building this integration was, like building the loader, a lot of fun. I learned a lot about how Astro and the different hooks, toolbar and middleware work together, how the communication between the dev server, the toolbar and the loader can be handled and how to use Server-Sent Events to get the realtime updates from PocketBase. Big thanks to Kibet Ishmael for the initial implementation of the SSE handling, which makes the whole integration feel like magic.
While it is super easy to build the integration and communicate between the different parts, creating the toolbar was the most challenging part. I’m used to building frontend applications with Angular, where you have a lot of tools and components available to build complex UIs. You don’t have to think about DOM manipulation, since you only declare your templates and the framework does the rest.
Building the toolbar for Astro was a completely different experience. While you can build the UI using HTML and CSS, binding events and updating ht DOM is a lot more work. But it is nice to have some predefined elements to use, so your toolbar looks like other native Astro toolbars.
One thing that was really annoying though was the whole toolbar window management. While you can e.g. listen to changes to the position of the toolbar, you don’t get the initial position and have to read it from local storage yourself. I even opted for a completely different approach an researched how the built-in toolbar does it. Turns out there are some internal functions to manage this state, which you can use, but they are not documented and I don’t believe they are for public use. So be aware of some of these limitations when building your own toolbar.
But if you want to use this finished integration in your own project, you can find the source code on GitHub and the package on npm. I’ve only covered a small part of the code in this post, so I highly recommend you to check out the full source code to see how everything works together. If you notice any bugs or have a new feature in mind, feel free to open an issue on GitHub or even create a pull request with your changes. I’m always happy to get feedback, am open to contributions and exited to see what you build with the integration.
Footnotes
-
We later found that we still need to check if the content is actually HTML before we add the script tag. Otherwise binary files like images would get corrupted. I left it out in the example though, to not overcomplicate the code. Back to the content