Building a modern e-learning website
- Published on
- Reading time
- 19 min read
- Category
- Under the Hood
In June 2023 I published a website for latin teaching material in cooperation with the department of classical philology at the university of Würzburg called “Forum für Antike und Gesellschaft”. The website features texts, videos, podcasts, interactive exercises and worksheets to every material and is used by students and teachers all over Germany.

In this article I want to share my experiences and learnings from this project. We will talk about the technical setup and decisions behind the tech stack and how the website and other components works behind the scenes. Even though “just building a website” sounds simple, there were a lot of challenges and decisions to make. Especially when it comes to hosting the website together with running the database and streaming video and podcast files.
About the project
Before we dive into the tech stack and how the website works, let’s talk about the project itself. The website contains a lot of different content, which is created by different authors from the university. The content ranges from original texts and translations, to videos and podcasts talking with experts about the topics, to interactive exercises like quizzes and maps. In addition, there are worksheets for nearly every material, which can be downloaded by teachers and students. All of this content is available for free and can be used by everyone, without the need to register an account.
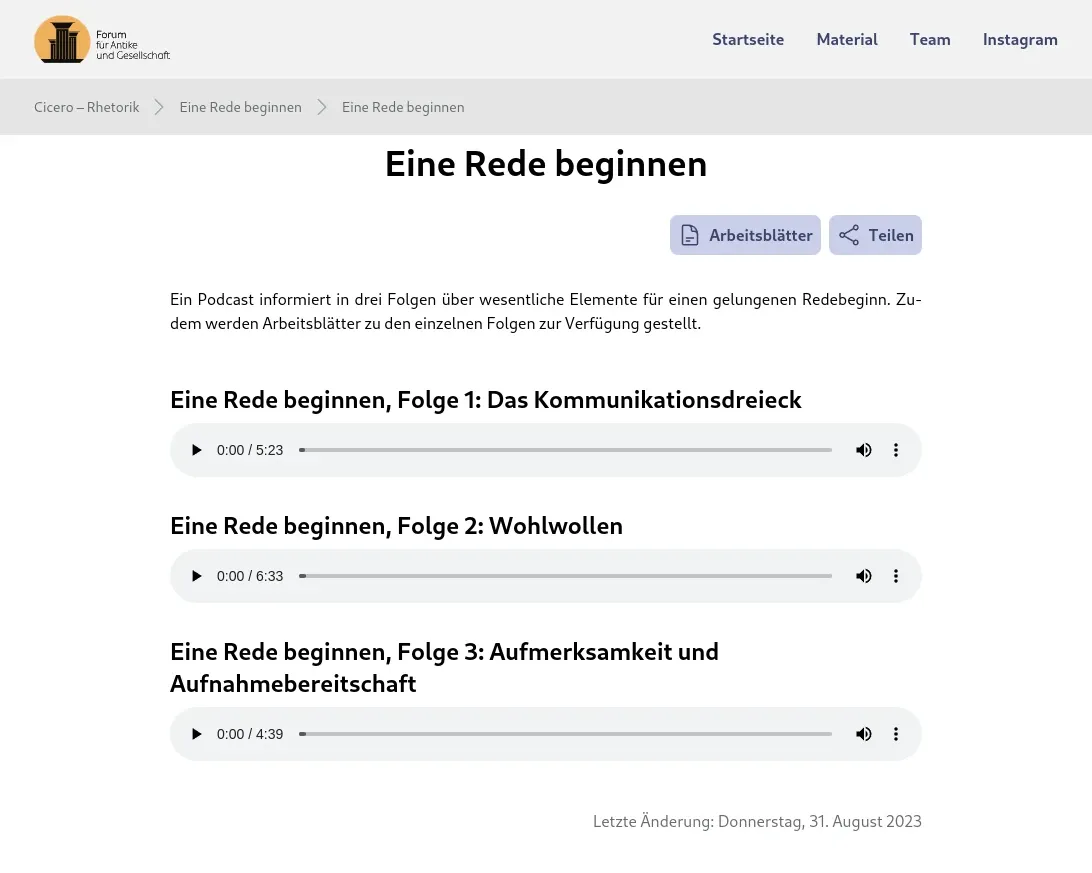
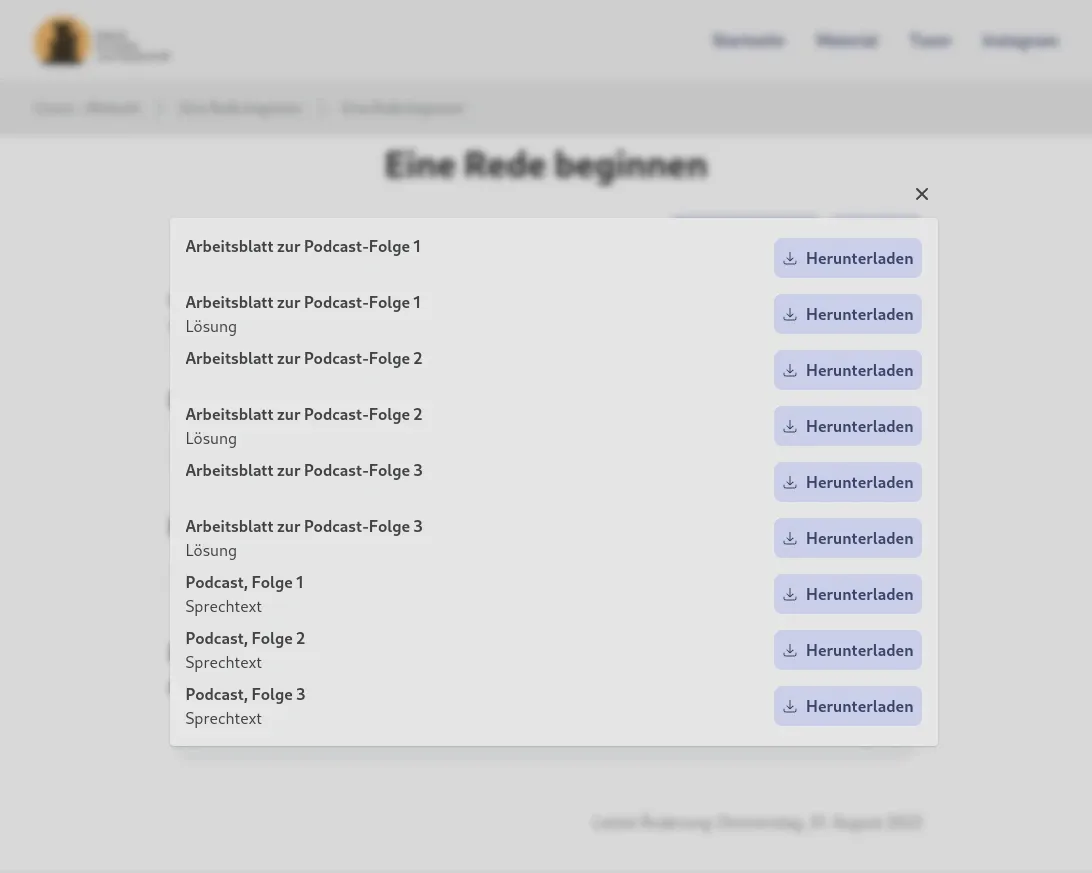
With all this in mind, here are the main requirements for the website:
- The website should be easy to use and modify for the authors, who are not developers.
- The website should be fast and reliable, even when used by a whole class at once.
- Watching videos and listening to podcasts should be done directly on the website, without the need to download the files first.
- The website needs to be optimized for search engines, so that more people can find it when searching for latin teaching material.
What is the tech stack?
Now that we know what the requirements for the project are, let’s talk about the tech stack and the decisions behind it.
Frontend
Since I am a web developer, I decided to build the website completely from scratch, not using any website builders or content management systems. This way, I have full control over the website and can optimize it for the requirements of the project. Today, there are three main ways to architect a website:
- Static site generation (SSG),
- Server side rendering (SSR) or
- Client side rendering (CSR).
If you want to know more about the differences between these three models, I recommend this portion of another article I wrote. There are still some other ways to architect a website, but these are the most common ones today.
SSG was not an option for me, because I wanted the authors of the website to be able to edit the content without having to know how to code or rebuild the website after every change. SSR could have been an option, but I wanted to stress the server as little as possible when the website is used by a whole class at once. This left me with CSR, with a little twist, but more on that later. Since I am very familiar with Angular from my day job and other projects, I decided to go with Angular for this project as well. Angular is a great framework for building large scale applications and it has a lot of features that make it easy to build a maintainable and scalable application. With all this I was able to build the frontend of the website in just a few weeks.
Having such a content heavy website, I wanted to squeeze every bit of search engine optimization (SEO) out of it.
Angular is (or at least was) not the best framework for SEO, because it renders the website on the client side / in the browser.
Being a single page application (SPA) at its core, search engines have a harder time to index the website, because they can’t see the content directly when they crawl the website (even though major search engines are getting better at this).
This is why I decided to add Angular Universal (this was still in the Angular 16 days) to the project.
It is a SSR engine for Angular that renders the website on the server and sends the rendered HTML to the client, which is then hydrated by Angular.
This makes SEO a lot easier, but also improves the website’s performance and makes features like rich link previews possible.
Since Angular 17 was released in November 2023, Angular now supports server side rendering out of the box with the @angular/ssr package, so I don’t need Angular Universal anymore.
This hybrid approach of SSR and CSR is a great way to combine the best of both worlds. Low server load and fast initial load times, but also a great user experience with fast navigation and search engine optimization.
Other frontend libraries I used are:
- Tailwind CSS, which makes styling a lot easier and faster
- Ng Icons with Heroicons and Simple Icons, which together provide all the icons I need
Backend
Hosting all the components
The goal for the backend was to have all components hosted on a single machine. Hosting the website in the universities own data center was to expensive. Instead I opted for a VPS by IONOS (since I worked with their products in the past), running the latest Ubuntu Server. It’s really cheap and has more than enough computing power for our use case.
Managing the services
To keep the server side rendering and other services running I used a tool called PM2. This is a daemon process manager mainly used for Node.js applications. It’s perfect for us, since a server-side Angular project is basically a Node.js application under the hood. With this setup, the website keeps always running and restarts automatically if it crashes or I update the code (you can read more about my automated deployment strategy in this post). I even added a plugin to enable autoscaling called “PM2-Autoscale”, even though I doubt that it ever has to spawn more processes. Using Docker would have been an option as well, but nearly all of the services I use are not containerized and simple node applications, so I decided to keep it simple.

Handling incoming requests
To manage the incoming requests and route them to the right component, I used Nginx. It’s a really powerful web server that is easy to configure. First of all, it’s used as a reverse proxy to forward the incoming requests to the right services depending on their subdomains. In addition to that, Nginx handles the SSL encryption in one central place, so I don’t have to configure it for every service separately. Another great feature of Nginx is the build-in caching. Since the website is the same for every user, I can cache all the responses for a few minutes and only have to render it once. This way, the load on the server-side rendering is reduced and the website loads significantly faster on recurring requests. Invalidating the cache is not a big problem, since the content of the website doesn’t change that often. On the other hand, requests going directly to the API are not cached to always be up to date. Our API responds really fast, so there is no need to cache it. Nginx also does one more thing but more on that later.
Next up is the database.
Storing (most of) the data
For storing (most of) the data, I used PocketBase. It’s a database / backend as a service (BaaS) that is built with Go and on top of SQLite. Even though it hasn’t had its first stable release yet, I decided to use it. The underlying technology is battle tested and I don’t need any custom features besides storing and retrieving data. Alternatively I could have used a “real” database like PostgreSQL together with a custom backend or another BaaS like Supabase. But PocketBase is really easy to setup and uses nearly no resources, so it was the perfect fit for this project. All authors of the website have their own administrator account and can edit their content through the integrated admin dashboard. Since the user interface is really simple for managing a database, it was easy to teach the authors how to use it and I don’t have to implement a custom editor for the website.
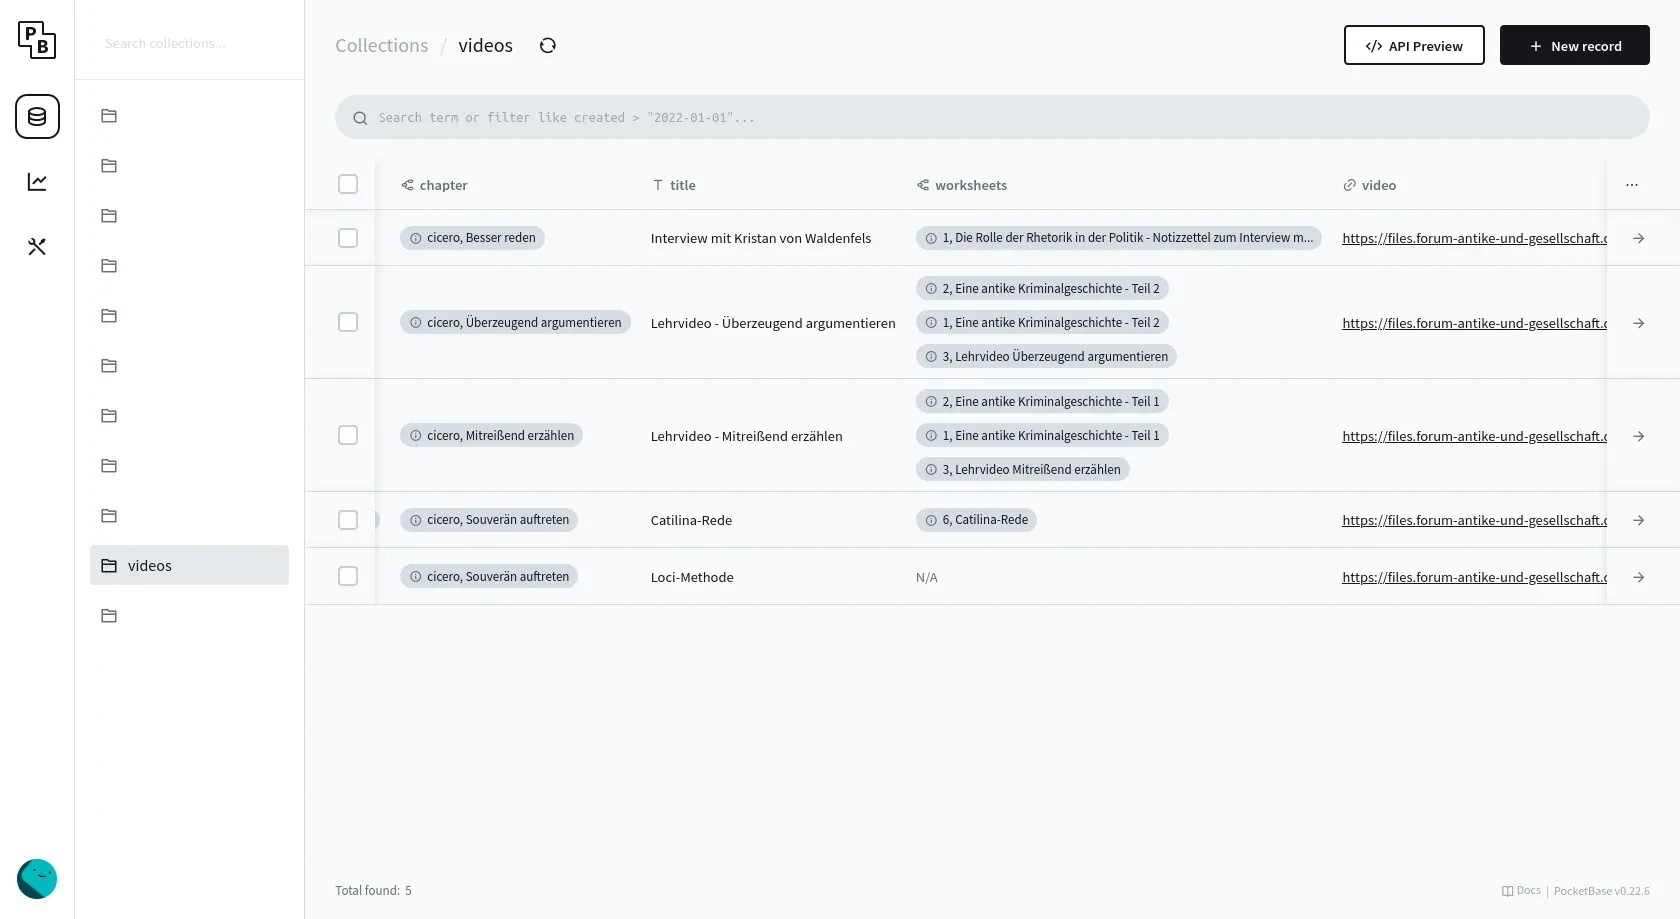
Besides just storing text data, PocketBase also supports storing files, which is perfect for all the worksheets that are available for download on the website. And before you ask, no, the files are not stored in the database directly, but on the file system and are then referenced by PocketBase in the background.
For larger files like videos and podcasts, I had another solution in mind.
Storing larger files
Since storing and delivering larger files like videos and podcasts can be a bit tricky, I decided to use Nginx for this. Instead of only using it as a reverse proxy for the other services and for caching, I also use it as a file server. All of the podcast and video files are stored in a shared folder on the server and are then delivered by Nginx. This allowed me to optimize the video playback experience using the ngx_http_mp4_module.
This module allows me to provide the files as a pseudo streaming service, which means that the video player can seek through the video without having to download the whole file. This is especially useful for the videos, since they are quite big and the user doesn’t have to wait for the whole video to download before they can start watching it. In addition to that, the browser first loads only the metadata of the video, to display the thumbnail and information like the duration of the video.
One could argue that using a CDN would be a better solution for this, but since the website is only used in Germany and the server is located here as well, the latency is not a big problem. Since we have enough storage for the files and the server is not under heavy load, we saved a lot of money by not using a CDN. Using YouTube for this streaming infrastructure would be nice as well (since it’s free, fast and provides multiple bitrates). But some interviewees were not comfortable with their content being on YouTube, and so we created this custom solution.
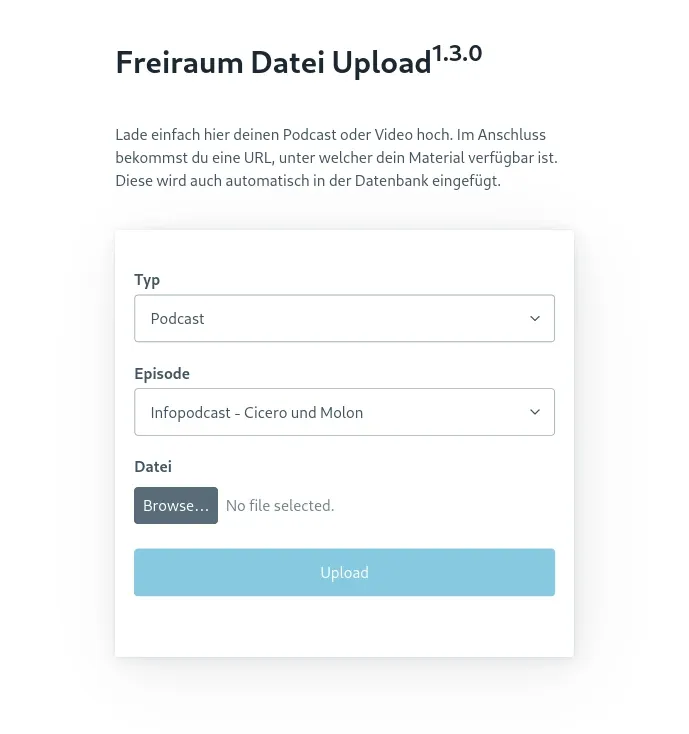
To upload the files to the server, I built a custom micro-service called “forum-files”. It’s just a simple express server that accepts file uploads from a simple dashboard and saves them to the shared folder. This way, the authors can upload the files themselves and I don’t have to do it for them with FTP, scp or something similar. In this custom dashboard, I also used the PocketBase SDK to first load a list of all the materials to select the right one for the file upload. After the file is uploaded, the file path gets automatically saved in the database and the file is already available on the website.
Generating thumbnails
The one thing left for the best user experience and SEO is was to generate thumbnails for each material. Since we want the users to share links to the website on social media and other messaging platforms, we need to provide rich link previews (see Open Graph protocol). This allows other users to see a small preview of the content like the title, a short description or an image. We already have the title and description in the database, but we need an image for the preview. Of course a designer could have created a custom thumbnail for each materia, but this would have been a lot of work and is not really scalable.
Instead I decided to generate the thumbnails automatically on demand. For this I build a custom open-graph image generator using Astro, Satori and Sharp (more on that in a future post). This way, when a user shares a link to the website, we embed some link metadata in the HTML like the following:
https://open-graph.forum-antike-und-gesellschaft.de/og-image.png?subtitle=Hello%20Blog!When the first user loads the message containing a link to the website, the social media platform makes a request to this URL and gets the image. The image is then generated on the fly and sent back to the client. The next user that views the same link gets the same image, since we internally save the generated image by hashing the query parameters. This way we don’t have to generate the same image multiple times and the server is not stressed by generating the same image over and over again when (hopefully) a lot of users see the shared link.
And the image from the URL above looks like this (live preview and not a static image):

With all of this in place, the website is ready to be used by students and teachers all over Germany. But how many people are actually using the website?
Collecting statistics about the usage
To get a rough estimate of how many people are using the website, I use Matomo. It’s a self hosted analytics tool similar to Google Analytics, but without any privacy concerns (which is important for a website intended for use in schools). Matomo is really easy to integrate using a npm package and provides all the features I need for free. I also use it for this blog and my other projects, so it was an easy choice for me.
With this, we have an overview over how many people are using the website, which content is the most popular and what else is needed to make the website even better.
The complete tech stack
To sum it up, here is the complete tech stack of the website:
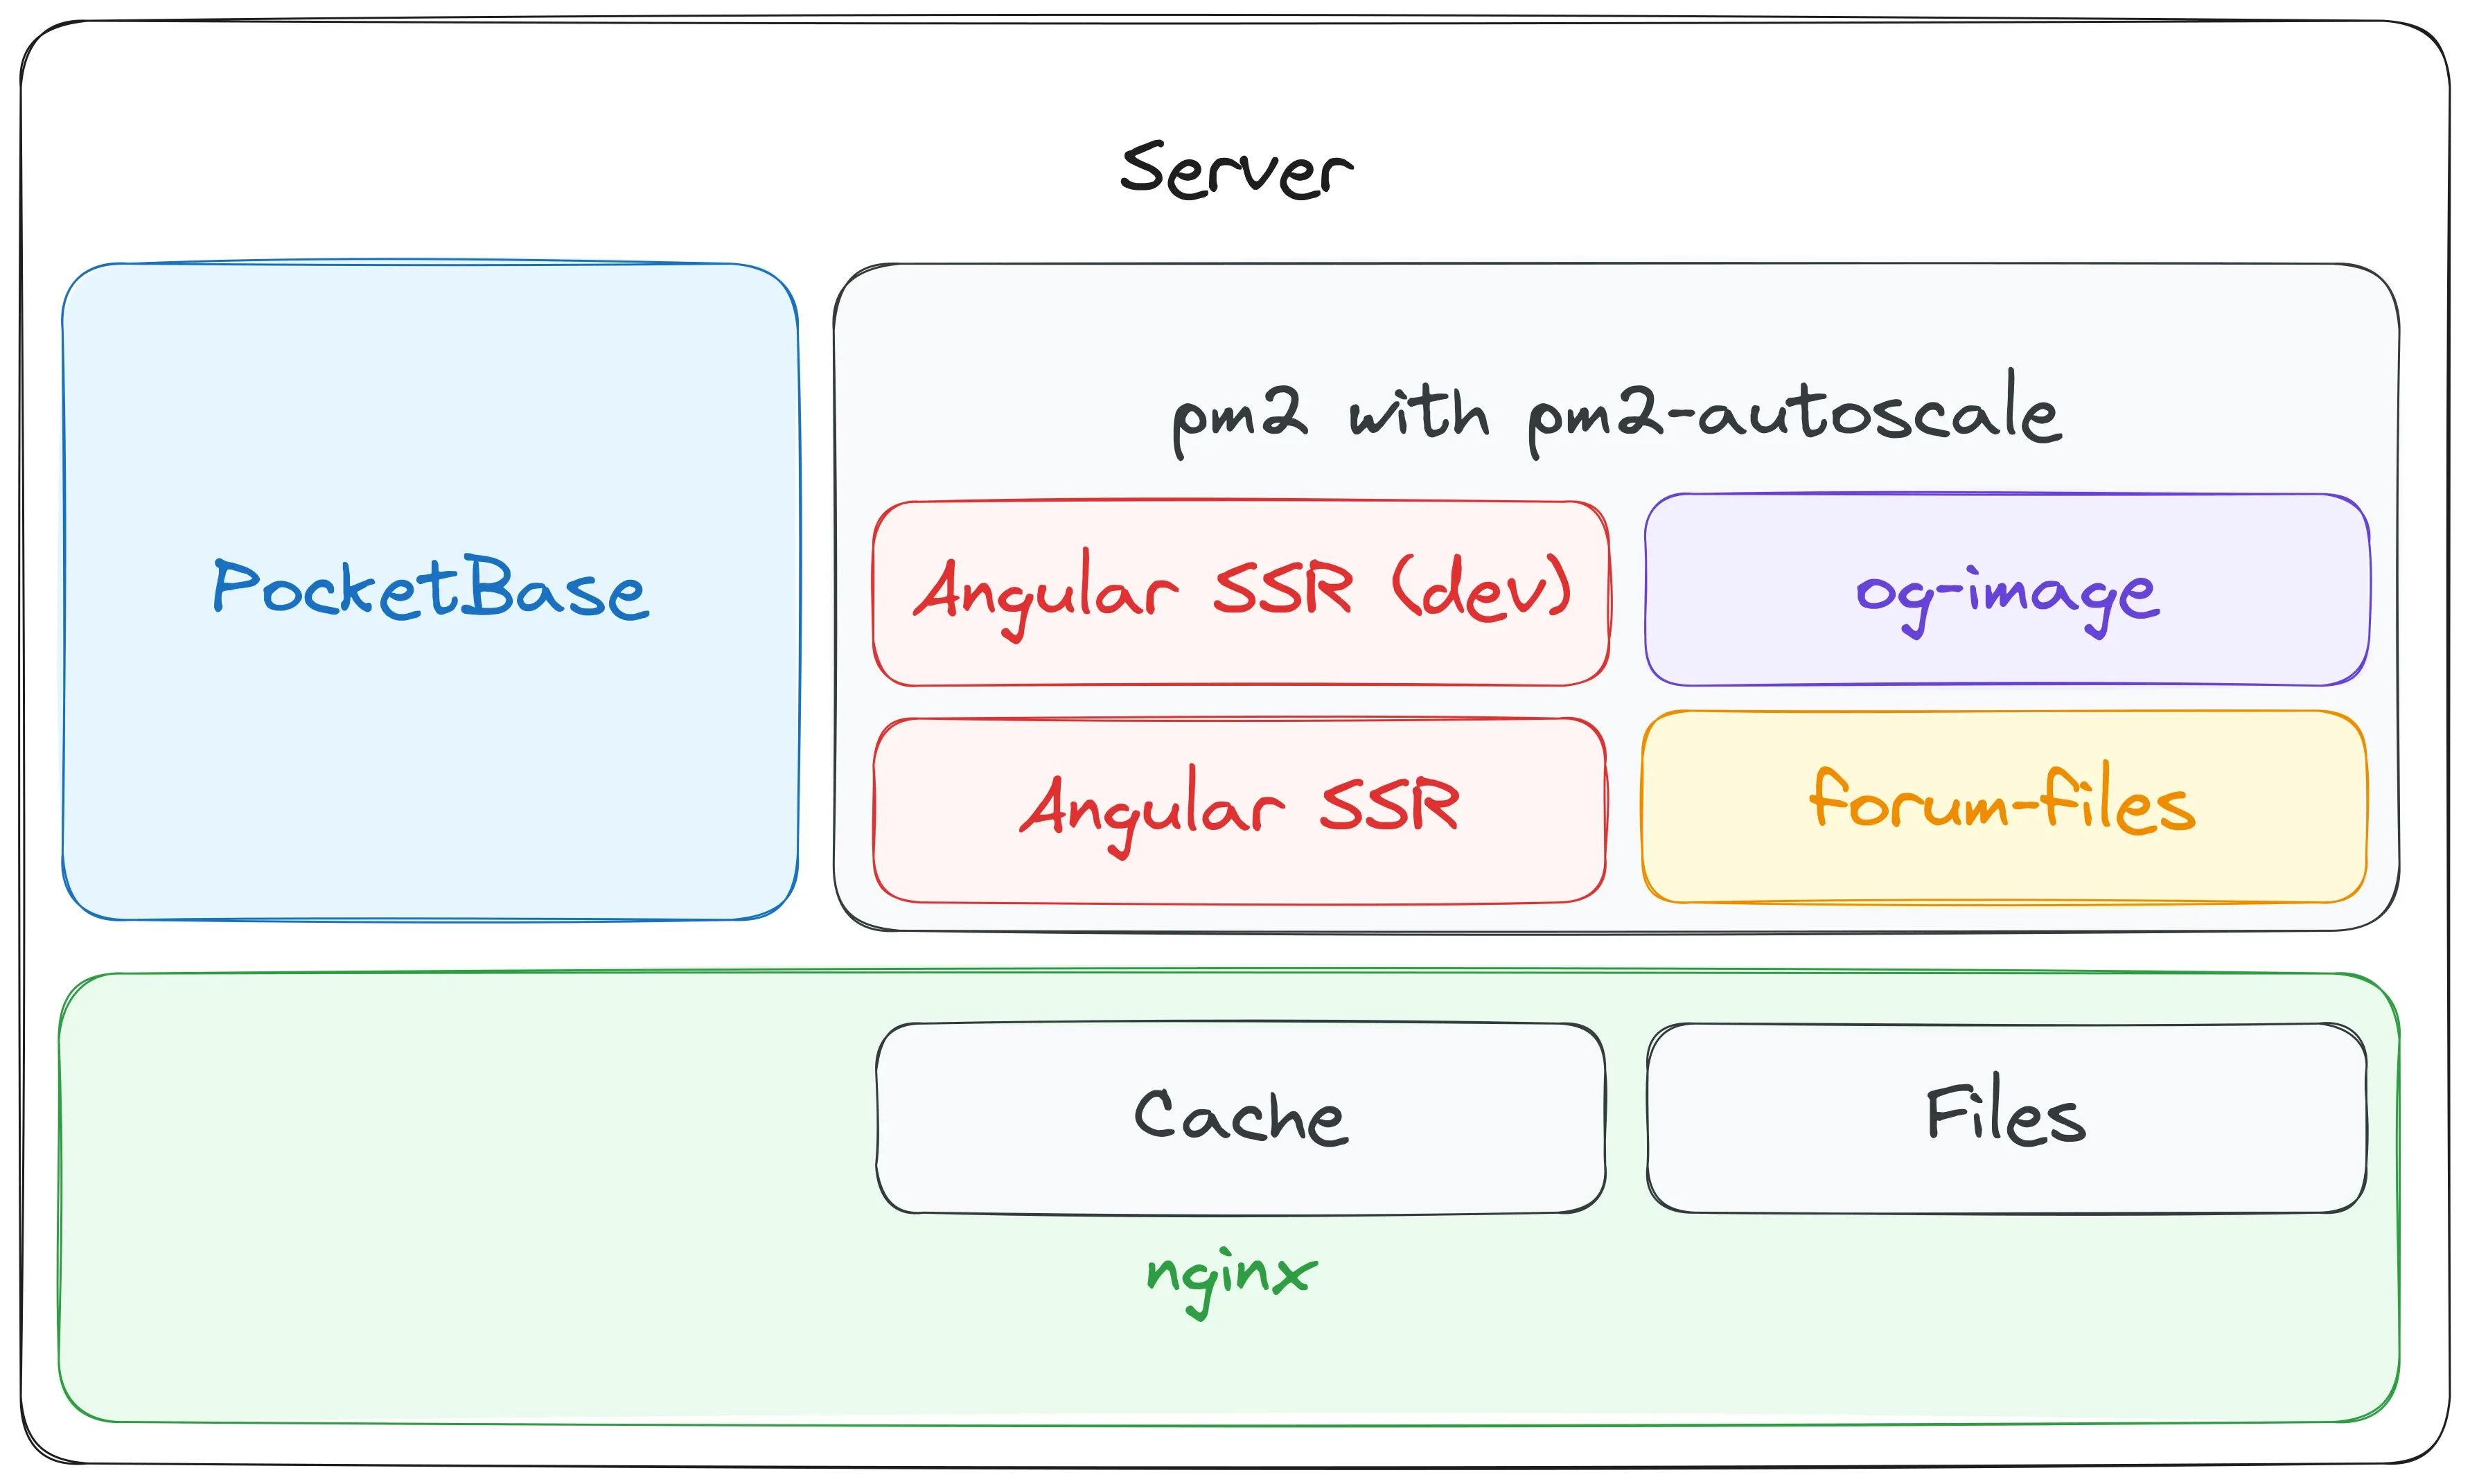
- Nginx as a reverse proxy, cache and file server
- PocketBase as a database and Backend as a Service
- PM2 as a process manager to scale and keep the node applications running
- Angular SSR for server side rendering (also running a second dev-instance for internal feature previews)
- forum-files as a custom micro-service for uploading video and podcast files
- og-image as a custom micro-service for generating open-graph images
- Matomo for creating anonymized statistics (running on a separate server)
Now that we know what the tech stack is, let’s talk about how the website works. How do the different components work together in different scenarios?
How does the website work?
Page visits and hydration
The most common scenario is when a user visits the website. When the user enters the URL in the browser and hits enter, the request is sent to the server. Nginx receives this request and checks if the requested page is already in the cache. In this first example the cache is empty, so the request gets forwarded to the Angular SSR service. Angular starts to render the page and (in most cases) queries some data from PocketBase. The data is then rendered into the HTML and when finished sent back to Nginx. Nginx writes the response into the integrated cache for recurring requests. After everything is done, the HTML gets sent to the user’s browser where the website gets displayed.
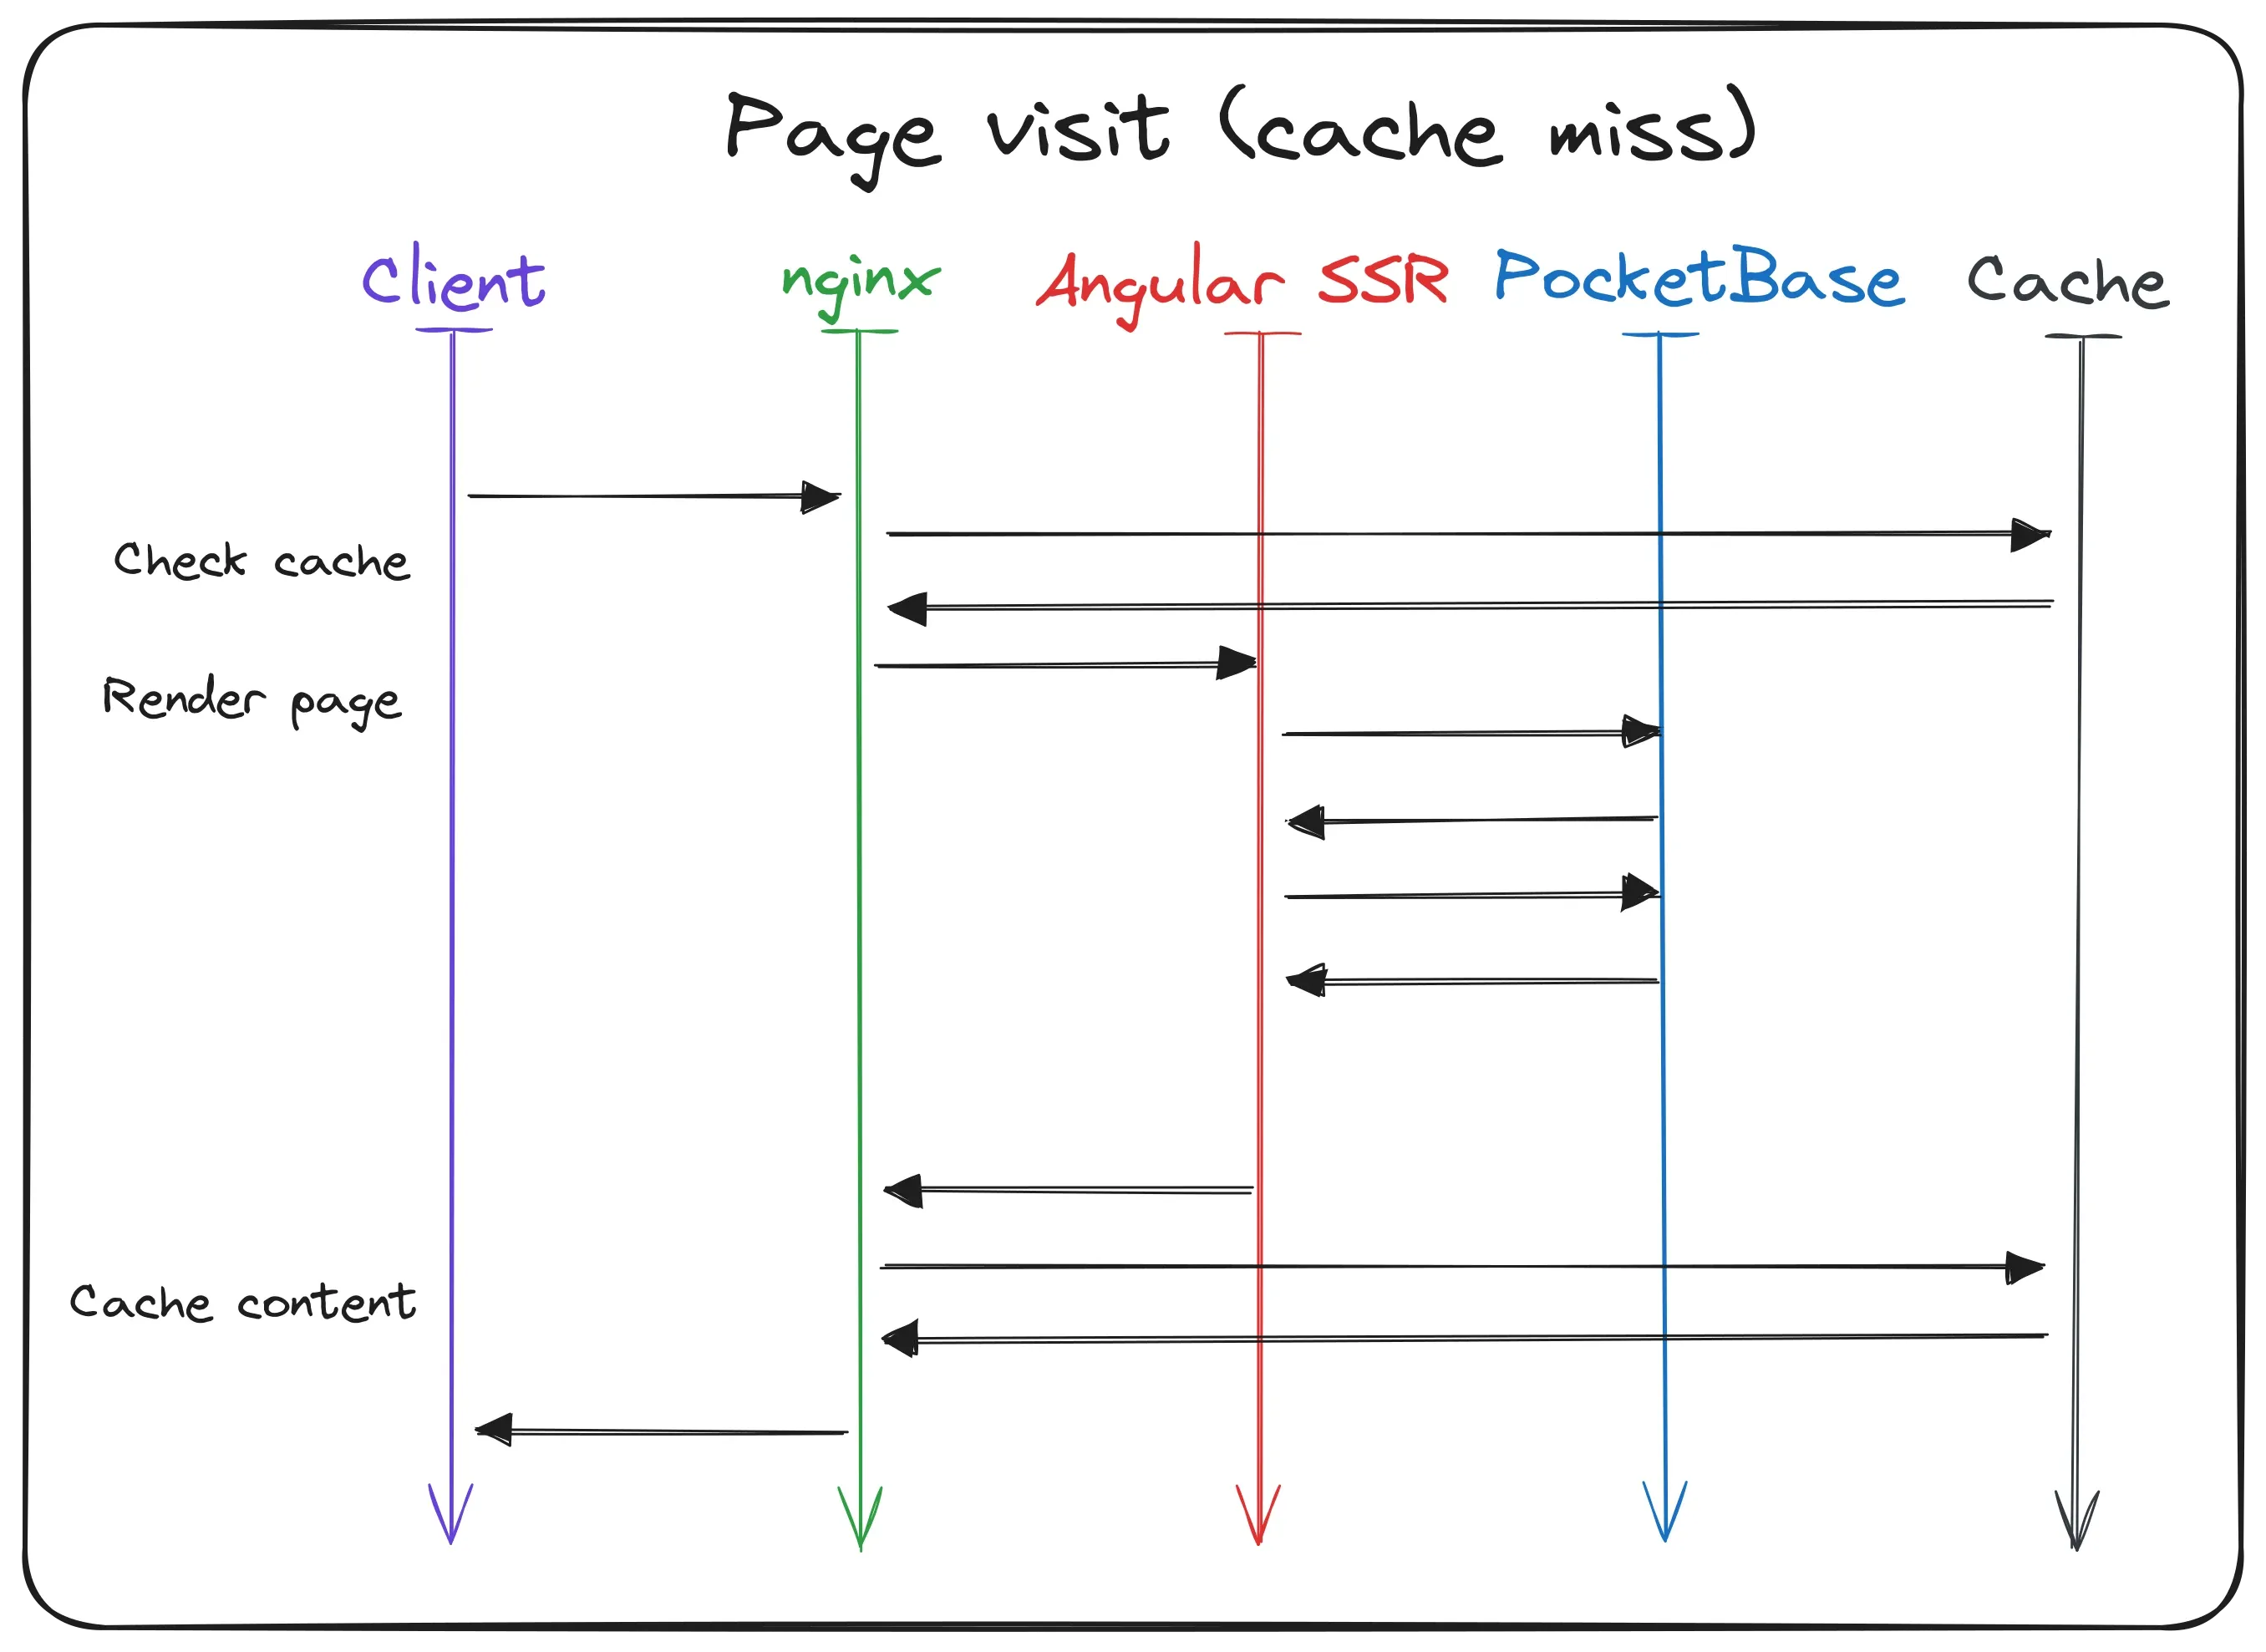
When the initial load is done, the browser gets to work. It starts to download all the assets like images, stylesheets and the Angular chunks. When everything is loaded, Angular takes over and hydrates the website. In this hydration process, the browser builds the whole website again like the server did to check if everything is correct. In most cases, this is the case and the website is ready for user interaction. If there are any errors, Angular will try to fix them and replaces the wrong parts of the website.
But doesn’t this mean that Angular also has to call the PocketBase API to retrieve the same data again? Yes, but actually no.
Since the data was already requested by the server, we can just serialize it and put it into the HTML response.
This way, the Angular client can just read the data from the HTML and does not call the API again.
In fact, Angular has this feature already built in and it’s called TransferState.
This normally only works for requests that are made through Angular’s HttpClient, but the PocketBase SDK is framework agnostic and works with the fetch-API.
To make this work, I had to write a custom fetch method and provide it to the PocketBase SDK so that the requests are made through Angular.
Now the data is available like it should and the server is not stressed through unnecessary duplicate requests.
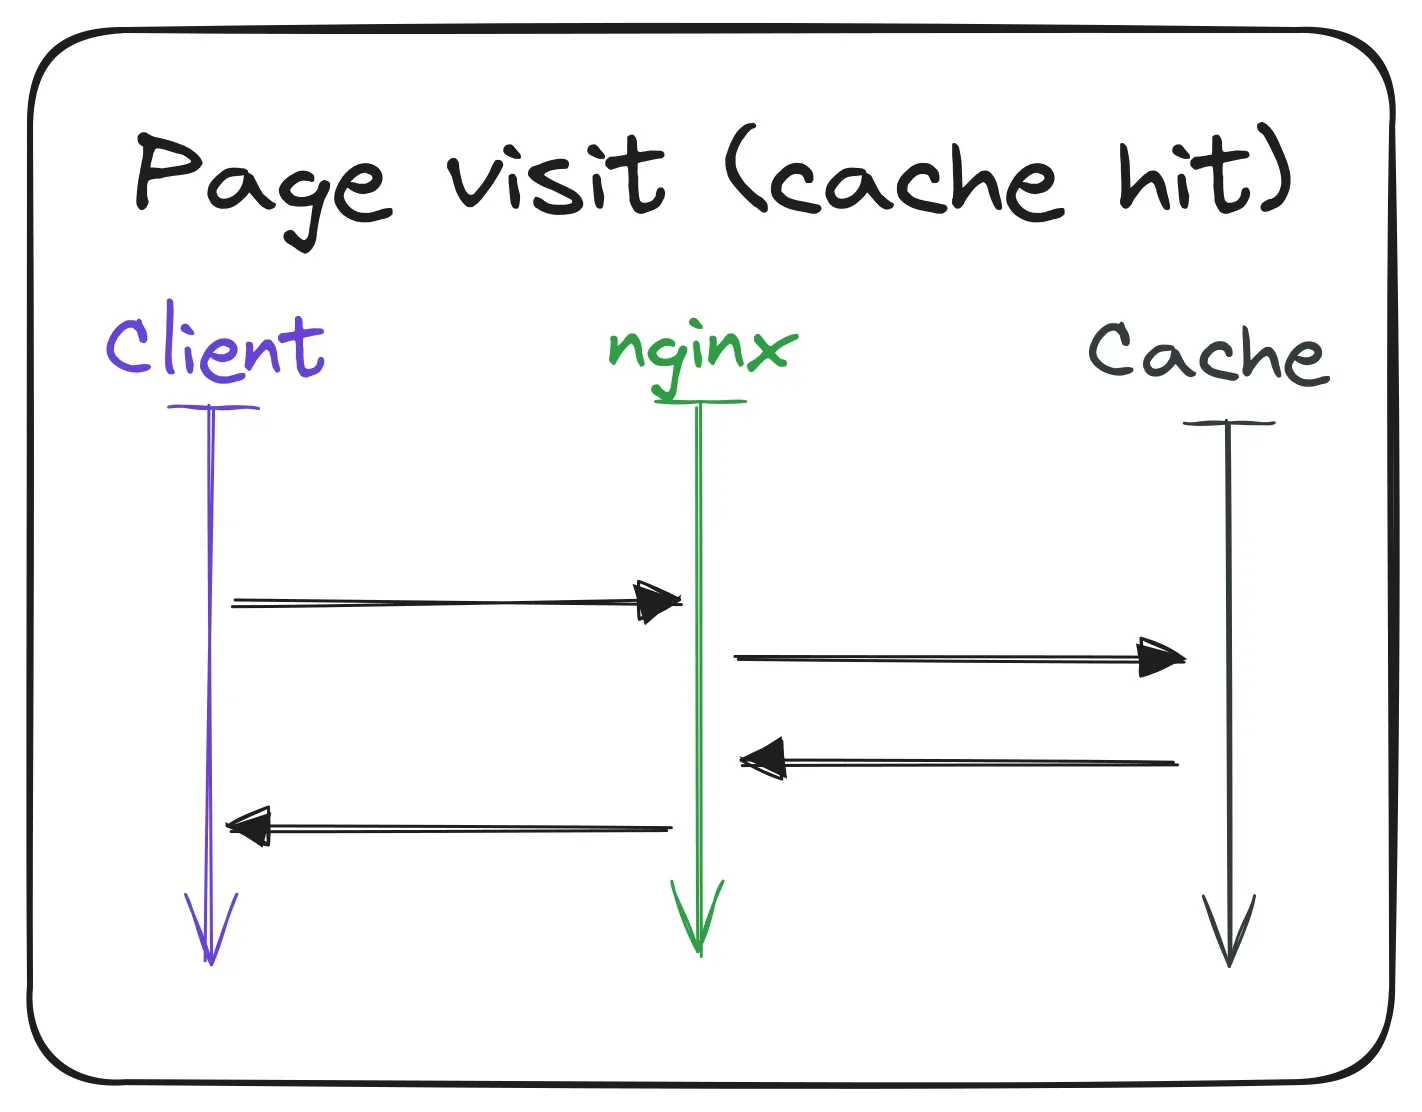
Now that that’s clear, let’s see what happens when another user visits the same page. The request is sent to the server again, but this time the page is already in the cache. Nginx recognizes this and sends the cached response back to the user immediately. This includes the HTML with the serialized data, so the browser can again hydrate the website without doing any requests to the API. Pretty neat, right?
Nearly the same happens when an author visits the development instance of the website. The only difference is that requests get forwarded to the development instance of the Angular SSR service directly. Since this is only for internal use, the cache is disabled and the website is always rendered from scratch. This way, the authors can see the changes they make immediately and don’t have to wait for the cache to invalidate.
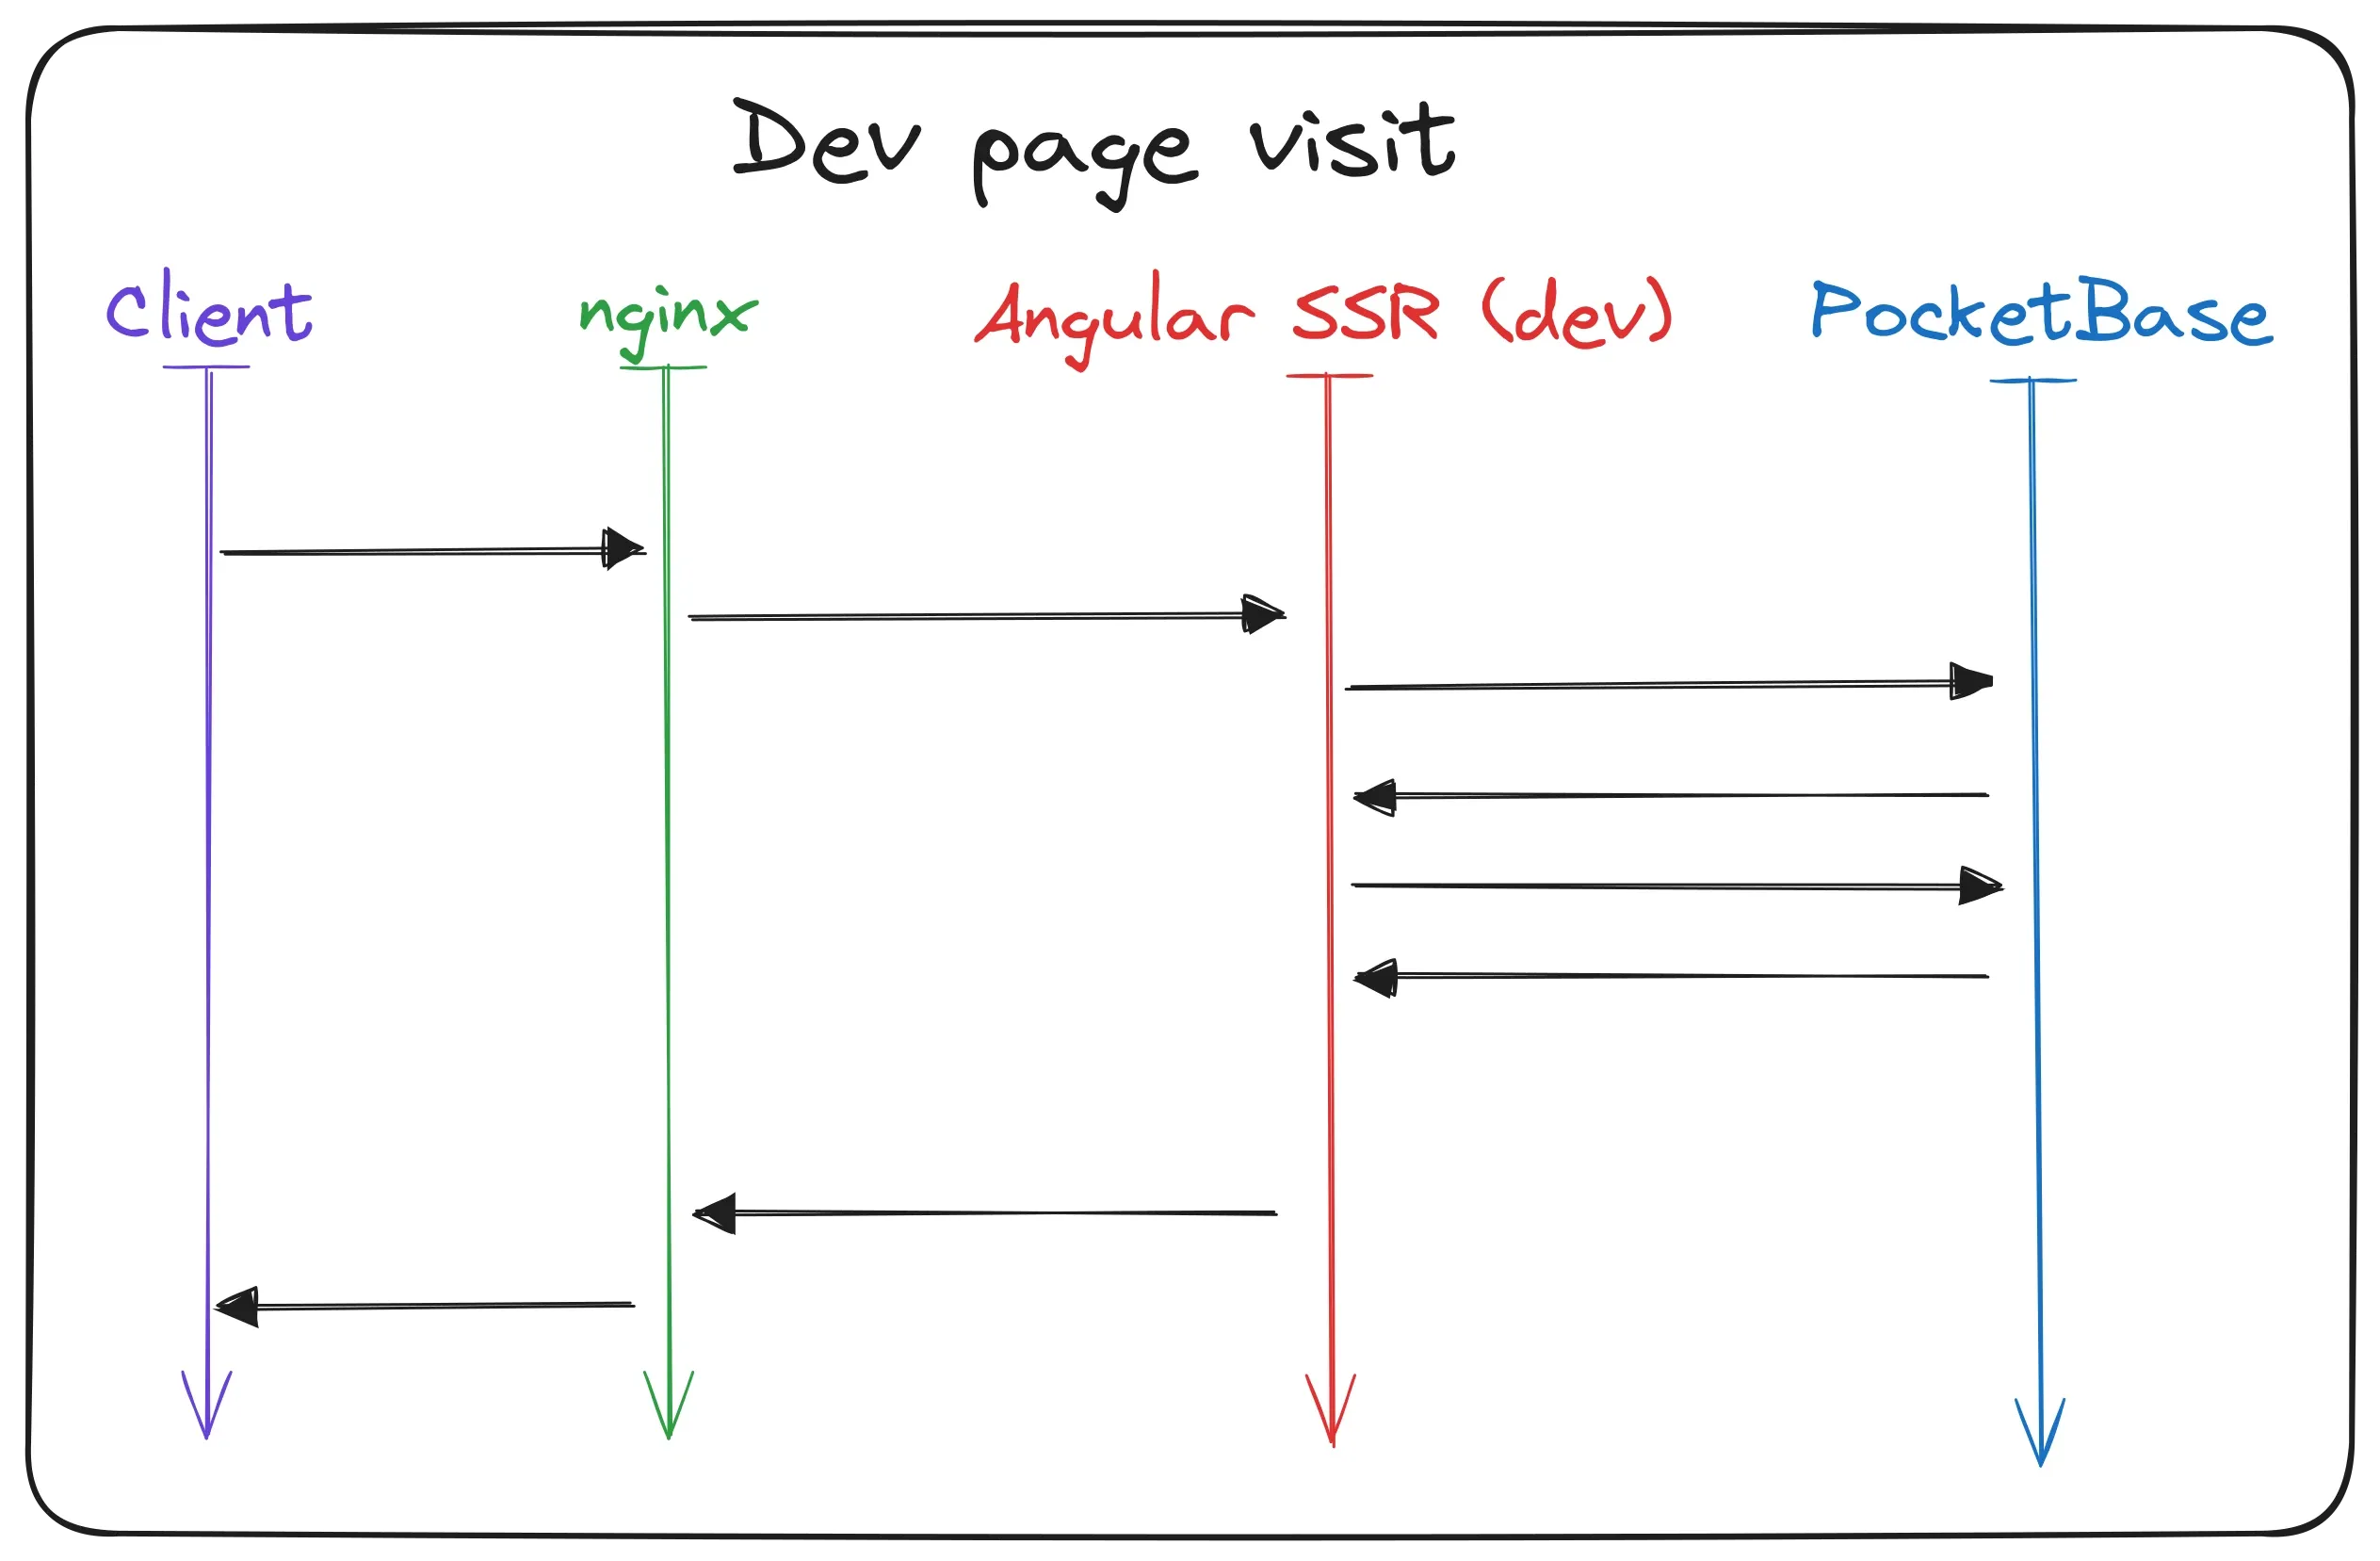
I also use this instance for testing new features in a production environment with SSL encryption and real data.
I am lazy and don’t want to clear the cache every time I make a change and deploy a new version of the website (which is done fully automated by the way).
Some features like the native Web Share API are only available in a secure context and on mobile devices.
With this in place I can visit my dev-instance on my phone with a real SSL certificate and test the feature without deploying it to the production instance or setting up a self-signed certificate.
Loading additional content
Visiting the “Forum für Antike und Gesellschaft” is not only about reading the rendered HTML but also about watching videos, listening to podcasts and downloading worksheets. So let’s see how this works.
First up are worksheets. (Fun fact: the same process is also used for the images on the team page.) These PDF files (and images) are stored on the file system and accessed through PocketBase. For this the PocketBase SDK provides a special method to get the correct file path for the requested material. Then when the user clicks on the download button, the file is requested from the server. Again the request is routed through Nginx and directly to PocketBase. PocketBase then resolves the file path and sends the file back to the user.
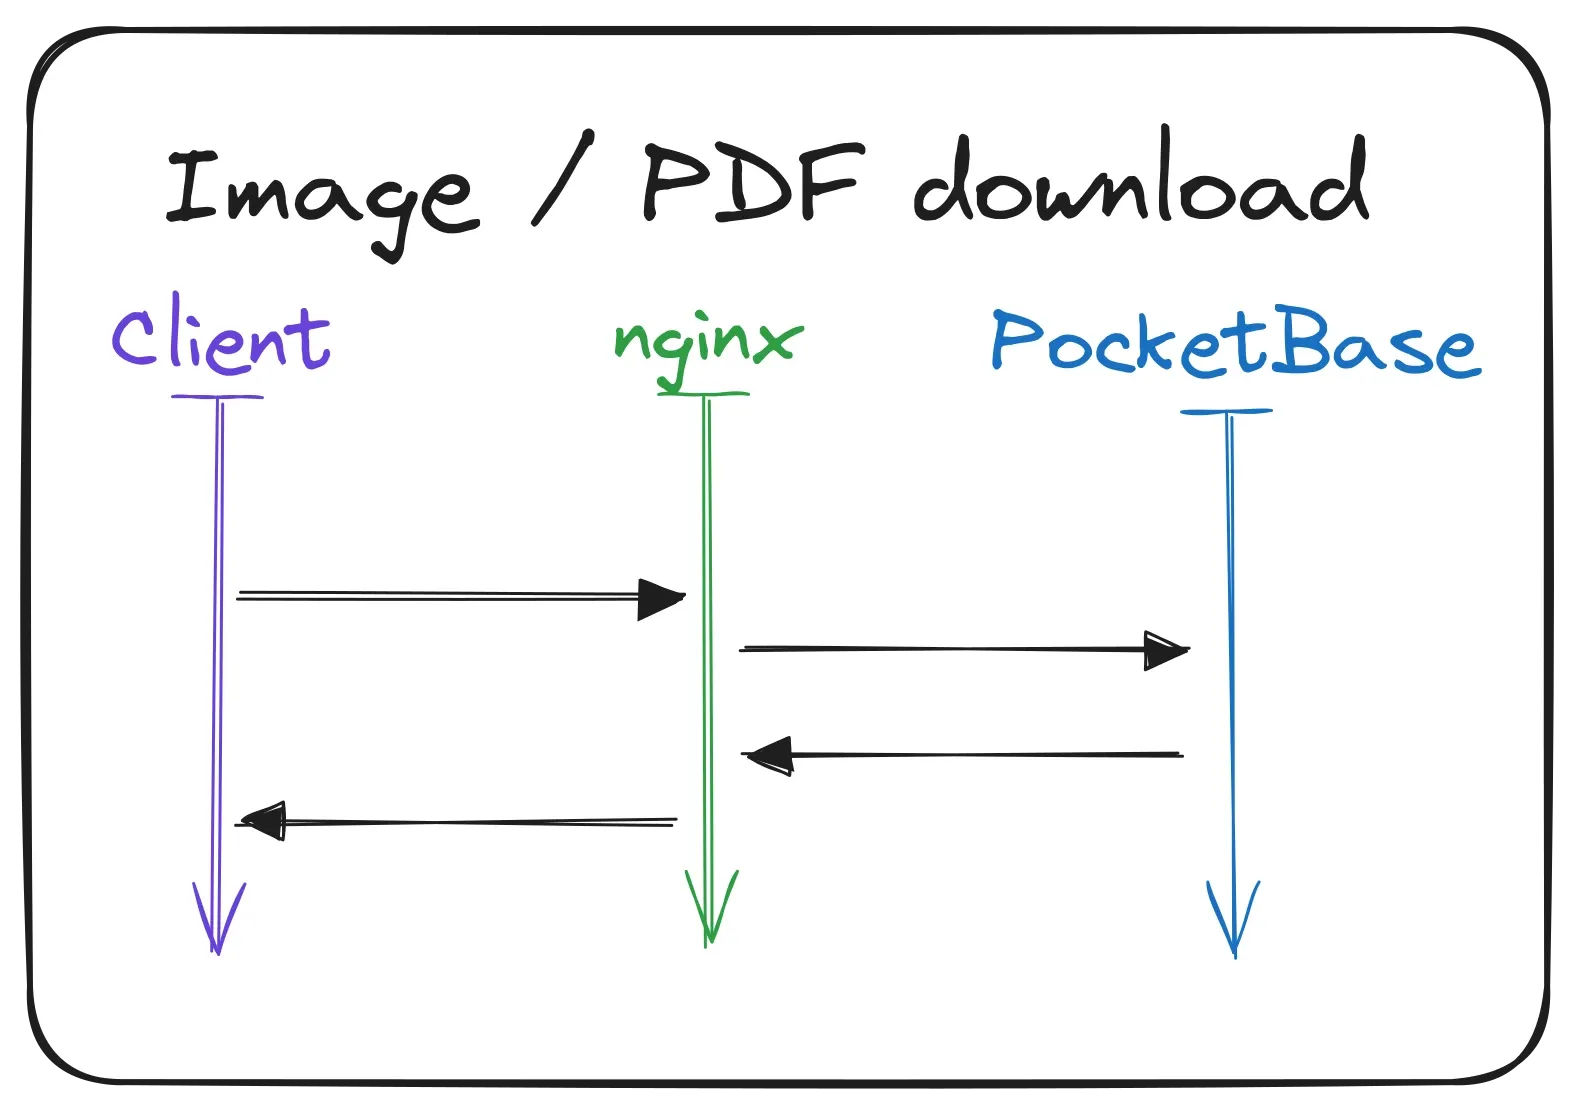
Now that I think about it, API requests are also handled this way. Even in the HTML rendering scenarios the API requests are technically made through Nginx and then PocketBase. But that would have made the first flow charts even more complicated, so I left it out.
Nearly the same simple process is used for the video and podcast files. The client / browser requests the file from the server, Nginx looks up the file in the shared folder and sends it back to the user.
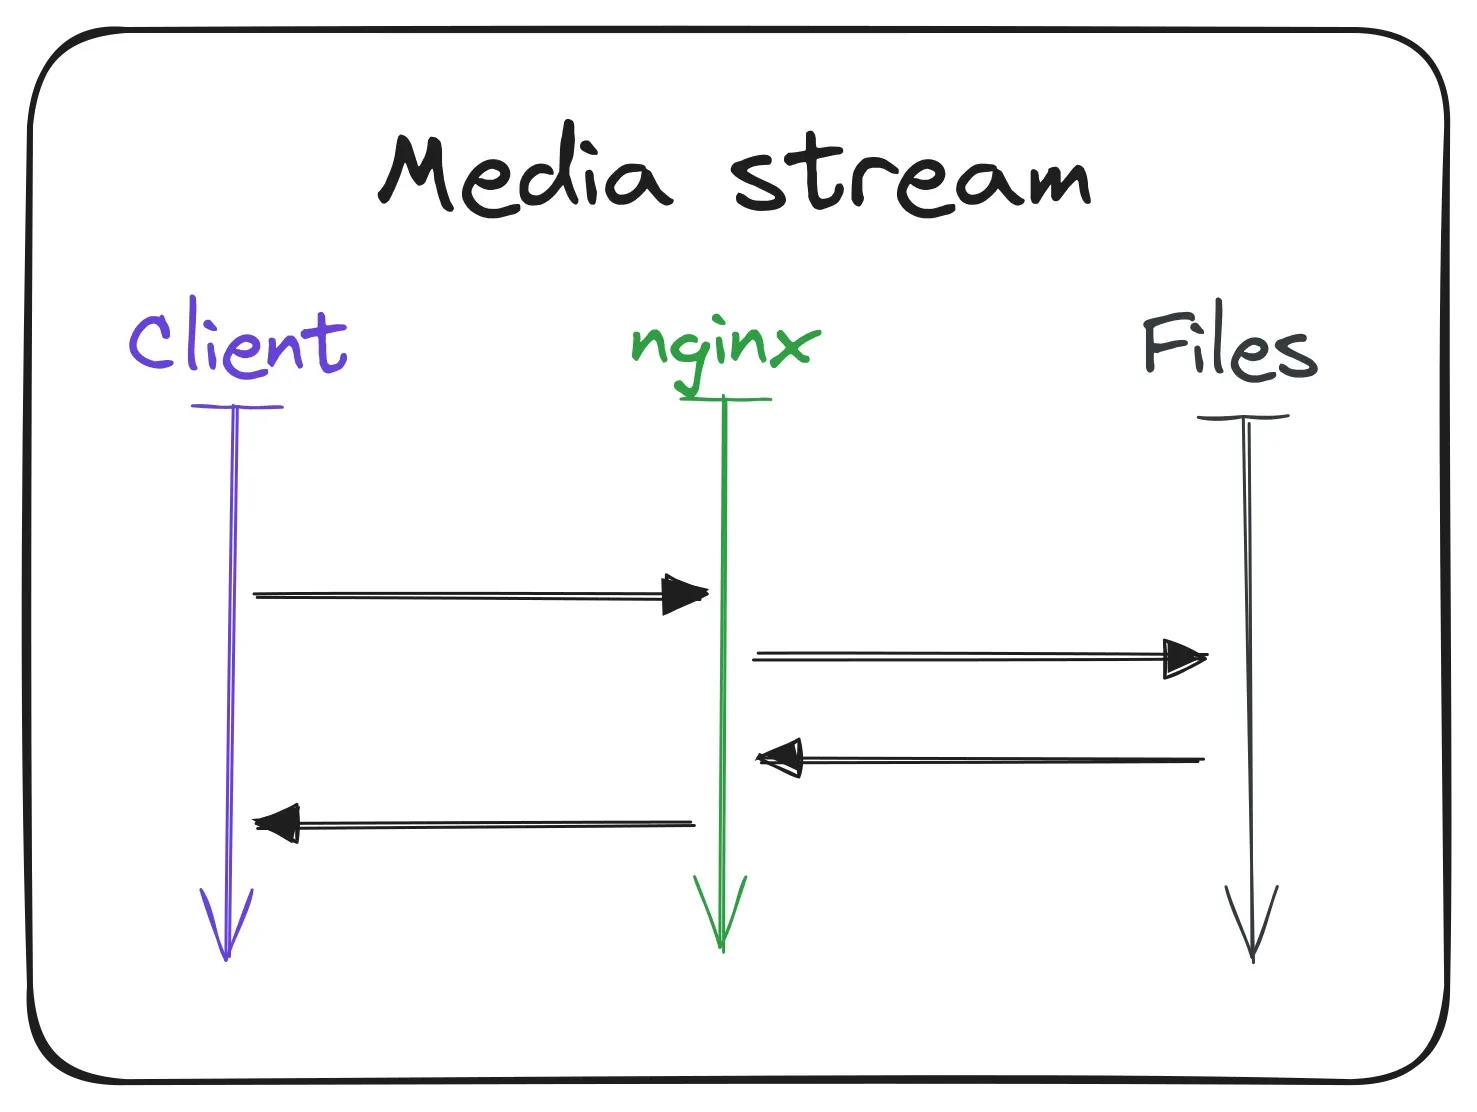
To not download the whole file at once, the video player only requests metadata for the video first. This way the user can see the thumbnail and the duration of the video before they start watching it. When the user clicks on the play button, the actual video file is gradually streamed to the user in chunks. Fortunately all of this is handled by the mp4 module in Nginx and the video player in the browser, so I don’t had to implement this complex logic by myself.
Uploading new media files
The last scenario is when an author uploads a new video or podcast file. Even though this is not a common scenario and only used internally, it’s still important to have a smooth workflow for this. And as you can see in the flow chart, it actually involves a lot of different services.
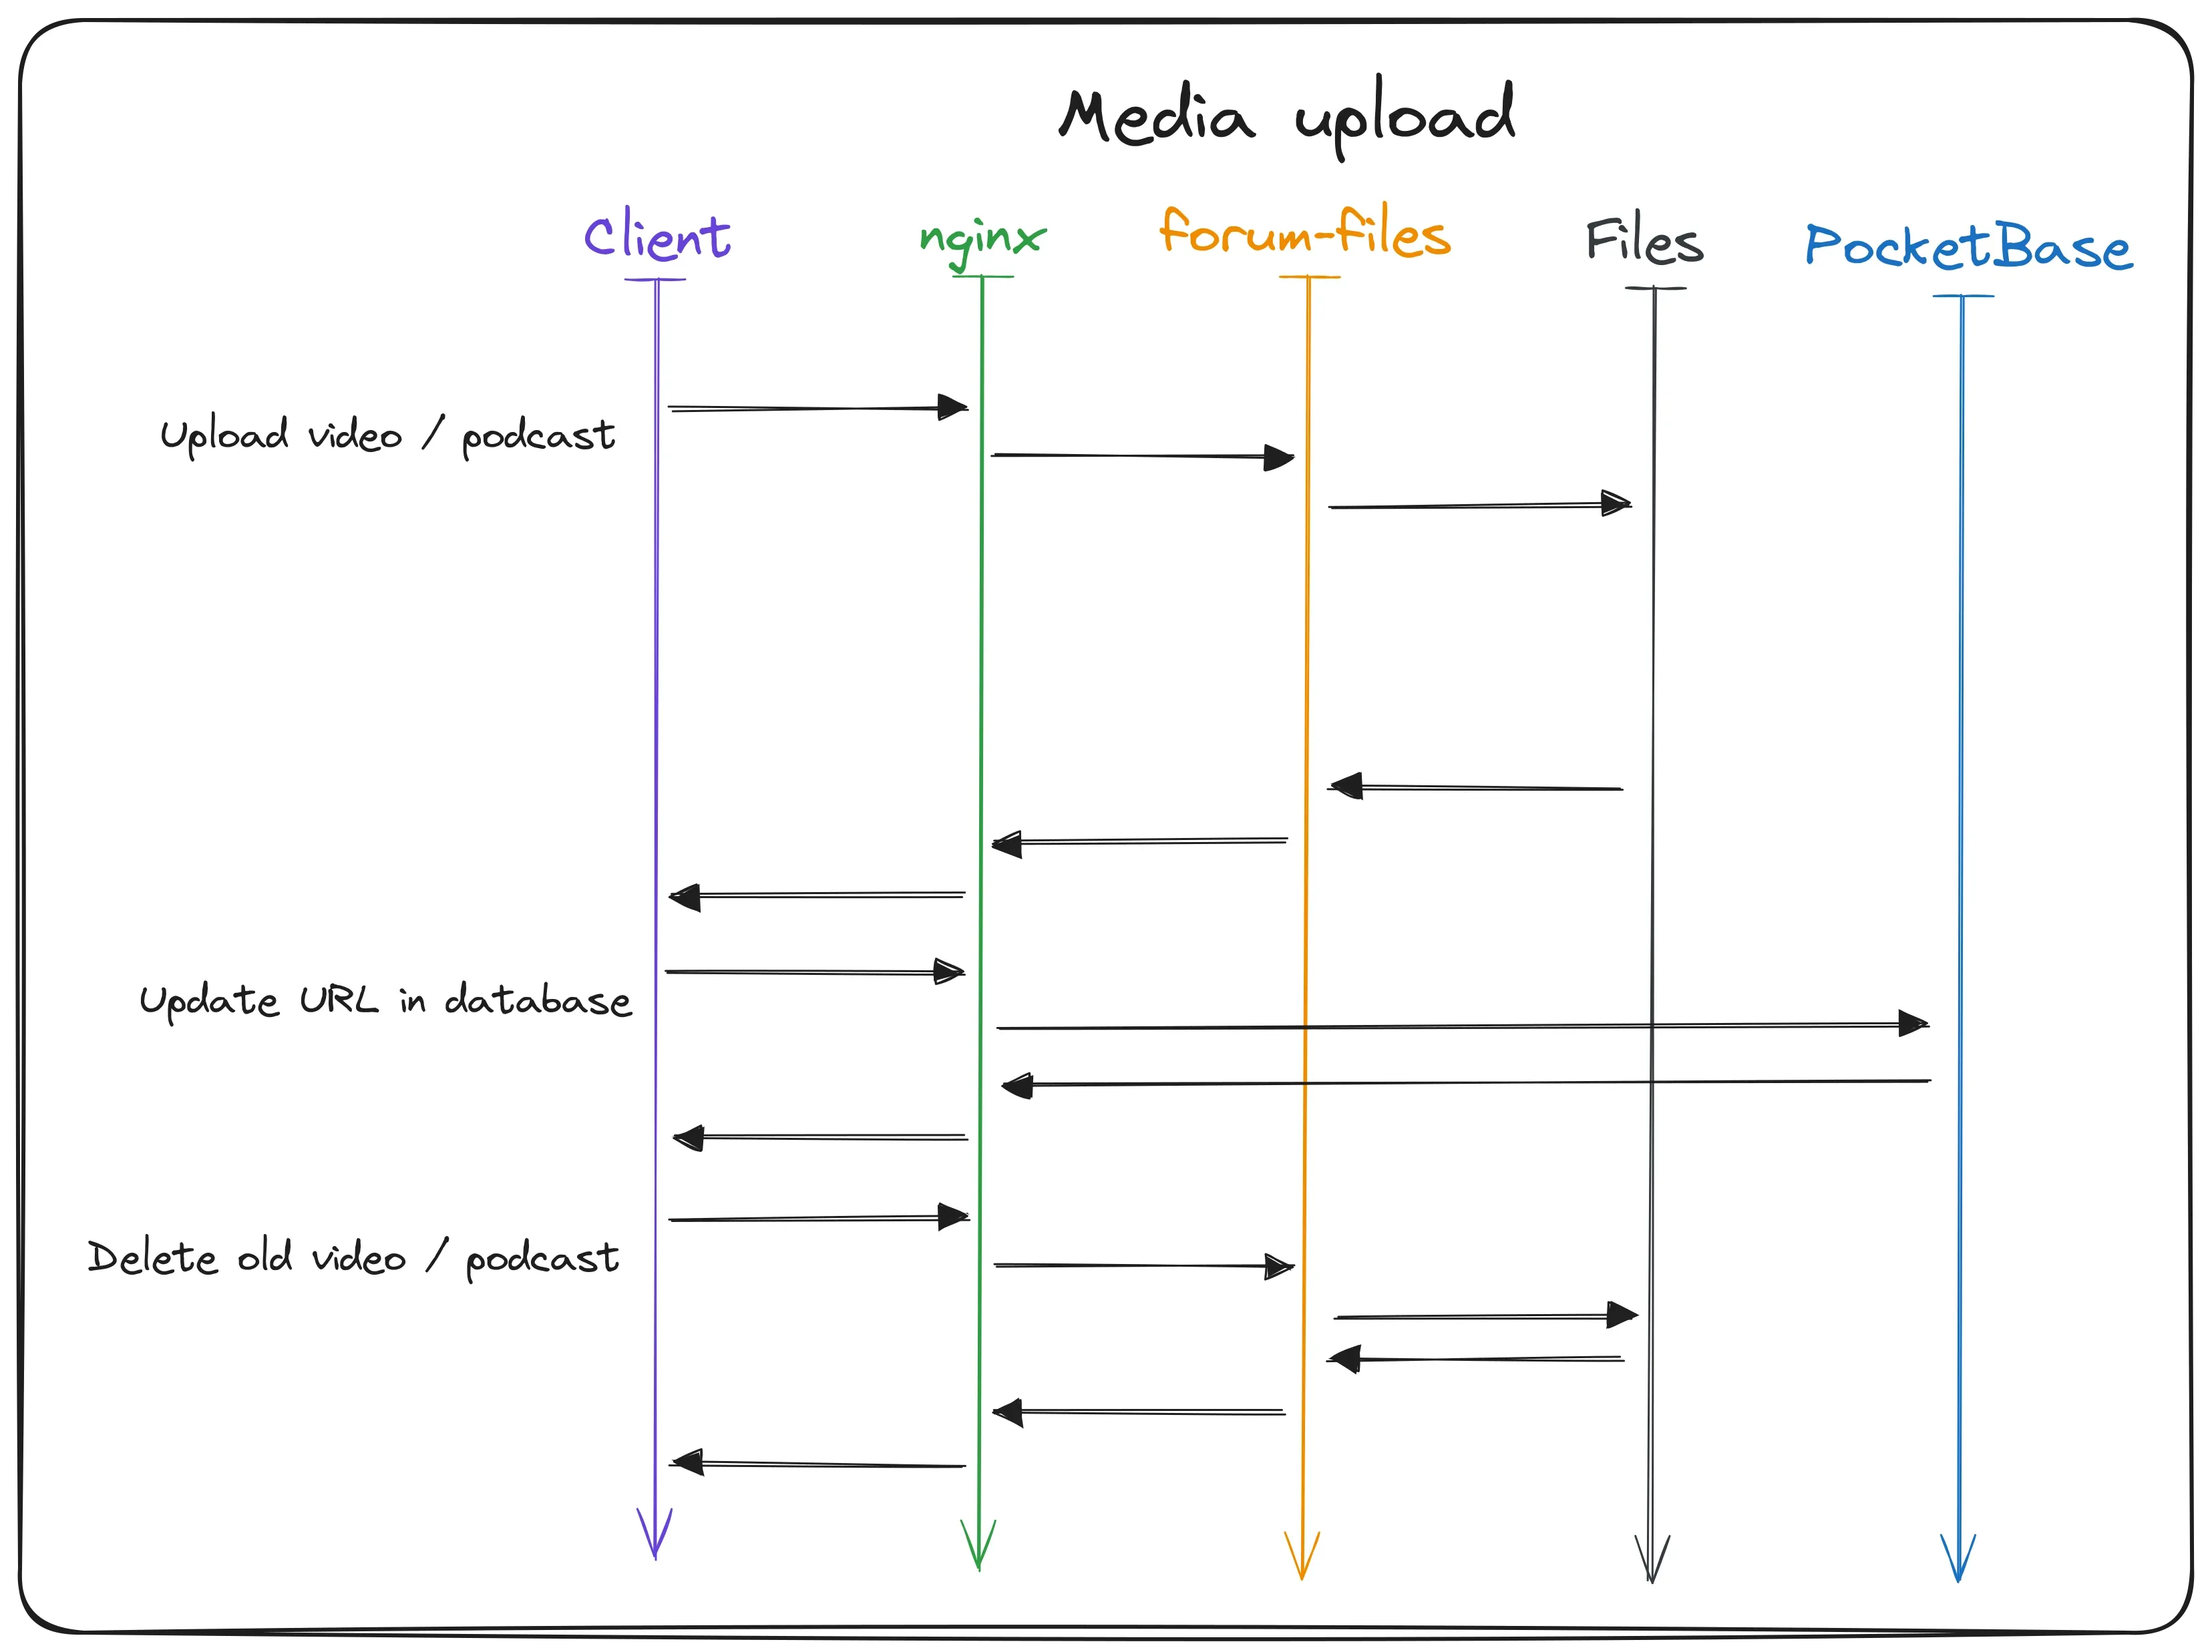
First the author visits the file upload dashboard and selects the material they want to upload the file for. The file then gets uploaded to the server, like all requests through Nginx, and gets handled by the custom “forum-files” micro-service. This express server generates a unique UUID-based file name and saves the file to the shared folder. When the upload was successful, the file path gets returned to the dashboard to show the author that the file is now available for them to check out.
In the background, the new URL gets sent to PocketBase where the corresponding record gets updated with the new file path. This makes the file instantly available on the website and the author doesn’t have to update the material manually.
Great, now we have the new file on the server, the database has a reference to it and visitors can watch or listen to it. But uploading a bunch of files for the same material can fill up the limited storage on the server really fast. To prevent this, the dashboard also tries to delete the old file after a new one was uploaded and linked. We have the original file name saved temporarily and thus can make a request again to “forum-files”. The service then simply deletes the old file and frees up storage.
Conclusion
That’s basically how the website works behind the scenes.
Building the “Forum für Antike und Gesellschaft” was a great experience for me. I learned a lot about designing a website for a specific use case and how to optimize it for the requirements of the project. Even though I had to learn a lot of new things, configuring Nginx took a while for example, I am really happy with the resulting project. I even wrote my Bachelor thesis about the project, building a custom load generator to test the servers performance under heavy load. But this is a topic for another article.
On that note, I hope you enjoyed this article and learned something new on the way. Up next I will probably write about how the website is maintained, since I just finished the [CI/CD pipeline and other automations for this. Stay tuned for that and have a great day!
